Tuesday, 15 June 2021

H-alpha solar imaging with an SV305M Pro prototype CMOS camera

A Coronado Solarmax ll 60 BF15 H-alpha scope was mounted on a Celestron AVX mount. A SV305M Pro camera was placed at the focus.

AstroDMx Capture for Windows was used to capture two, overlapping, 5000-frame SER files of the Sun in H-alpha light.

Click on an image to get a closer view

Screenshot of AstroDMx Capture for Windows capturing H-alpha solar data

The best 30% of the frames in the SER files were stacked in Autostakkert and wavelet processing in Registax 6.

The two resulting images were stitched together in Microsoft ICE, and post-processed in the Gimp 2.10.

Solar disk in H-alpha light


A x2 CEMAX barlow was used with the SV305M Pro using a ZWO tilting adapter to reduce the effect of Newton's rings that plague CMOS cameras.


The region of the Sun with AR2833 was imaged with AstroDMx Capture for Windows, capturing 5000-frame SER files exposed for the disk and also exposed for the promineces.

Screenshot of AstroDMx Capture for Windows capturing H-alpha data exposed for the prominences


The best 30% of the frames in each SER file were stacked in Autostakkert!, Wavelet processed in Registax 6, post-processed and combined in the Gimp 2.10.

AR2833 and a closeby prominece


The SV305M Pro is proving to be very capable in every imaging task given to it.

We shall continue to test and find issues in the SDK and reporting them to the manufacturer.

Monday, 14 June 2021

Exploring the versatility of the SV305M Pro prototype monochrome, CMOS camera.

Versatility is a desirable characteristic for an astronomy camera; so we set out to look at the versatility of the SV305M Pro, and to search for issues.

In addition to having been implemented in AstroDMx Capture Capture by Nicola; we have been testing the functionality of the SDK so that SVBONY can fix the invevitable issues that we are uncovering. It would be naive to think that a new camera will work correctly in all aspects at this stage in its development.

We tested the pre-production SV305M Pro camera on different types of astronomical objects:

  • The Crescent Moon
  • The Sun in Ca K-line light
  • The Sun in H-alpha light
  • The Eagle nebula
  • M3 and M10 globular clusters

A Bresser Messier-AR-102-xs/460 ED, f/4.5 refractor was mounted on a Celestron AVX mount and The SV305M Pro camera was placed at the focus.

AstroDMx Capture for Windows was used to capture a 10,000 frame SER file of the 5.4% waxing, crescent Moon. The best 10% of the frames were stacked in Autostakkert!

Click on an image to have a closer view.

Screenshot of AstroDMx Capture capturing lunar data


The resulting image was wavelet processed in Registax 6 and post-processed in the Gimp 2.10

Final image of the 5.4% waxing Moon


A Coronado CaK PST calcium K-line solar telescope was mounted on a Celestron AVX mount. The SV305M Pro was mounted at the focus.

AstroDMx Capture was use to capture 1000-frame SER files of each of two overlapping panes of the Sun.

Screenshot of AstroDMx Capture saving solar Ca K-line data


The two panes were stitched in Microsoft ICE, wavelet processed in Registax 6, and post-processed in the Gimp 2.10

The solar disk in Ca K-line light


Active region AR2833 can be seen emerging around the limb, and the regions of high magnetic flux in the chromospheric network are also clearly visible.

A Coronado Solarmax II, 60, BF15 H-alpha scope was mounted on the Celestron AVX mount and the SV305M Pro was placed at the focus. Two overlapping, 3000-frame SER files were captured using AstroDMx Capture for Windows. The best 25% of the frames in the SER files were stacked in Autostakkert! and wavelet processed in Registax 6. The two panes were stitched automatically using Hugin Panorama creator, and the final image was post processed and colorised in the Gimp 2.10.

The solar disk in H-alpha light


AR2833 can be seen along with small filaments and plage in the chromosphere.


A Bresser Messier-AR-102-xs/460 ED, f/4.5 refractor was mounted on an AVX mount and the SV305M Pro fitted with a narrowband H-alpha filter was placed at the focus.

AstroDMx Capture for Windows was used to capture 45 x 60s FITS exposures of the Eagle nebula, along with matching dark-frames. Also bias frames were captured.

Screenshot of AstroDMx Capture for Windows capturing data on M16, the Eagle nebula.


The FITS files were stacked with dark-frame and bias-frame correction in Affinity Photo. The resulting image was post processed in Affinity Photo, Topaz sharpen and the Gimp 2.10.

Final image of M16, the Eagle nebula

The ‘Pillars of creation’ are very prominent in this image.


A Bresser Messier-AR-102-xs/460 ED, f/4.5 refractor was mounted on an AVX mount and the SV305M Pro fitted with a UV/IR cut filter was placed at the focus.

AstroDMx Capture for Windows was used to capture 53 x 30s FITS exposures of the globular cluster M3, along with matching dark-frames. Also bias frames were captured.

Screenshot of AstroDMx Capture for Windows capturing data on M3


The FITS files were stacked with dark-frame and bias-frame correction in Affinity Photo. The resulting image was post processed in Affinity Photo, Topaz sharpen and the Gimp 2.10.

Final image of M3


AstroDMx Capture for Windows was then used to capture 90 x 30s FITS exposures of the globular cluster M10, along with matching dark-frames. Also bias frames were captured.

Screenshot of AstroDMx Capture for Windows capturing data on M10


The FITS files were stacked with dark-frame and bias-frame correction in Affinity Photo. The resulting image was post processed in Affinity Photo, Topaz sharpen and the Gimp 2.10.

Final image of M10


Versatility is important in an astronomy camera. The SV305M Pro proved in these tests, to be a very versatile camera; having produced results on Solar, Lunar and Deep Sky objects.

There are issues in the SDK that need to be resolved before the camera can be released onto the market, but hopefully, with the information that we will supply to SVBONY, these issues will be resolved.

Meanwhile, we shall continue with the testing of the camera.


Saturday, 12 June 2021

First light for the SVBONY prototype SV305M Pro, monochrome USB3.0, CMOS astronomy camera

First light for the prototype SV305M Pro, monochrome USB3.0, CMOS astronomy camera. 

The SV305M Pro has a IMX290LLR-C sensor. 

The IMX290 is a STARVIS back-illuminated CMOS image sensor with Starvis technology which produces a high quality image in the visible and near infra-red wavelengths and has low noise. The camera does not have a UV/IR cut filter.

Nicola has implemented the prototype camera in AstroDMx Capture for Windows, macOS and Linux.


Basically, The SV305M Pro is a monochrome version of the SV305 Pro, having a USB3.0 and an ST4 port.

The SV305M Pro prototype camera


For testing the camera as an imager, it was mounted without filters at the focus of a  Bresser Messier-AR-102-xs/460 ED, f/4.5 refractor mounted on a Celestron AVX mount, and with an Svbony SV165 Guide-scope mounted on the refractor.

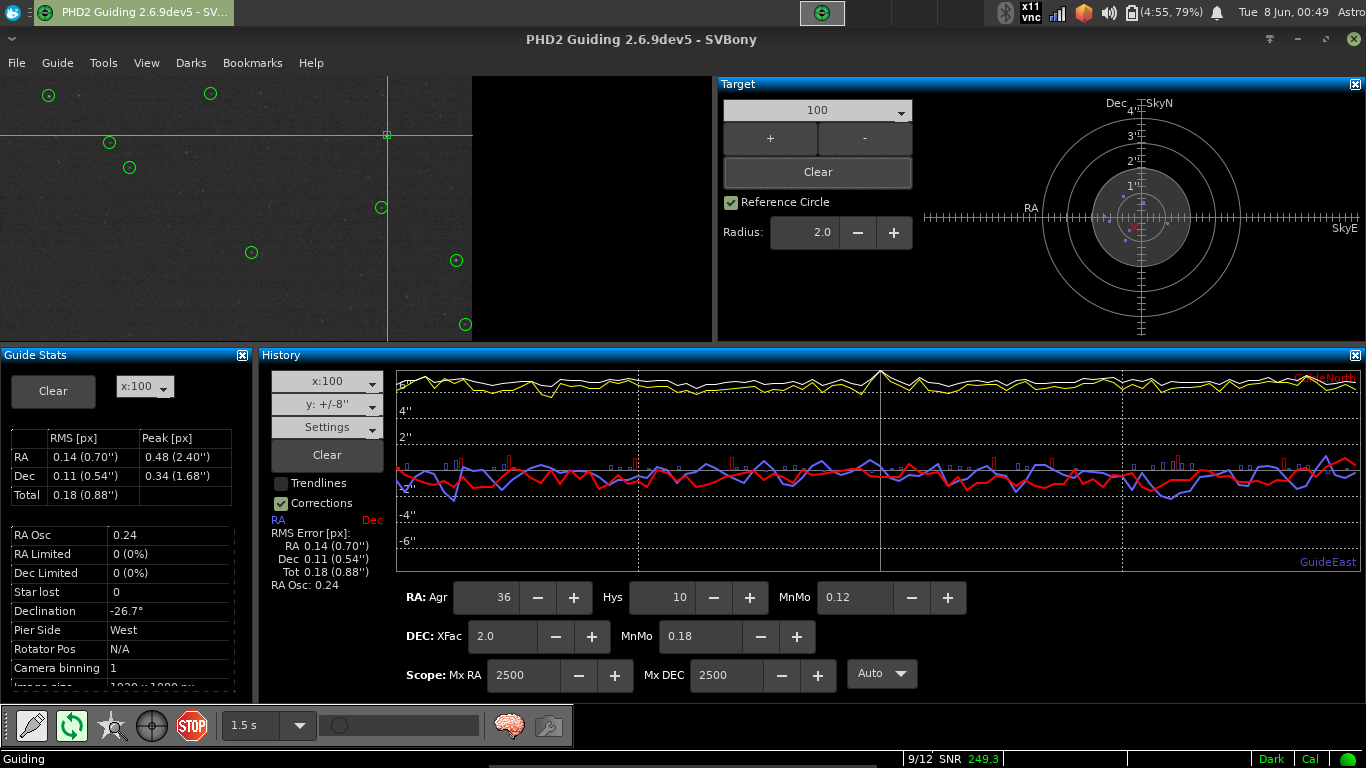
An SV305 camera was used as a guide-camera, with PHD2 running on a Fedora Linux laptop to do pulse auto-guiding, that is, via the hand controller and not the ST4 port.

Screenshot of the pulse auto-guiding with PHD2 and Fedora Linux


 AstroDMx Capture for Windows was used for capturing images. 60 x 30s FITS exposures and 10 x 60s exposures were captured with matching dark-frames and also 50x bias frames were captured. The files were stacked in Deep Sky Stacker and post processed in the Gimp 2.10.

Screenshot of AstroDMx Capture for Windows capturing M4 data with the prototype SV305M Pro


Final image of M4

The camera performed well as an imaging device. At these latitudes in south Wales, UK, M4 is always quite low in the sky and there is a tendancy for stars to bloat due to the thickness of atmosphere that the light has to pass through. Also the camera was used without any filters as the test was of the camera alone. The result was satisfactory and showed the camera to be sensitive. The noise levels were also low, with few evident hot pixels.


Saturday, 5 June 2021

M13, AstroDMx Capture and Dark Mode in macOS

M13, AstroDMx Capture and Dark Mode in macOS


Nicola is sorting out some details for the next release of AstroDMx Capture for macOS. This includes the use of Dark Mode.

Dark Mode will only work in Mojave or later releases of macOS and for it to work in AstroDMx Capture for macOS it has to be enabled in the OS.

A ZWO ASI178MC (USB3.0, 14 bit ADC) CMOS camera was placed at the focus of a Bresser Messier-AR-102-xs/460 ED, f/4.5 refractor mounted on a Celestron AVX mount. A Svbony SV165 Guide-scope D=30mm F=120mm was mounted on the refractor and an SV305 camera was used as the guide camera for multi-star PHD pulse auto-guiding. Although there is a full implementation for the SV305 in the PHD2 codebase; when compiling on Linux this code is not built. Nicola modified the PHD2 source to overcome this and then compiled and linked against the SVBONY SDK.  This allowed PHD2 on Linux to fully control the SV305 camera via a direct implementation. That is to say, the camera was controlled directly via the SDK and not via an INDI interface. An INDI server was used only to control the mount, not to control the guide-camera.

PHD2 was run on a Fedora laptop and the imaging with AstroDMx Capture for macOS was done with a MacBook Air.

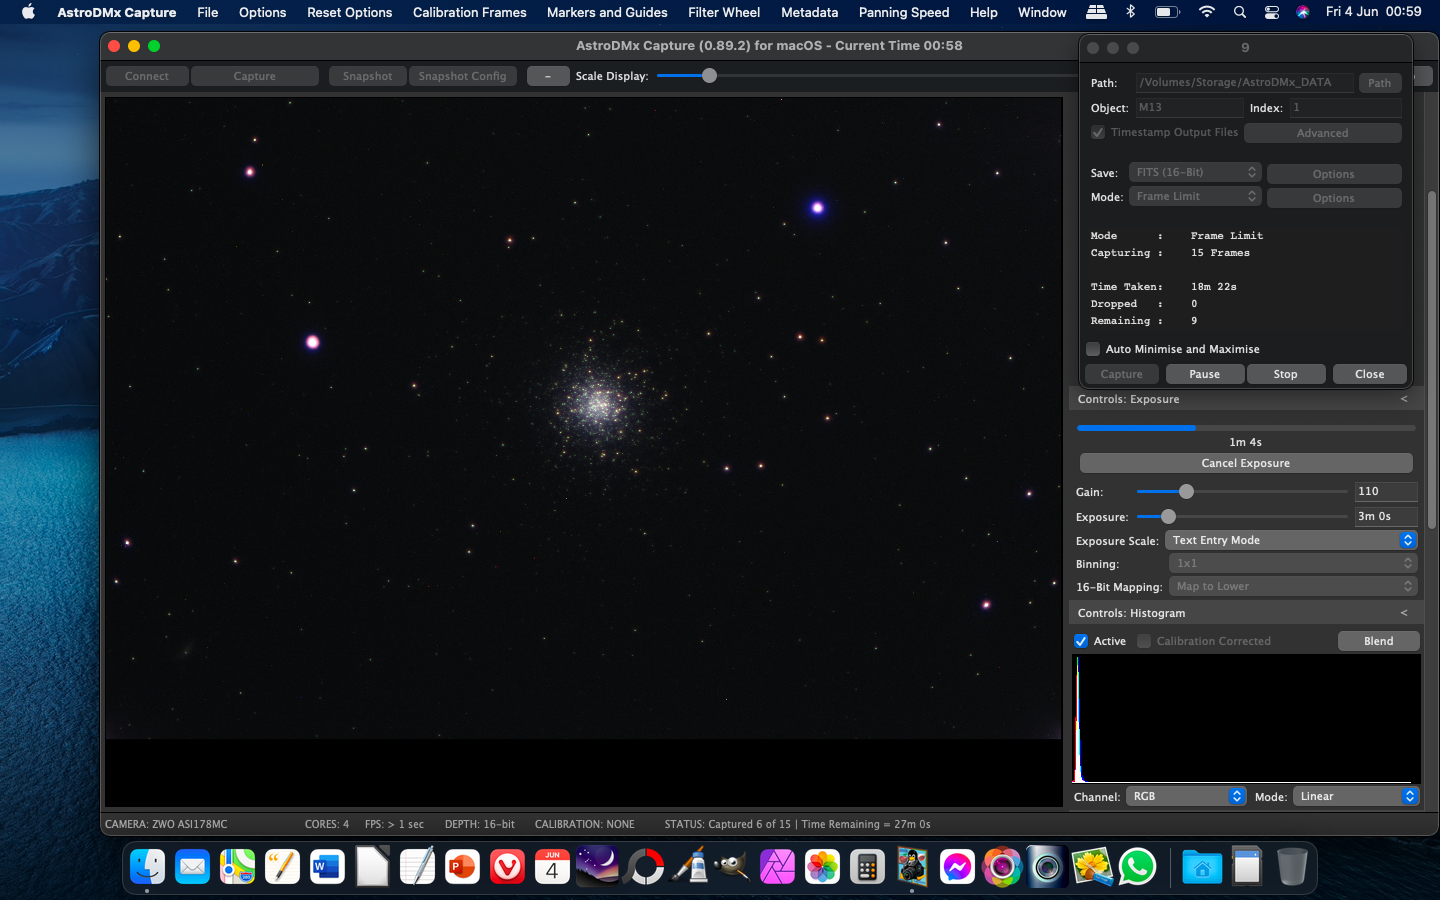
Screenshot of the PHD2 multi-star pulse auto-guiding


AstroDMx Capture for macOS was used to capture 3 minute exposures of M13 and Dark mode was active.

Screenshot of AstroDMx Capture for macOS in Dark mode. One of the reticles was used to help position M13 close to the centre of the field of view. FITS images were being captured.


Screenshot of AstroDMx Capture for macOS, without the reticle, capturing FITS images of M13


Note that Dark mode in macOS gives a pleasing, low light, screen environment for the image capturing.

Fifteen 3 minute exposures were captured as FITS files along with five matching dark-frames, plus 50 Bias frames.

The data were stacked in Deep Sky Stacker and also in Affinity photo, and the two workflows were eventually combined into the final image. The images were post processed in the Gimp 2.10, Affinity Photo, Fitswork and Faststone.

Final image of M13


I shall post here when the next release of AstroDMx Capture is released.

Wednesday, 2 June 2021

Mater artium necessitas

Mater artium necessitas

This text appeared in a book that was published in 1519 by William Horman, the headmaster of Winchester and Eton, entitled ‘Vulgaria’. It was a book of aphorisms that the schoolboys had to learn by heart as part of their Latin studies.

It is obviously an ancient saying and it may be traceable back to Plato’s Republic.

We know it of course as ‘Necessity is the mother of invention’ and it is just as valid today as it was the day it was coined.

Recently I was doing some H-alpha solar imaging using a Coronado Solarmax II, 60, BF15 H-alpha scope mounted on a Celestron AVX mount, and a DMK 31AU03.AS mono CCD camera. AstroDMx Capture was used to capture the data.

It was my intention to capture 5000-frame SER files.

Click on an image to get a closer view.

Screenshot of AstroDMx Capture gathering solar data

However, an observant reader will notice that TIFF files were being captured, not a SER file as I had intended. I hadn’t taken care to make sure that I was capturing the type of files that I wanted. I didn’t realise until the imaging session was finished.

I wasn’t particularly worried because I intended to use Autostakkert! to stack the images, and Autostakkert! can load and stack image files as well as AVI and SER movie files.

I then found, to my disappointment, that Autostakkert! was unable to load more than 1000 image files, but I had 5000 files to stack. The same proved to be true for Registax.

It turns out that this is a hard-wired property of Windows! The operating systems Linux and macOS have no such limitation and they are not limited to loading up to 1000 images into an application.Using Wine to run Autostakkert! or Registax doesn’t help because the Windows limitation is carried over into Wine.

There is, however, a way around this, and Nicola started a new project that in a sense, ‘invents a new sort of wheel’ using the method overcoming the Windows limitation.

The project is called ‘ PTM ’ (Pictures to Movies)

At the moment, the project is in its infancy and can convert any number of Tiff files to a single SER file. No doubt the PTM GUI will change as the project proceeds, but at the moment it is relatively simple.

It is intended that the program will eventually be able to load TIFF, JPG, PNG or BMP images, and will be able to convert them to AVI or SER movie files. Where appropriate, PTM will also work with 16-bit data.

As it stands, I have found the software to be very useful for correcting the error described above. However, it is anticipated that there will be many other uses for PTM when it is completed and available for Windows, Linux and macOS.

Final image obtained from stacking the best 20% of frames in the 5000-frame SER file created by PTM from the individual TIFF files.

I shall post here when PTM is available for download.

Sunday, 23 May 2021

Evaluation for astronomical imaging of the Arducam adaptor for the Raspberry Pi HQ Camera. A circuit board to convert the Pi HQ camera into a USB camera.

The Raspberry Pi HQ camera and the Arducam circuit board

The Raspberry Pi High Quality (HQ) camera is a high-resolution camera intended for the Raspberry Pi. It interfaces with the Raspberry Pi SBC via a ribbon cable. Part of the work of the camera is done by the GPU on the SOC.

We have tested the PI HQ camera previously to look at its suitability as an astronomical imaging device.

Firstly, on December 26th 2020, using a Raspberry Pi 4B with a Python capture program I had written. Very promising results were obtained, including some 8-bit, 10s exposures of the Orion nebula, as well as some lunar data. The quality of the images obtained was quite good and they showed very few compression artefacts. The blog article can be read at

https://x-bit-astro-imaging.blogspot.com/2020/12/evaluation-raspberry-pi-high-quality.html

Secondly, experiments were done on January 22nd 2021, to control the Pi HQ camera using AstroDMx Capture for the Raspberry Pi, to capture lunar data. 

https://x-bit-astro-imaging.blogspot.com/2021/01/raspberry-pi-hq-camera-work-in-progress.html

The camera was working normally with the Raspberry Pi where the camera constantly streams data to the GPU. The maximum resolution we were able to use was 1600 x 1200. The lunar data were acceptable, but it was evident that there were some very slight compression artefacts.

The tests on these previous occasions were using the Pi HQ camera in its normal configuration attached via a ribbon cable to the camera port on the Raspberry PI SBC.

The current test involved the fitting of an Arducam circuit board which connects via a ribbon cable to the Pi HQ camera. Using plastic standoffs, the Arducam adaptor sits as a second layer above the main Pi HQ circuit board.

Click on an image to get a closer view

The Arducam board mounted on the back of the pi HQ camera board


The 1m USB lead connects to the Arducam board by a 4 wire connector. 

It is a shame that such a short cable and such an inflexible cable was supplied with the the Arducam board.

The specifications of the Arducam board are dissapointing, and suggest that little thought has gone into the purpose of the Raspberry Pi SBC or the Pi HQ camera.

The Raspberry Pi SBC is intended as a device for innovation, learning and application in many fields. The take-up of the device in areas other than education is testimony to its versatility.

The Raspberry Pi HQ camera is supposed to be exactly that! A High Quality camera, not just a high resolution camera! The purpose of the Arducam bord is to convert the Pi HQ camera into a USB device that can be used with computers other than the Raspberry Pi; and it does this, but at a cost!

The Arducam board allows a variety of resolutions to be used over USB 2.0 including the highest resolution of 4032 x 3040 down to 640 x 480.

It is noteworthy that for the highest four resolutions, the specifications quote the frame-rates that can be acheived:

4032 x 3040 10fps

3840 x 2160 20fps

2592 x 1440 30fps

1920 x 1080 60fps

The latter resolution is Full HD 1080p

This, in combination with the fact that the Arduboard only offers Motion JPEG video compression shows that the priority for the manufacturer was to provide fast frame-rates (regardless of the quality of the frames being streamed).

In fact, what has been done is to convert the Pi HQ camera into a webcam (but what an expensive webcam). No consideration has been taken for the variety of applications that the camera could potentially be used for. No consideration for the fact that some applications require high quality images and possibly long exposures, or even 12 bit output and not necessarily high frame-rates!

Testing the Arducam board plus the Pi HQ camera as a lunar imaging device.

The Arducam/Pi HQ camera was fitted with a Mogg adaptor and placed at the focus of a Bresser Messier-AR-102-xs/460 ED, f/4.5 refractor, on a Celestron AVX mount. AstroDMx Capture for Windows was used to capture a 1000 frame SER file of the 82.1% waxing, gibbous Moon at the maximum resolution of 4032 x 3040.

The Arducam/Pi HQ camera mounted on the scope


Screenshot of AstroDMx Capture for Windows capturing the lunar SER file

The camera offers lots of controls including gain, exposure, gamma, contrast and a number of others. At this stage things look reasonable.

The best 75% of the frames in the SER file were stacked in Autostakkert!, wavelet processed in Registax 6 and post processed in the Gimp 2.10.

Final image of the lunar disk


The final image still looks reasonable, but the devil is, as always, in the detail!

When viewed at full resolution, the image can be seen to be highly compressed! Virtually all of the fine detail on the lunar surface has disappeared in the JPEG compression. The result is a very unnatural looking lunar image devoid of the subtle finer details.

The highly compressed image

There is lots of fine detail in this image that is obliterated by the high compression in the PiHQ/Arducam image.

This image can be compared with an image of the Clavius region of the Moon taken with an SV305,  a camera that does not compress the video stream.

As it stands, the Arducam board does not convert the Pi HQ camera into a USB camera that is of any value for astronomical imaging. When used alone with the Raspberry Pi SBC as it is intended to be used, the Pi HQ camera is a promising astronomical imaging device.

What would be required for the Arducam board to be useful with the Pi HQ camera as an astronomical imaging device?

  • Uncompressed YUYV, whatever the effects on frame-rate.
  • Availablility of RAW, undebayered data.
  • Region of Interest resolutions.
  • Long exposures.
  • 12-bit data output.

Until such time as these things become a reality, it will be necessary to confine the use of the Pi HQ camera to operation with the Raspberry Pi computer in the way that it was designed, and to attempt to extract data from the camera in as high a quality as possible. Sadly, documentation on using the camera is scant and it will be up to individuals to explore the camera as an astronomical imaging device.

If the application was different, for example some sort of surveillance or wildlife observation camera, where a large moving image is required, then the Arducam in conjunction with the Pi HQ camera would provide a solution.


Tuesday, 18 May 2021

Can a fully automatic cheap, modern webcam be suitable for an introduction to lunar imaging?

Firstly, to make it clear, this article is not an endorsement or a recommendation for a particular webcam. It is simply reporting the results of an experiment.

The webcam that was used cost less than £14 on Amazon. It is fully automatic in that it offers no functional controls to imaging software. AstroDMx Capture for Windows was used to capture data from the camera. AstroDMx Capture does have software controls that can be applied to save data if required, and this can be helpful if a camera doesn't present any controls.

The webcam used for this experiment.


The webcam was originally purchased to monitor an aquarium in which fish were breeding. It had to be high resolution, and this one is a true Full HD camera. It also had to be able to be focused rather than have an automatic focus.

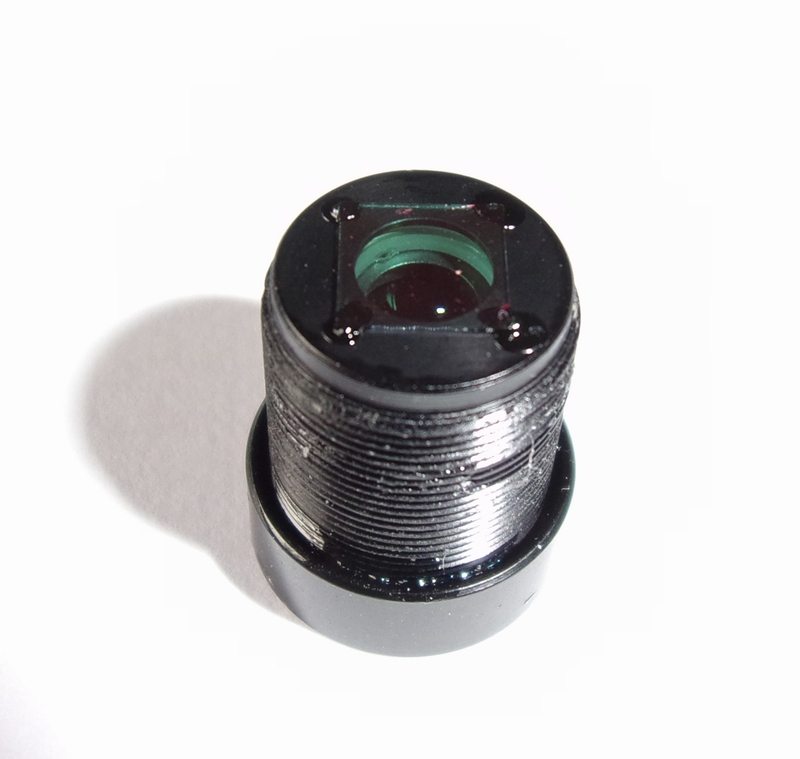
The camera was easy to disassemble. The front of the camera just pops off, being held in place by small, integral plastic clips. The lens is a Standard S-mount M12 lens of the type often used with board cameras. It had been pre-focused at the factory and then a dab of glue had been used to cement the focus. With a pair of plyers, the glue could be broken and the lens either removed, or focused to a different distance as was required for monitoring the equipment.

Superfluous parts of the camera were removed and discarded and for aquarium monitoring, the camera was held in position with a clamp stand. For the astronomical imaging experiment the lens was removed and replaced by a standard 12mm x 0.5mm Mogg adaptor.

The camera lens


The lens replaced by a Mogg adaptor
The lens has a UV/IR cut filter attached to the bottom of it, so the filter is removed along with the lens

It is therefore necessary to fit a UV/IR cut filter to the front of the Mogg adaptor. This corrects the colour balance, which would otherwise have a pink shade, but also eliminates the UV and IR wavelengths that may not come exactly to the same focus as the visible light in a telescope that uses lenses.

The front of the camera housing could easily have been clipped back in place, but it was left off to provide ventilation and heat dissipation from the electronic components. In addition, two superfluous LEDs were cut away from the circuit board. They serve no function for the camera and produce unwanted light. It is standard practice to remove any microphone from webcams as sound is not required.

It was discovered that the camera shows no pixel vignetting a phenomenon that is a blight to many modern webcams when they are adapted for astronomical imaging. Cameras which have proper lenses and M12 threads such as the camera tested here are the least likely to show pixel vignetting. On the other hand, cameras with very small sensors, lens threads smaller than M12 and tiny lenses, that are often little more than pinholes, often show pixel vignetting. The lack of pixel vignetting is a bonus for this camera.

Legacy webcams and some modern webcams have controls that are available to imaging software, and are desirable for optimising the properties of the video stream such as brightness, contrast and maybe even exposure. This camera offers no functional controls to imaging software. The camera is intended to be a high resolution video conferencing webcam that will automatically adapt to different lighting conditions in order to maintain an optimal image. Moreover, in order to maintain a satisfactory frame-rate at high resolutions, compression of the video stream is automatic.

It was the purpose of this experiment to determine whether the automatic features of the camera would be able satisfactorily to cope with the lighting on the Moon as 'seen' by the camera through the telescope; and secondly, to determine whether the compression of the video stream would result in compression artefacts that would ruin the final stacked image. If the camera performed well enough in both of these aspects, then it might be possible to conclude that such a camera might be suitable for outreach work and possibly as an introduction camera to lunar imaging.

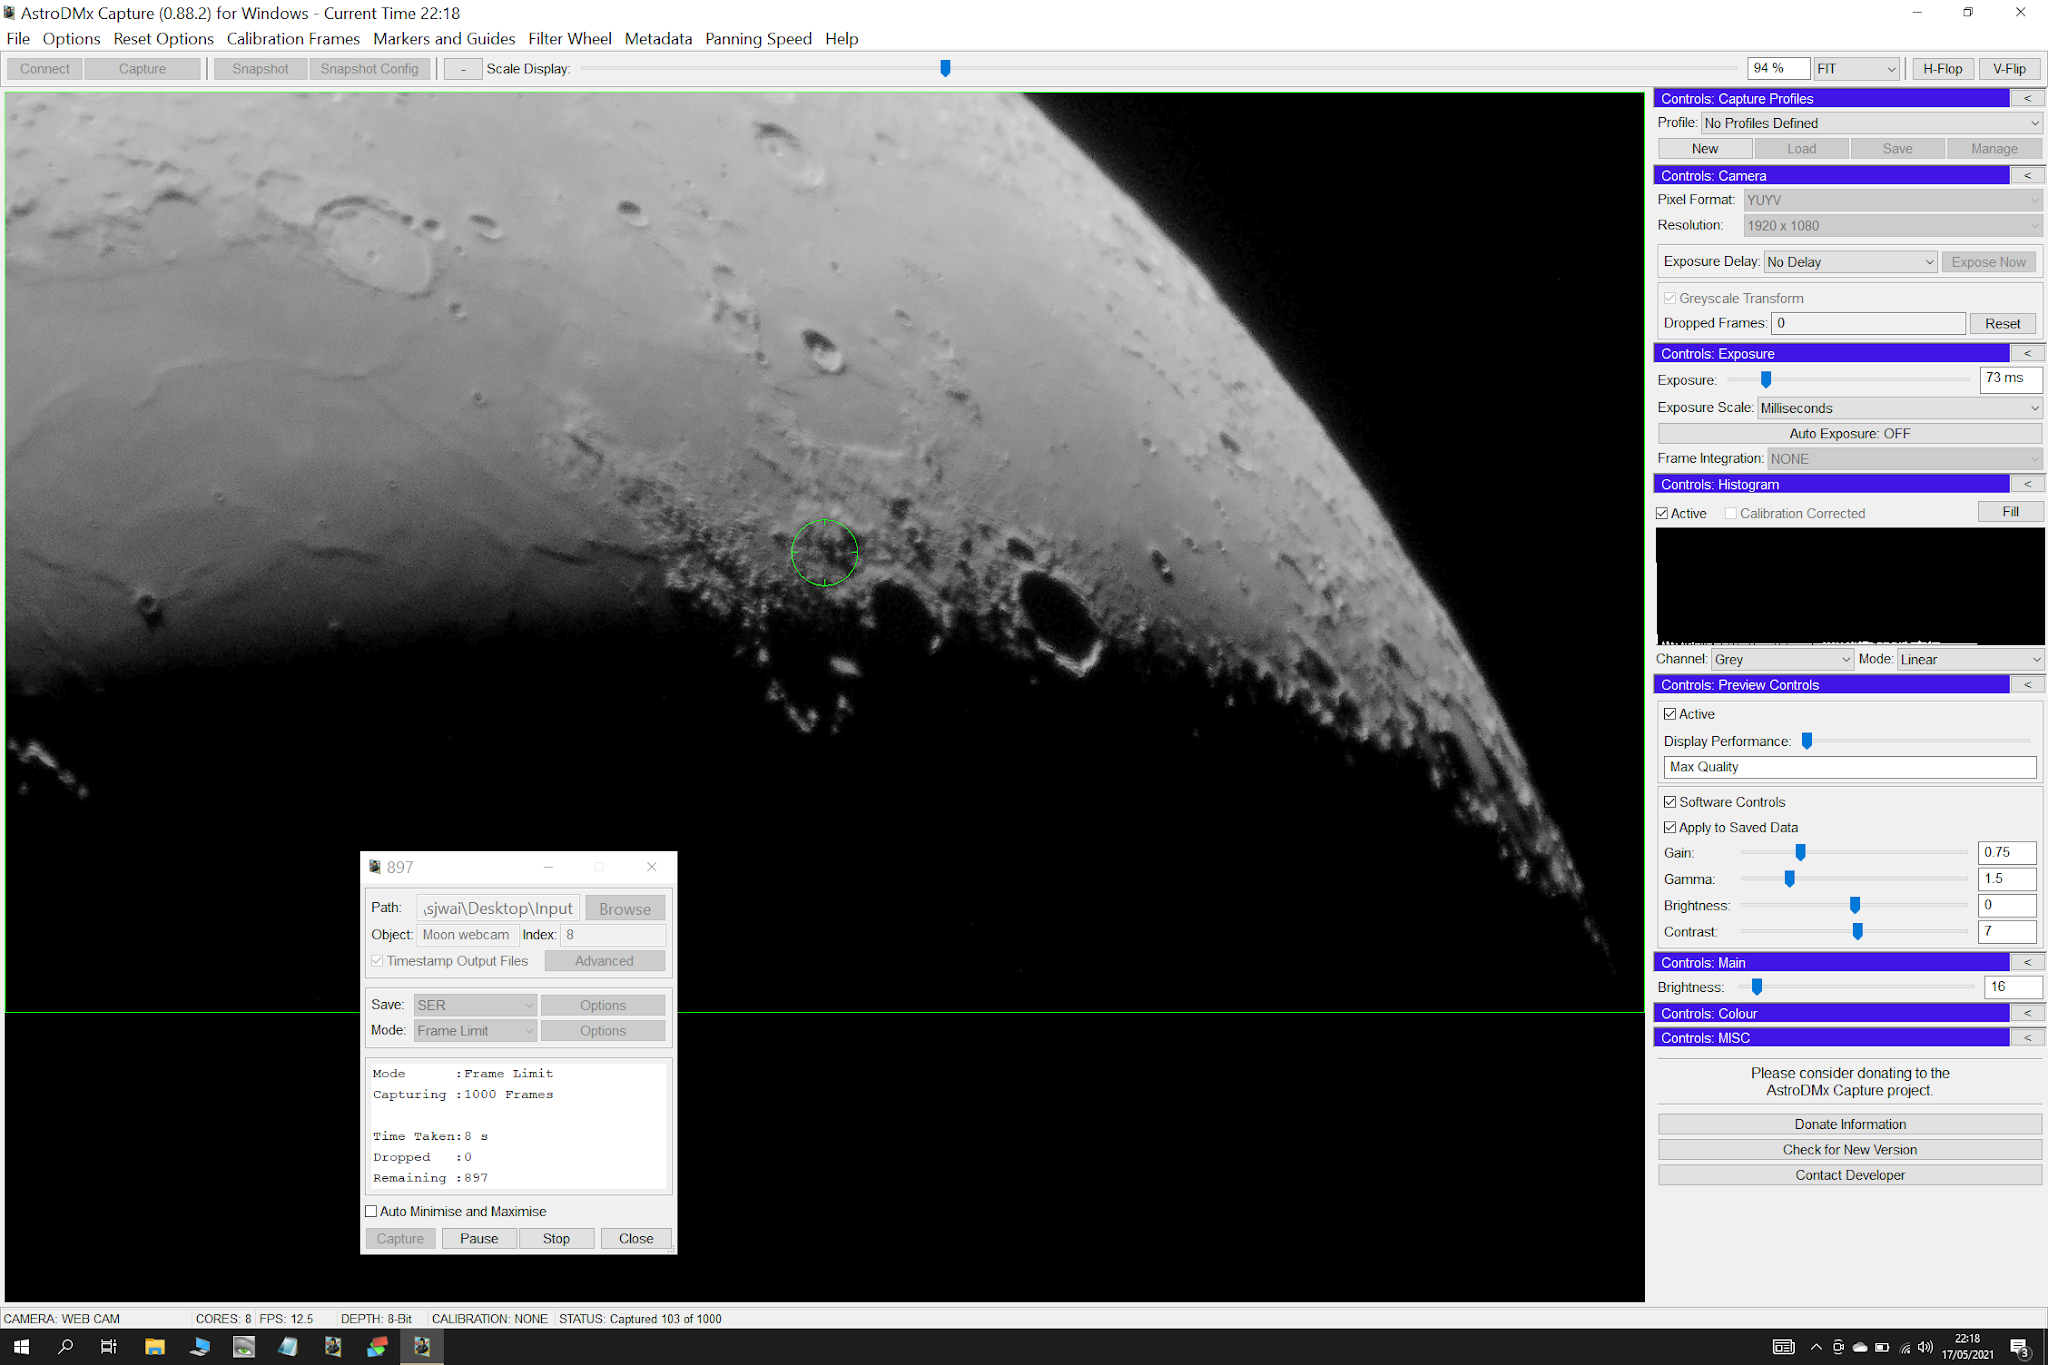
The webcam was placed at the Cassegrain focus of a Skymax 127 Maksutov that was mounted on a Celestron AVX mount. AstroDMx Capture for windows was used to stream video of the 30.5% waxing Moon, and to capture 1000-frame SER files at maximum resolution of 1920 x 1080. The software was set to map to greyscale which would produce a greyscale file of only 1/3 the filesize of a colour image. The camera was oriented to capture the maximum amount of the Moon and the terminator was the area of interest.

Click on an image to get a closer view

Screenshot of AstroDMx Capture for Windows capturing a SER file of part of the lunar terminator

The best 50% of frames in the SER file were stacked and wavelet processed in Registax 6 (which is able to stack monochrome SER files, Autostakkert! can stack colour SER files). The resulting image was reoriented to the correct orientation.
The post-processed image

Screenshot of AstroDMx Capture for Windows capturing a SER file

The post-processed image

Screenshot of AstroDMx Capture for Windows capturing a SER file

The post-processed image

Screenshot of AstroDMx Capture for Windows capturing a SER file

The post-processed image

The individual panes were stitched into a mosaic of the terminator using Microsoft ICE

The conclusion is that the automatic functions of the webcam coped quite well with the lighting conditions on the Moon and it may be that a cheap, fully automatic camera such as this one could be suitable for outreach and/or as an introduction to lunar imaging.