Monday 26 June 2023

The Omega nebula with an SV705C uncooled 12 bit CMOS camera, AstroDMx Capture and a William Optics Zenithstar 66 SD Apochromatic refractor mounted on a Celestron AVX GOTO mountt

The configuration of the equipment

This is essentially our test rig. It has a Pegasus FocusCube 2 motorised focuser, a ZWO EFW Mini 5 position filter wheel,  A TS-Optics T2 Thread 360° Rotation and Quick Changer, an SV705C uncooled CMOS camera. The Raspberry Pi computer attaches firmly to the body of the scope with heavy duty Velcro. The Pi runs an INDI server and communicates via WiFi with the imaging computer indoors running AstroDMx Capture, to control the Mount, Focuser and Filter wheel.

In operation, an SVBONY SV165 guide-scope fitted with a QHY-5II-M guide camera was mounted on the imaging scope.

The experiments in this session were to test the PHD2 auto guiding integration into AstroDMx Capture for automatically turning guiding off when the mount slews and turning guiding back on as soon as the slew finishes so that image capture and plate solving are done whilst auto guiding is active. The plate solving and slewing are done repeatedly until the object is centred with a user specified accuracy or until a user defined number of solves has occurred.

Also part of the test was to test these automatic PHD2 controlling actions during an assisted meridian flip.

These functions worked well during the testing and will work their way into the next feature release of AstroDMx Capture. 

AstroDMx Capture controlled the Filter wheel, via the INDI server running on the Raspberry Pi, to put the UV/IR cut filter in the optical path.

AstroDMx Capture sent the scope/mount to Arcturus, missed, plate-solved and iteratively refined the centring of the star. A Bahtinov mask was used to achieve perfect focus with AstroDMx Capture controlling the Pegasus FocusCube 2.

Scope with the Bahtinov mask in place


The scope slewed to its imaging position

Auto guiding was started and AstroDMx Capture was then used to send the mount/scope to M17, the Omega or Swan nebula, then plate solve and iteratively refine the centring of the object. Using the integrated PHD2 control to maintain auto guiding when the mount was not in motion.

Click on an image to get a closer view.

AstroDMx Capture captured 60 x 90s FITS exposures of the Omega nebula


Negative preview mode


Fifteen matching dark frames were captured along with Fifty Flat fields

Capturing Flats using an illuminated, variable brightness tracing pad.


The images were calibrated, registered and stacked in Siril. The resulting image was partly stretched in the Gimp 2.10 and using the Starnet+ plugin for The Gimp the stars were removed and retained. The background was extracted and gradient removed from the starless image using GraXpert and the resulting image was denoised in Neat Image. The starless image was then further stretched in the Gimp, denoised again and the stars put back in the Gimp. The final post processing was done in PhotoScape X Pro.

Background extraction and gradient removal of the starless image with GraXpert


Denoising with Neat Image


Processed starless image


Starsback M17, the Omega nebula


The SV705C proved to be a capable deep sky camera. It is a zero amp glow device but dark frames are required to eliminate hot pixels at least.

The new PHD2 control integration worked well and minimised the time when the system was not guiding while slewing to another object or performing an assisted meridian flip. When this functionality is tested on all platforms it will be incorporated into the next feature release of AstroDMx Capture.


Saturday 24 June 2023

Solar imaging with a Bridge camera and an ICE 100000 Neutral density filter.


The ICE 58mm ND100000 is a Neutral Density Optical Glass Filter, ultra dark with an exposure factor of 16.5 F Stops. This makes it similar in light reduction to Baader solar film, but it is less fragile.

The camera used was a A Panasonic Lumix DMCFZ72, 60x optical zoom bridge camera. A 55 to 58mm step up ring was required to connect the filter to the 55mm threads on the front of the lens.


The bridge camera fitted with the ICE filter 


The camera was mounted on a static tripod and images of the Sun were taken at maximum zoom in bursts of 3. A total of 138 images were captured.


The images were precisely cropped to 1700 x 1700 pixels using Nicola Mackin’s AstroCrop.


Click on an image to get a closer view


AstroCrop precisely cropping the images


The directory containing the cropped images 


The images are at this stage virtually aligned due to the precise cropping.


The images were registered and stacked in Siril


The resulting image was levels adjusted in the Gimp 2.10 


The image was wavelet processed in waveSharp 


The image was post processed and rotated in the Gimp 2.10 and PhotoScape X Pro


The Sun in white light June 23 2023 


In conclusion, the ICE ND100000 58mm optical glass solar filter performed very well, and equally well as our Baader and Thousand Oaks solar filters. We obtained it via Amazon UK but it came from Desmond Photographic in the USA. What we like about this filter is that being optical glass, it is less fragile than the Baader filter, and not being a coated filter, it is not subject to pinhole damage.


The filter stores nicely for convenience in the type of container that we use for storing our 2” filters 


Tuesday 13 June 2023

White light solar imaging with a low cost aluminised PET solar filter, an SV705C and AstroDMx Capture

White light solar imaging with a low cost aluminised PET solar filter.

A low cost aluminised PET (PolyEthylene Terephthalate) filter was mounted over the objective of a William Optics Zenithstar SD doublet APO, 66mm, F=388mm refractor. An SVBONY SV705C CMOS camera was placed at the focus.


The equipment used

The scope was fitted with a Pegasus FocusCube version 2, a Raspberry Pi computer (running an INDI server) plus a Goodmans power supply for the Pi. The hand controller was connected to the Raspberry Pi. The system was mounted on an AVX GOTO mount which was, as usual placed on marks on the concrete to provide an acceptable polar alignment.


AstroDMx Capture, via the INDI server on the network, sent the scope/mount to the Sun. An arbitrary Region Of Interest was drawn around the Sun. AstroDMx Capture controlled the Pegasus motor focuser and brought the Solar image preview to focus.


AstroDMx Capture captured a 5000-frame SER file of the whole solar disk.


The best 20% of the frames were stacked in Autostakkert!, wavelet processed in Registax 5.1 and post processed in the Gimp 2.10. The filter produces an essentially white image which was given a yellow hue by adjusting colour temperature in the Gimp.


Solar image


The filter needs to be tested further, but it performed quite well and produced an acceptable image with the SV705C camera


Monday 12 June 2023

M20, the Trifid nebula with AstroDMx Capture and an SV605MC camera

The scope used was a William Optics Super Zenithstar 81mm ED Doublet APO refractor at f/5.5 with x0.8 flattener/reducer fitted with an Altair magnetic filter holder version 2. 

An SVBONY SV605MC cooled, monochrome CMOS camera was placed at the focus of the telescope which was mounted on a Celestron AVX EQ, GOTO mount. An SVBONY SV165 guide-scope fitted with a QHY-5II-M guide camera was mounted on the imaging scope. PHD2 auto-guiding was controlled by a separate Linux laptop for convenience. 

AstroDMx Capture controlled the mount via an INDI server running on a Raspberry Pi computer. The hand controller was connected to the Raspberry Pi and AstroDMx Capture communicated with the INDI serve on the Pi via the local network.

AstroDMx Capture sent the scope/mount to a bright star; a Bahtinov mask was fitted and focus was checked and adjusted if required. This had to be done with each of the 2" Red, Green and Blue filters.

As usual, the mount was placed on marks on the ground which gives an acceptable polar alignment.

AstroDMx Capture sent the mount/scope to Altair to focus with a Bahtinov mask and then M20, the Trifid nebula.

AstroDMx Capture capturing 40 x 30s FITS exposures through the Red filter


AstroDMx Capture capturing 40 x 30s FITS exposures through the Blue filter


40 x 30s FITS exposures were also captured through the Green filter. Darks and Flats were also used

Deep Sky Stacker was used to stack the images as well as co-align the colour channels.

The three colour channels were precisely co-aligned with Deep Sky Stacker using the method we used HERE.

The resulting images were RGB components combined in Gimp 2.10 and further processed in GraXpert, Neat Image and PhotoScape X Pro.

M20, The Trifid Nebula


The data were obtained while testing the plate-solving and assisted meridian flip developments in AstroDMx Capture.

Experiment with camera-case cooling with a TEC phone cooler

Some people use mobile phones for gaming or watching movies which require the phone to be active for long periods of time, and particularly in the case of gaming on a phone, there is considerable SOC activity which generates heat.

In order to prevent overheating of the phone a number of companies have developed cooling systems which can be attached by magnetic means to the phone. Some of these systems have TEC cooling and a fan.


This experiment involves the use of a phone cooling device to cool the case of a ZWO ASI178MC 14 bit planetary Colour CMOS camera. The ASI178MC has a 1/1.8″ and 6.4M pixels sensor IMX178 with SONY STARVIS and Exmor R Technology with a pixel Size of 2.4µm. Although it is an uncooled camera, it does have a temperature sensor along with a flat back with no recesses which together made it suitable for this experiment. The aim was to see whether the cooler significantly cooled the camera and whether a significant difference was made to the thermal noise generated by the camera.


The ZWO ASI178MC has a perfectly flat back with no recessed areas and it has a diameter of 6 cm. The mobile phone cooler chosen was the Yodoit K6 Portable Magsafe Magnetic Mobile Phone TEC Cooling LED Radiator, Silent Smart Battery Protecting Semiconductor Heat sink. This device has a diameter of exactly 6 cm which makes it suitable. (It should be noted that there are other similar devices that have the same diameter and even have settings for different levels of cooling). The device was purchased from Amazon for less than £20. 


The boxed cooler


Contents of the product box 


The cooler takes power via a USB C connector via the supplied cable. We connected the cable to a Mains powered USB plug.


The cooler connects to the camera via a self-adhesive magnetic disk of 6cm diameter. This is required because the camera body is aluminium.


The back of the ASI178MC camera


The magnetic disk is stuck to the back of the camera


The cooler is held firmly to the magnetic disk by magnetism


The cooler is held firmly so it will not fall off  but can be easily slid off the back of the camera.


Side view of the assembly


This view shows the USB C port for powering the cooler.


Bench testing was done by mounting the camera-cooler assembly on a Capped off refractor


When the power to the cooler is turned on, LEDs that continually change colour light up in the cooler and the fan spins up silently carrying heat away from the hot junction of the TEC cooler.


Click on any image to get a closer view

AstroDMx Capture was used to stream images from the camera. It was set to 16 bit, fully debayered, 30s exposure at 250 gain.


Ambient temperature was 22oC. The camera temperature took 30 minutes to reach 30oC.


AstroDMx Capture streaming data from the camera at 30oC


If you look carefully, you will see that the preview shows significant noise in the dark exposure.

A 16 bit FITS snapshot was taken and then stretched an exact, reproducible amount.


Stretched snapshot taken at 30oC


The thermal noise is evident after the relatively mild stretching of the dark image.

The power was then connected to the cooling device and the progress of cooling recorded every 5 minutes for 30 minutes.


Graph of the cooling process


It can be seen that after 30 minutes the camera had cooled to about 5oC below ambient. The rate of cooling seemed to be asymptotically approaching an equilibrium.

The camera body was cold to the touch and some condensation was present on the outside of the camera body whilst no condensation appeared on the sensor window during the experiment.


AstroDMx Capture Streaming images at 17.3oC


Stretched snapshot taken at 17.3oC


Little thermal noise is present compared with the identically stretched snapshot taken at 30oC.


Discussion


It is evident that the cooler was able to cool the camera below ambient. How much cooler the camera would have become if the cooler was left switched on for more time is not known, but the graph does seem to show the temperature was approaching a limit.


It is not known how cool the camera would get if the ambient temperature was something like a winter’s night.


However, in the bench tests reported here it seems that under warm conditions, at least half an hour is required for the camera to cool down. This has to be viewed as a serious limitation of the method. This is particularly true in a climate such as that experienced by the UK, where every moment of clear sky should be taken advantage of.


Another unknown at the present time is whether the optical window of the camera would eventually become covered in dew and how this would be affected by humidity, or even worse (and potentially dangerous to the camera itself), whether dew would start to form inside the camera, or whether the heat generated by the electronics would prevent this from happening.


In the end, the reason for wanting some cooling will determine what is the best approach. If what is required is to prevent the camera from overheating then an air-cooled camera such as the Altair Hypercam 174M Mono Fan-Cooled Astronomy Camera should be chosen or less satisfactorily, an external fan attached as with some Player One cameras. The TEC cooling solution examined here may be chosen to help reduce thermal noise in long exposure deep-sky images when a proper cooled camera is not available.


Nevertheless, the method, in its broadest sense, works; and for this reason field tests will be justified to see what kind of deep sky images can be obtained.


Any attempts to reproduce the work done here should be done with caution as there is the caveat that any adverse effects that might affect the camera are at this time unknown. For this reason we are NOT recommending this procedure at this stage.


Wednesday 7 June 2023

Stacking 3 colour channels with accurate channel co-alignment in Deep Sky Stacker.


It is sometimes the case that when filters are changed between imaging different channels, that there is some slight misalignment between channels. This could be because the scope may need to be refocused when the new filter is put in place and may have to be slewed to a bright star to do Bahtinov mask focusing if the filters are not exactly parfocal. It could be that if a manual filter wheel is used, or filters exchanged in a single filter holder, that the act of changing the filter could introduce some slight movement that can result in misalignment of the colour channels.

Whilst techniques such as the fully automatic locating and centering of an object in AstroDMx Capture will minimise misalignment after changing filters, it may not completely eliminate misalignment.

Using Deep Sky Stacker (DSS) it is possible to stack all three colour channels separately and also achieve perfect co-alignment of the three colour channels stacked images. This then facilitates the RGB composition of a colour image from the three monochrome stacked images.

This procedure applies equally to narrowband imaging as well as RGB imaging.

Screenshot of Deep Sky Stacker in action. The panel at the left hand side contains most of the actions described in this article


Method

Start with the monochrome images taken through the RED filter

Load the Red Picture files into DSS

Load the Dark files

Load the Flat files

Click Check all

Click Register Checked pictures

Make sure that Stack after registering is UNCHECKED

Using the Advanced tab, adjust the Star detection threshold so that about 100 stars are detected

Click OK and the images will be registered

Click Compute offsets

Click Stack checked pictures and then click OK

The images will be calibrated, stacked and the resulting stack saved as a 32 bit file called autosave.fit or autosave.tif depending on what format of images is being stacked. (this can also be specified).

If you look at the folders containing the Darks and the Flats you will find a file called MasterDark… and a file called MasterFlat… These will be needed later


It will facilitate matters if the autosave.tif is copied to the desktop at this stage and renamed to something like REDreference.tif


Restart DSS

Load the Green Picture files

Load the MasterDark file

Load the MasterFlat file

Click Check all

Click on the Load Picture files again

This time navigate to the REDreference.tif file on the Desktop and load the file. It will go to the bottom of the file list in DSS.

Right click on the REDreference.tif file and select Use as reference frame. Make sure that this reference frame is UNCHECKED

Click Register Checked pictures

Make sure that Stack after registering is UNCHECKED

The checked images will be registered

Check the reference frame and click Compute offsets.

This will compute all of the information to co-align the Green files with the Red reference file.

UNCHECK the reference frame

Click Stack checked pictures and then click OK

The images will be calibrated and stacked and the autosave.tif file for the Green filtered images will be saved to the Desktop.

Rename it to something like Greenstack.tif


Restart DSS and repeat the procedure exactly but this time with the Blue Picture files.


On the desktop you will now have three monochrome 32 bit stack files. One for each of the colour channels which are perfectly co-aligned.

These three files should be stretched with Curves so that they have a similar brightness.

These can be rgb-composed into a colour image which can then be further processed using a program such as the Gimp.


Tuesday 6 June 2023

An RGB image of M13 with an SV605MC and AstroDMx Capture


The scope used was a William Optics Super Zenithstar 81mm ED Doublet APO refractor at f/5.5 with x0.8 flattener/reducer fitted with an Altair magnetic filter holder version 2. 

An SVBONY SV605MC cooled, monochrome CMOS camera was placed at the focus of the telescope which was mounted on a Celestron AVX EQ, GOTO mount. An SVBONY SV165 guide-scope fitted with a QHY-5II-M guide camera was mounted on the imaging scope. PHD2 auto-guiding was controlled by a separate Linux laptop for convenience. 

AstroDMx Capture controlled the mount via an INDI server running on a Raspberry Pi computer. The hand controller was connected to the Raspberry Pi and AstroDMx Capture communicated with the INDI serve on the Pi via the local network.

AstroDMx Capture sent the scope/mount to a bright star; a Bahtinov mask was fitted and focus was checked and adjusted if required. This had to be done with each of the Red, Green and Blue filters. The RGB filters were a set by Pegasus Astro and are not quite parfocal.

As part of a test of the fully automatic finding and centering via multiple plate solves if necessary, to achieve a user-specified pointing accuracy. In this case a value of 2 arcseconds was specified and the scope/mount was sent to M13. M13 was automatically centred in the field of view.

In turn, AstroDMx Capture captured 50 x 25s exposures with R, G and B filters, being sent to a bright star for Bahtinov mask focusing after each filter change, and returning to M13 by the fully automatic process.

Dark frames were captured and Flat fields were also available. The Red data were calibrated, registered and stacked in Deep Sky Stacker. The stacked Red image was then used as the reference image for stacking the Blue and the Green images. The results were perfectly co-aligned Red, Green and Blue stacked images.

The stacked images for each colour channel were stretched a similar amount in the Gimp 2.10. The channels were combined into an RGB image in the Gimp and the RGB image was further processed in the Gimp, Neat Image and GraXpert.

RGB M13


Closer view

The fully automated finding and centering of an object function in AstroDMx Capture and the Assisted meridian flip will soon be ready for release in the next version of AstroDMx Capture.


Sunday 4 June 2023

Working with the SV605MC monochrome, cooled, 14 bit CMOS camera and AstroDMx Capture

 Working with the SV605MC monochrome, cooled, 14 bit CMOS camera.

The data were obtained while testing the plate-solving, object sync and assisted meridian flip developments in AstroDMx Capture.


The scope used was a William Optics Super Zenithstar 81mm ED Doublet APO refractor at f/5.5 with x0.8 flattener/reducer fitted with an Altair magnetic filter holder version 2. An SVBONY SV605MC camera was placed at the focus of the telescope which was mounted on a Celestron AVX EQ, GOTO mount. An SVBONY SV165 guide-scope fitted with a QHY-5II-M guide camera was mounted on the imaging scope. PHD2 autoguiding was done by a separate Linux laptop for convenience.


A simple stiff-felt cylinder was placed over the magnetic filter holder to prevent stray light ingress.


The felt cylinder can be easily slid out of the way to facilitate filter changing.

As usual, the mount was placed on marks on the ground which gives an acceptable polar alignment


The first experiments involved the Eagle nebula.

AstroDMx Capture, via the INDI server running on a Raspberry Pi computer, sent the scope/mount to the star HD168137 which is close to the ‘Pillars of Creation’ in the Eagle nebula. The field of view was plate solved and the star centred in the field of view.

AstroDMx Capture captured 20 x 2 minute FITS exposures of the Eagle nebula through each of H-alpha, SII and OIII narrowband filters plus matching dark frames.


Negative preview


Flatfields were captured using a green filter and an illuminated tracing panel as the diffused source of light at the end of the imaging session.

The separate groups of images were calibrated, stacked and part processed in Siril and stretched in the Gimp. 

Monochrome images captured through each filter

H-alpha


OIII


SII


The colour channels were combined in the Gimp to different palettes. Star removal techniques were used with the Starnet++ plugin for Gimp and processed with Neat Image, Photoscape X Pro and the Gimp 2.10.

Star removal and replacement techniques are important because:

They allow stars to be largely desaturated if they have strange colours due to the palette being used.

They allow for the nebulosity to be stretched without also stretching and bloating the stars.

Pertinent steps in the processing of the Hubble Palette using the Gimp.

However, it should be understood that these procedures are illustrative rather than prescriptive, and that there are different ways of achieving an end result.

Register the three colour images so that the stars in the images exactly line up.

Combine the three monochrome images as component channels of an RGB image; mapping SII to Red, H-alpha to Green and OIII to blue.

SHO


It can be seen that most of the stars are a pinkish magenta. At this stage, or after they have been removed, the colour cast can be removed from them either generally or selectively.

The stars can be removed in the Gimp 2.10 with the Starnet++ plugin.

Stars generally desaturated


Stars selectively desaturated reducing mainly magenta colour


It must be said that the best way to produce stars for the image is to take exposures through red , green and blue filters and produce true RGB stars that can be added back into the starless images.

The starless image of the Eagle nebula


The Starless image can then be stretched and denoised to reveal more nebulosity


The stars can then be added back either using the addition mode or the screen mode for combining layers

Addition mode stars-back Hubble Palette


The Screen mode stars-back Hubble Palette


It can be seen that the Screen mode puts the stars back with more prominence than the Addition mode.

Producing hues more generally used for the Hubble palette, can be done by selective colour adjustment within specific colours. Various software can do this such a Photoshop, Affinity Photo and PhotoScape X Pro.

Here we have within the Yellows, selectively reduced the Cyans and increased the Magentas to produce the desired effect.

Selective colour processed Hubble Palette starless image


Selective colour processed Hubble Palette image with stars added back by Addition mode


Selective colour processed Hubble Palette image with stars added back by Screen mode


It can be seen that the person processing the images has considerable latitude with how the processing proceeds and on the appearance of the final image. 

There are five other narrowband palettes where H-alpha, SII and OIII are mepped in various combinations to the red, green and blue channels of a false colour image that are less commonly seen than the hubble palette, but all equally valid. The palette of choice is ultimately a decision for the individual.

The other narrowband palettes

HOS


OHS


HSO


SOH


OSH


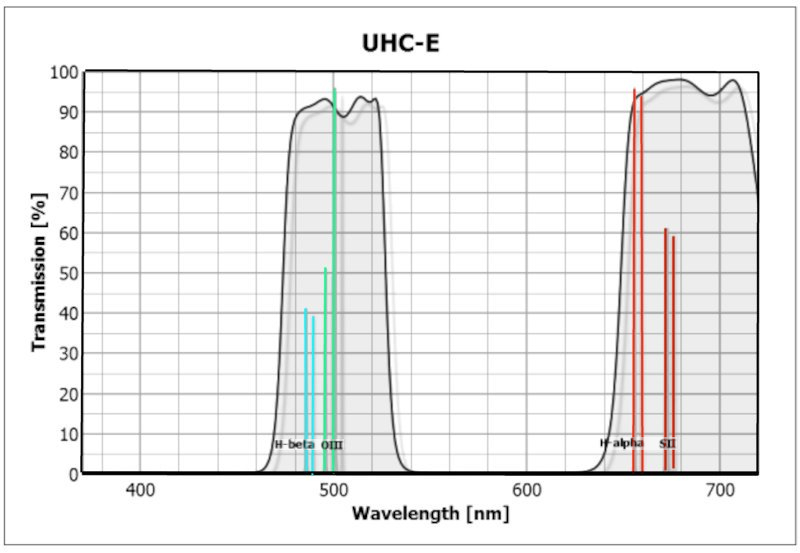
The SV605MC in conjunction with an Astronomik UHC-E filter

The UHC-E filter has two regions of transmission. One in the blue/green and the other in the red/far-red parts of the spectrum. It is an effective light-pollution filter and facilitates the study of emission regions.


Another imaging session involved using an Astronomik UHC-E filter in combination with the SV605MC camera for producing monochrome images. These sorts of images can be appreciated as they are or could be used as luminance data with narrowband imaging.

The Omega (Swan) nebula

AstroDMx Capture, via the INDI server in the Raspberry Pi computer, sent the scope/mount to the Omega nebula, plate solved and centred the object.

AstroDMx Capture captured 80 x 45s exposures with matching dark frames

Negative preview


The images were calibrated, stacked and partly processed in Siril


The Stars were removed in the Gimp with the Starnet++ plugin and denoised in Neat image.


The extracted stars


The starless image was stretched in the Gimp 2.10


Then the stars were added back and the image flipped horizontally to a more familiar orientation.

The Omega (Swan) nebula


Then AstroDMx Capture slewed the scope/mount to the Lagoon nebula, plate solved and centred the object in the field of view.

AstroDMx Capture captured 25 x 45s exposure before it became too light to capture worthwhile images.


The images were calibrated, stacked and partly processed in Siril


The Stars were removed in the Gimp with the Starnet++ plugin and denoised in Neat image.


The starless image was stretched in the Gimp 2.10


The stars were added back

The Lagoon nebula


The SV605MC camera in conjunction with the William Optics Super Zenithstar 81mm ED Doublet APO refractor at f/5.5 with x0.8 flattener/reducer proved to be a very capable imager with narrowband filters to produce false colour images in various palettes, and with an Astronomik UHC-E filter to produce monochrome images covering all of the wavelengths of the object or data to be used as luminance along with narrowband data.

Although not absolutely required, the star removal and replacement technique proved to be a satisfactory way of dealing with star colours and stretching the nebulosity the nebulosity without bloating or over emphasising the stars.

These data were, as explained earlier, obtained whilst testing the plate-solving, object sync and assisted meridian flip developments in AstroDMx Capture.