Tips for using AstroDMx Capture.
Downloading
Be sure to read carefully what is written on the download website, otherwise you could end up downloading the incorrect version of AstroDMx Capture. Particular care is needed at the moment because the site is being prepared for other releases.
This is particularly important for Linux downloads as there are versions for CPUs made in 2013 and younger and also for older CPUs. If you download the wrong version, it may crash on startup. The software is not designed to run on CPUs older than 2006. On any older CPU the software will possibly not work.
There are versions of AstroDMx Capture for X86-64 Linux rpm and deb as well as manual installers. As stated above, there are versions for newer and older CPUs. There are versions for the Raspberry Pi ARM 32 and 64bit. There are also versions for macOS (released), Windows (Pending release), and (FreeBSD which is still a work in progress). Take your time to navigate to the appropriate version for you.
Running the software
The first time that AstroDMx Capture runs, it sets up a default location where captured data are stored. This is a folder called AstroDMx_DATA. However in Options there is the possibility to set a different location for captured data to be stored. For example, on one of our computers the Folder AstroDMx_DATA has been created manually in a fast, high capacity SD card that is permanently in the computer for extra storage, and the storage location has been set to this folder.
Connecting a camera
At the top left of the AstroDMx Capture Window is the Capture button. Connect a camera to the appropriate USB port and click on the connect button once. A dialogue will come up that shows all of the detected cameras such as the built in webcam and also your astronomy camera. Select the astronomy camera and after a few seconds it will be connected. Then you have to select the Format.
The camera selection dialogue
Selecting the correct Format
In this example, the camera is the SVBONY SV305 and the three formats offered are RGB24, RAW 8 and RAW 16. When the format is selected, this is the format that the camera will use for the capture of image data. Note that this format can be changed later, but it is best to start with the format required. It is important to understand the differences between these formats and what they should be used for.
RGB24
This is an 8 bit format and should never be used for deep sky imaging. The 24 means 8 bits per colour channel (Red, Green and Blue 3 x 8 = 24). A good reason not to choose this format, even for 8 bit, planetary or lunar imaging, is that the debayering of the colour information is done internally by the camera SDK and we have no idea which debayering algorithm is used. However, if you wish to collect monochrome data from your camera, for example lunar data, you can select RGB24 and then select Greyscale transform. This can allow faster frame rates, but more importantly, the files will only be a third of the size of an RGB file.
AstroDMx Capture is context aware, so the option to transform to greyscale will only appear if RGB24 is selected, and other, irrelevant options will not be shown.
Greyscale transform
RAW 8
This format should never be used for deep sky imaging.
This is an 8 bit format that can either save RAW data, or AstroDMx Capture can debayer the data to RGB using the highest quality debayering algorithms and save RGB data. The default is to save RAW data. If you try to view RAW images they will appear to be monochrome with a pattern all over the image. However, software such as Autostakkert! can debayer the data for you. Consider using this format if you find that it improves your frame rates.
This is where you can control the saved and displayed formats
Debayer: Full
This gives a colour display and saves RGB image data.
This is often the debayer mode of choice
Colour Display / Raw Out
This shows a colour preview image but saves RAW image data
Debayer: None
This shows an undebayered image and saves RAW data
RAW 16
This is the format that should always be chosen for deep sky imaging.
It is best to save your deep sky 16 bit data by choosing Debayer: Full. This will give you the greatest choice of software to register and stack your data. Not all stacking software can debayer RAW data.
ADC bit depths
Some cameras such as the SV305, many other astronomy cameras and some DSLRs have 12 bit ADCs (Analogue to digital converters)
Other cameras such as the ZWO ASI178MC have 14 bit ADCs as do some other astronomy cameras and some DSLRs.
Cameras such as the Atik 314L mono have 16 bit ADCs as do a number of other astronomy cameras.
Most cameras with 12 bit or 14 bit ADCs can also save out 8 bit data, which is a rapid process that allows them to have high frame rates when doing solar system imaging.
What do 8 bit, 12 bit, 14 bit and 16 bit mean in terms of cameras and images produced?
8 bit image data contain 28 that is 256 levels of brightness
12 bit image data contain 212 that is 4096 levels of brightness
14 bit image data contain 214 that is 16384 levels of brightness
16 bit image data contain 216 that is 65536 levels of brightness
Astronomical objects have continuous levels of brightness and the larger the number of bits used to capture the data, the more of the intermediate levels of brightness are actually captured and jumps in brightness within images are avoided.
Saving 16 bit image data from 12 bit and 14bit ADC cameras
There are only 8 bit, and 16 bit integer image formats used in astronomy. This means that image data can be saved in 8 bit image containers or in 16 bit image containers (files). Tiff files can be 8 bit or 16 bit. (As an aside, Deep Sky Stacker automatically saves the stacked image in a 32 bit floating point TIFF or FITs file, whatever bit depth and format you chose to save out the stacked image. This is because Deep Sky Stacker, like some other stacking software, sums the registered images into a 32 bit floating point image file). However, the typical images worked on by astronomers are 8 bit or 16 bit integer files.
8 bit data are stored in 8 bit files.
12 bit and 14 bit data are stored and saved in 16 bit files, usually TIFF or FITs files.
All processing is done on the high bit-depth images and only when processing is finished is the bit depth converted to 8 bits and saved, usually as an uncompressed PNG file that can then be used for display and sharing.
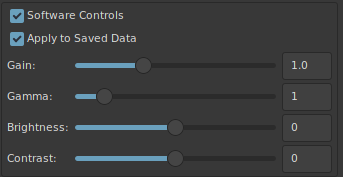
The displayed image can be controlled by the Camera’s controls, but also the Software Controls, that in 8 bits can even be applied to the saved data if required.
Software Controls
In general, software controls should only be applied to saved data if the camera itself does not have the required controls.
In 16 bits the display Preview Controls also include various transforms that enable a 16 bit image to be made visible in the display screen.
It will be noticed that in all of the previous images, AstroDMx Capture has inherited the dark theme set in the desktop environment themes. In the image below, where a dark theme isn’t used, AstroDMx Capture does not use a dark theme.
AstroDMx Capture using the Preview controls to render the 16 bit image easily visible
I hope that these tips and information will make it easy and enjoyable to use AstroDMx Capture.
However, no software should be used for the first time when you are seriously trying to capture astronomical images. It is best to practice in daylight on landscape or cityscape objects, so that you can become familiar with the operation of the software.
The information provided here is not exhaustive, but is just intended as an introduction to the intuitive AstroDMx Capture imaging software.
AstroDMx Capture for Windows, macOS or Linux (Including Raspberry Pi) can be downloaded freely here:
https://www.astrodmx-capture.org.uk


