Friday 22 April 2022

Using an SV305M Pro with a Barlow lens, tilt adapter and AstroDMx Capture for Linux

It is a common problem with H-alpha solar imaging with CMOS cameras that if a Barlow is introduced into the optical train Newton's rings frequently become evident in the image where they were not present if a Barlow has not been used. It has been found that a tilting mechanism can eliminate Newton's rings by using a correct tilt angle.

Click on an image to get a closer view

The equipment used

A Coronado Solarmax II, 60, BF15 H-alpha scope mounted on a Celestron AVX mount. A ZWO tilting mechanism was used to attach the SV305M Pro camera to a x2 Barlow lens which was then placed in the diagonal.

The slight tilt can be seen

AstroDMx Capture for Linux was used to capture a 2500-frame SER file of the Sun.

Screenshot of AstroDMx Capture capturing the SER file data


The SER file was registered, stacked and wavelet processed in Registax 6 and post processed in the Gimp 2.10

Below are four process renderings of the active regions imaged AR2993, AR2994 and AR2995 revealing details of the surface structure.

Normal monochrome image


Colourised normal image


Monochrome half-negative image


Colourised half-negative image


It can be seen that considerable detail of the sunspot active regions and filaments has been captured. The various renderings of the image can be used to explore and examine the various details of the structures.

The SV305M Pro USB 3.0, CMOS camera performed well in combination with the tilting mechanism and the H-alpha scope to produce a detailed image without Newton's rings.

AstroDMx Capture can be downloaded HERE.

AstroDMx Capture is available for Windows, macOS, Linux including Raspberry Pi OS and ChromeOS.

Sunday 17 April 2022

Flat-fields and sensor dust

In the previous article we looked at the correction of vignetting by the use of flat-fields and we explained exactly how flat-fields work.

In this article we shall look at a situation where there is no vignetting but where problems arise that require correction by flat-fields. Flat-fields are required if there is dirt or dust on the sensor or optical window in front of the sensor and when cleaning fails to cure the problem.

AstroDMx Capture has the facility to capture flat-fields and to apply the master flat-field in real-time which makes the process of capturing clean data more efficient and pleasant.

For this experiment we used an old DMK 21AU04.AS camera that has accumulated dust and dirt on the sensor over the years, and which we now use for flat-field testing.

To capture flat-fields we place a variable illuminated panel on the front of the telescope.


The panel is of the sort sold by  Amazon as a Light box tracing drawing board. The device has even illumination across the panel and variable brightness control which facilitates setting the optimal illumination for the flat-fields.

AstroDMx Capture for Linux was used to capture 20 flat fields by the built-in flat-field capture routine which captured the flat-fields and produced a Master Flat-field.

Click on an image to get a closer view

Screenshot of AstroDMx Capture for Linux setting up to capture Flats

Capturing 20 TIFF file flat-fields. The exposure giving 52% maximum in the histogram
About 50-60% maximum is generally the correct exposure for flat-fields

Capture of the flat-fields is complete

Setting up to load the Master Flat that has been created

Loading the Master-Flat

This is the Master Flat that will be applied

Master Flat is loaded but flat-field calibration not yet activated

Activating the flat-field calibration

When the flat-field is applied to the data stream

When the flat-field is NOT applied to the data stream


Using flat-field calibration in a Solar imaging session

An APO 66mm f/5.5 refractor fitted with a Baader solar filter was used with AstroDMx Capture for Linux to image an area of the Sun using a DMK 21AU04.AS camera.


Screenshot of the imaging session imaging the Sun in White light with AstroDMx Capture

The dust spots can be seen all over the image of the Sun

Screenshot showing the same view when the Master Flat is applied in real time in AstroDMx Capture

It can be seen that the dust spots have all disappeared, removed by the flat-field.

AstroDMx Capture for Linux captured a 2500 frame SER file of the Sun. The best 80% of the images were stacked in Autostakkert! The resulting image was wavelet processed in Registax 5.1 and post-processed in the Gimp 2.10.

Resulting image of part of the solar disk

The image was then oriented correctly and colourised slightly in the Gimp 2.10

The large sunspot groups AR2993 and AR2994 can be seen appearing around the limb of the Sun. Smaller sunspots and some granulation and plage can also be seen, but the blemishes due to dust on the sensor are gone.

AstroDMx Capture can be downloaded HERE.

AstroDMx Capture is available for Windows, macOS, Linux including Raspberry Pi OS and ChromeOS.

Tuesday 12 April 2022

Markarian's chain of galaxies with an SV405CC, AstroDMx Capture and a 102mm f/4.5 refractor, and the effect of flat-fields

This experiment had a number of aims. One of them was to create an optical path that would produce vignetting. The second was to show that the use of flat fields would compensate for the vignetting. The equipment used was a low cost, poorly colour corrected, 102mm f/4.5 ED achromat that is motor-focus modified. It is possible to avoid vignetting by using a 2" adapter, but on this occasion a 1.2" adapter was used in a 1.25" star diagonal in order to create vignetting.

The SV405CC was fitted with an SVBONY 1.25" IR/UV cut filter and was placed in the star diagonal of the scope. An SVBONY 165 guide scope fitted with a QHY-5II-M camera was used for pulse auto-guiding with PHD2. AstroDMx Capture was used to capture 22 x 3min FITS exposures of the Markarian Chain of galaxies with matching dark frames. Also 20 flat-fields were captured to compensate for vignetting in the optical setup used.

Click on an image to get a closer view

Screenshot of AstroDMx Capture saving FITS data on the Markarian chain. The screenshot clearly shows the vignetting where the centre of the image is brighter than the regions of the image towards the edges.


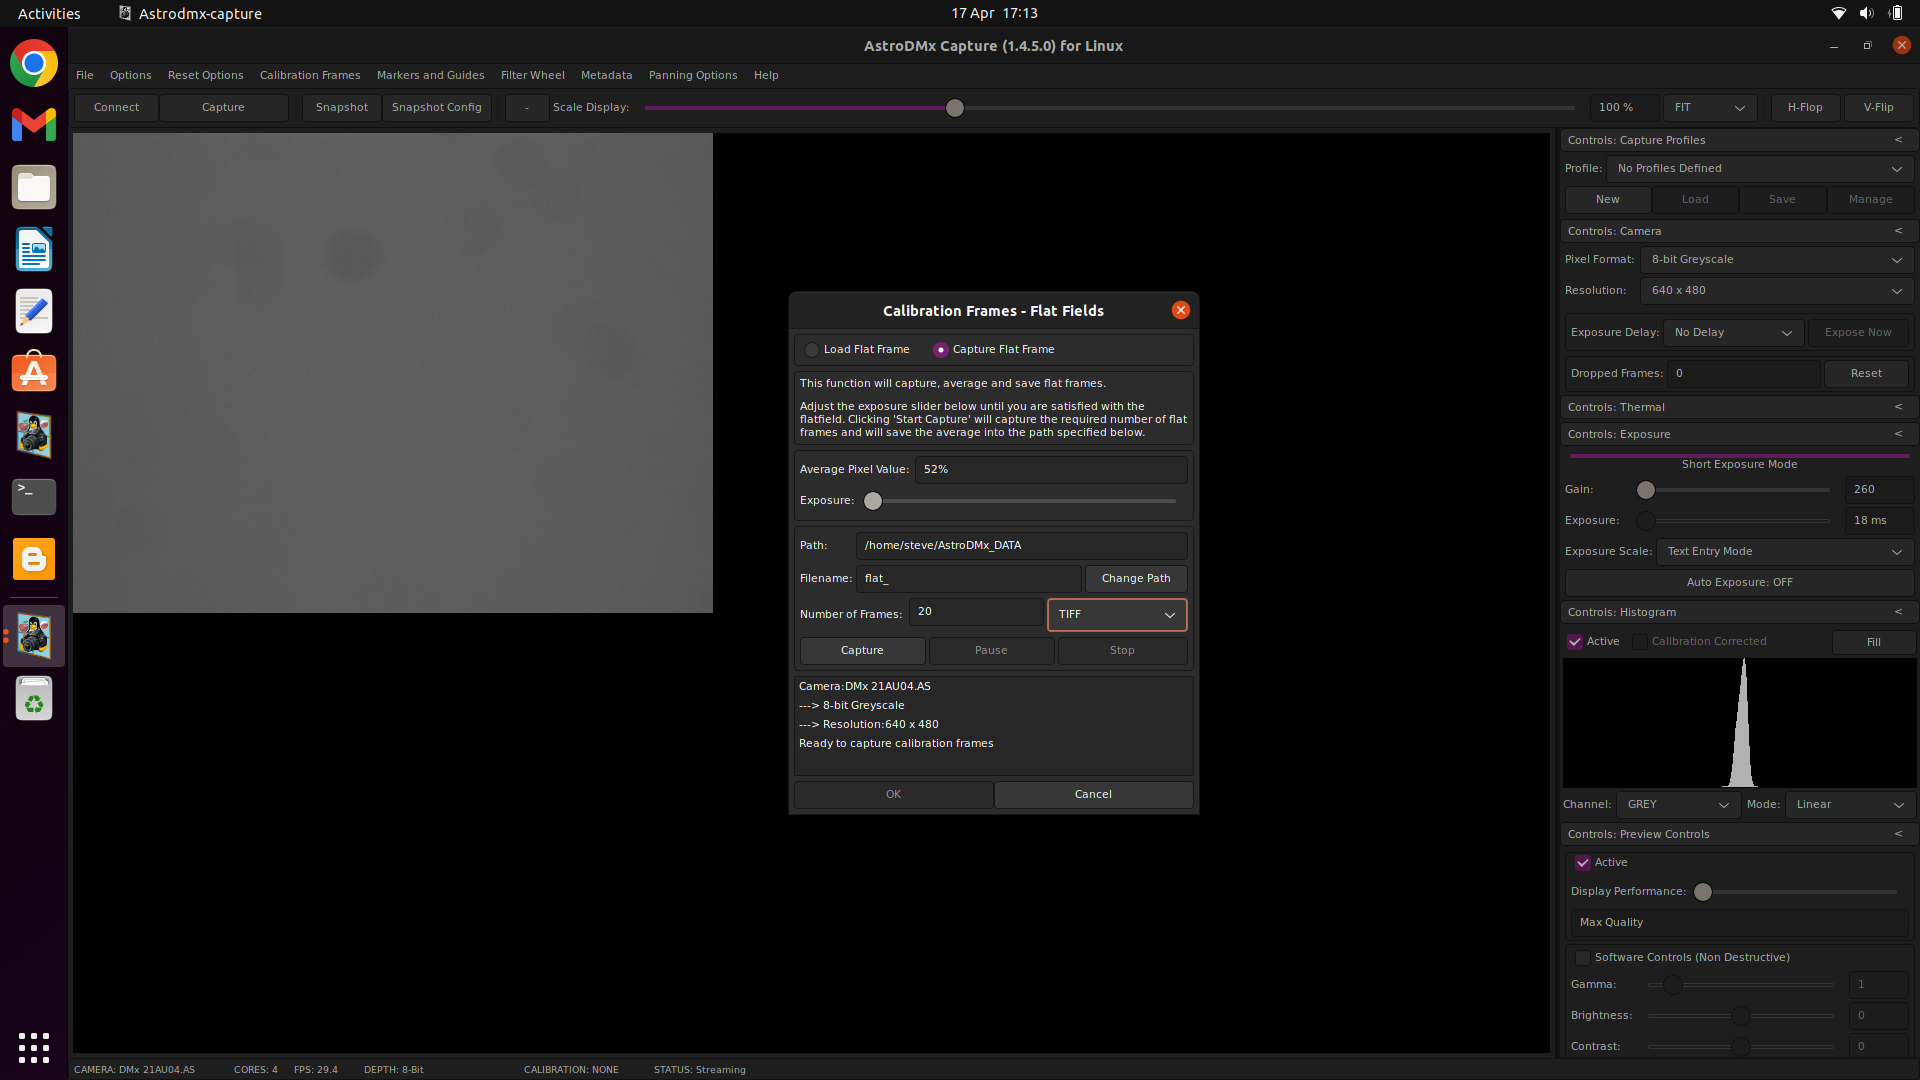
Screenshot showing AstroDMx Capture saving FITS flat-field images

The vignetting is very clear in this screenshot of flat-field capture.

Let us consider for a moment how flat-fields work. If the imaging system was perfect, the flat-fields would be a uniform brightness across the field of view (and would not be needed). There are a number of reasons why the illumination might not be equal across the field. The most obvious that is seen here is vignetting, where less light reaches the outer regions of the sensor than reaches the middle of the sensor. In this case, the vignetting is due to the geometry of the optical path caused by using a 1.25" adapter rather than a 2" adapter. Another reason might be that the sensitivity of all of the pixels over the sensor is not the same. Such a situation can arise as a sensor ages for example. Parts of the sensor might be dirty and so in those regions light is to an extent obscured. Dust rings can be seen on images if dust has fallen onto the sensor or onto the optical window in front of the sensor. It is not always easy to remove such dust. The dust rings produce circular donut-like regions where less light is falling onto the sensor. It is all of these causes of uneven illumination that flat-fields are designed to correct. 

How flat fields work

The exact details of flat-fielding can vary a little, but basically flat-fields work like this:

A number of flat-fields are captured and an average flat field image is produced. Then the brightness of every pixel is measured and the pixels can be ordered from brightest to dimmest. The middle pixel in this ordered list of brightness is the median pixel. Alternatively, the brightness of all of the pixels can be averaged and this average or mean pixel brightness will be very similar to the median brightness. Whether the median or the mean pixel brightness is used is a matter of choice, but my preference is for the median as it, unlike the mean, is robust as a measure of central location against the effects of outliers.

The brightness of each pixel should be divided into the brightness of the median (or mean) pixel to produce a correction value for that pixel. Then the brightness of that pixel should be multiplied by its correction value. In this way, the brighter parts of the image will be dimmed a little and the darker parts will be brightened a little.

Remember that a flat-field in a perfect system would have perfectly even brightness across the entire field. Let use use a small numerical example to illustrate the principle. Suppose that the brightness of the median pixel is 10, the brightness of the brightest pixel is 20 and the brightness of the dimmest pixel is 5. If we divide the brightness of the median pixel by the brightness of the brightest pixel we get a correction factor of 10/20 = 0.5. Similarly, if we divide the brightness of the median pixel by the brightness of the dimmest pixel we get a correction factor of 10/5 = 2. Lastly if we divide the brightness of the median pixel by the brightness of the median pixel we get a correction value of 10/10 = 1.

We now need to multiply the brightness of each pixel by its correction factor. Thus the brightness of the three pixels become 20 x 0.5 =10; 10 x 1 = 10 and 5 x 2 = 10. We have achieved our aim of removing the inequalities in brightness due to the various defects previously mentioned.

Every pixel in every image is corrected in this way and the effects of the defects in the system are compensated for and the effects disappear.

Stacking software such as Deep Sky Stacker can do flat-field correction as well as dark-frame correction etc.

Processing the data

Deep sky Stacker was used to dark-frame and flat-field correct the images and then register and stack them. The resulting image was post processed in the Gimp 2.10, Fitswork 4 and Neat Image.

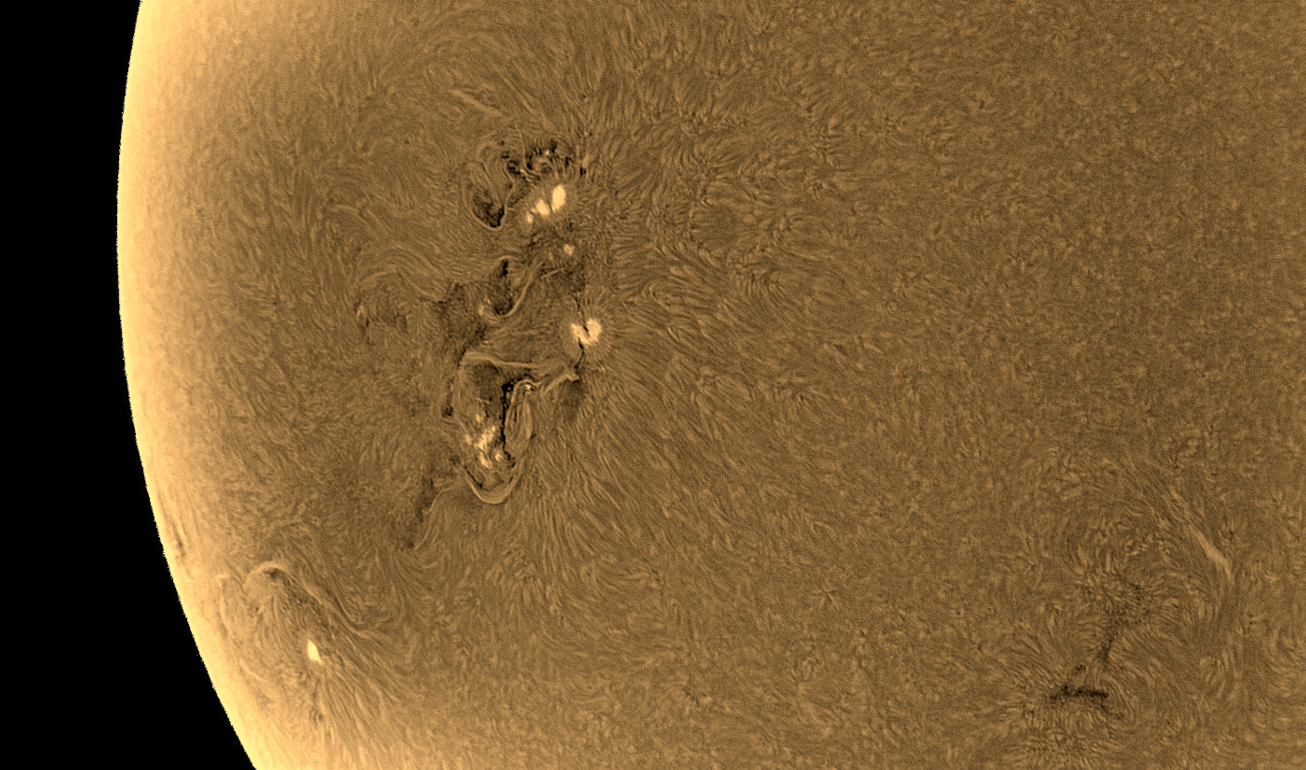
The Markarian chain of galaxies


The SV405CC camera is proving to be a versatile and competent imaging device with a variety of telescopes and with AstroDMx Capture.

AstroDMx Capture can be downloaded HERE.

AstroDMx Capture is available for Windows, macOS, Linux including Raspberry Pi OS and ChromeOS.

Black Eye Galaxy with an SV405CC, AstroDMx Capture and a Skymax 127

A motor-focus modified Skymax 127 Maksutov was mounted on a Celestron AVX mount and an SV405CC OSC fitted with an SVBONY UV/IR cut filter was placed at the focus with a star diagonal. An SVBONY 165 guide scope fitted with a QHY-5II-M camera was used for pulse auto-guiding with PHD2. An occultation board was used to shield the equipment from a nearby street light.

Click on an image to get a closer view

Equipment used


AstroDMx Capture was used to capture 33 x 3min FITS exposures of  M64, The Black-Eye Galaxy, with matching dark frames.

Screenshot of AstroDMx Capture saving 16 bit FITS images of M64


Multistar pulse autoguiding was done using PHD2.

Screenshot of the auto-guiding

The FITS files were calibrated and stacked in Deep Sky Stacker, and post-processed in the Gimp 2.10, Photoshop Elements and Neat Image.

Wide field image of M64

Cropped image of the Black-Eye Galaxy

This experiment again shows that the SV405CC OSC camera performs well with AstroDMx Capture, and a Skymax 127 Maksutov to obtain deep-sky images.

AstroDMx Capture can be downloaded HERE.

AstroDMx Capture is available for Windows, macOS, Linux including Raspberry Pi OS and ChromeOS.

Saturday 9 April 2022

The SV305M Pro, AstroDMx Capture, A Raspberry Pi and a Skymax 127 Maksutov

A Skymax 127 Maksutov was  mounted on a Celestron AVX GOTO mount and an SV305M Pro monochrome camera fitted with an SVBONY IR/UV cut filter was placed at the Cassegrain focus of a motor-focus modified Skymax 127.

AstroDMx Capture for Raspberry Pi OS, running on a Raspberry Pi 400 was used to capture a 2000-frame SER file of the 46% waxing Moon.

Click on an image to get a closer view

Screenshot of AstroDMx Capture for Raspberry Pi OS capturing a lunar SER file


The best 80% of the frames in the SER file were stacked in Autostakkert!, wavelet processed in Registax 6 and post-processed in the Gimp 2.10.


The SV305M Pro worked well with the Raspberry Pi and AstroDMx Capture to produce a high resolution detailed image of the Theophilus region of the Moon.

AstroDMx Capture can be downloaded HERE.


Tuesday 5 April 2022

Globular clusters with an SV405CC, AstroDMx Capture and a Skymax 127 Maksutov

A motor-focus modified Skymax 127 was mounted on a Celestron AVX GOTO mount. an SVBONY SV405CC OSC camera, fitted with an SVBONY UV/IR cut filter was placed at the Cassegrain focus.

Click on an image to get a closer view

Equipment used


AstroDMx Capture was used to capture 100 x 25s FITS images of each of the globular clusters M3 and M13 with matching dark frames.

Screenshot of AstroDMx Capture saving FITS images of M13

Screenshot of AstroDMx Capture saving FITS images of M3

The images were stacked in Affinity Photo and post-processed in The Gimp and Affinity Photo

M13

M3

The SV405CC camera performed very well with the Skymax 127 Maksutov; and with AstroDMx Capture was able to deliver detailed images of the two globular clusters M3 and M13.
AstroDMx Capture can be downloaded HERE.

AstroDMx Capture is available for Windows, macOS, Linux including Raspberry Pi OS and ChromeOS.