Saturday 31 July 2021

Installing Linux on a Chromebook, installing and running Linux applications, including AstroDMx Capture for Chrome OS Linux

When you have Linux installed on your Chromebook, you will be able to install locally a number of programs and greatly enhance the functionality of the Chromebook, and also enable it to be used for astronomical imaging with the SVBONY, SV305, SV305 Pro and SV305M Pro cameras; the only astronomy cameras that will work with Chrome OS Crostini at the moment.

Versions of Chrome OS of 91 and above are able to set up Linux in the stable channel and require no special preparations to do so.

Click on any image to get a closer view

Follow these steps to set up Linux on your Chromebook

In your Chromebook, click on the time at the bottom right of the screen


Select Settings

then Advanced, then Developers.

By the ‘Linux development environment’, select Turn on.

Just follow the on-screen instructions and after a few minutes, a Terminal window opens.

The Debian 10 Linux is now installed and you can run Linux commands in this terminal.

Updating the Linux environment

You will notice that the first line of the terminal contains your username followed by the prompt

:~$

So the prompt will always look something like this:

joebloggs@penguin:~$

Where joebloggs is your username (of course, yours will be something different).

The first commands to type into the terminal are to update the Linux you have just installed

Type in sudo apt update and press Enter.


When you press Enter something like this will be printed in the terminal window:


In my system, shown above, everything is up to date. However, yours probably won't be.

Then at the :~$ prompt as shown above, type: sudo apt upgrade and press Enter.


Again, in my system, everything is up to date.

If however, there were any packages that needed to be updated, you would be given the option [Y/n] as to whether to proceed. You type y to proceed with the upgrade.

You now have a fully functioning Linux virtual machine within your Chromebook and you can download and install Linux applications to run in it.

Installing two Linux applications

The first application that we will download and install is AstroDMx Capture for Chrome OS Linux. This is downloaded from the AstroDMx Capture website and is downloaded as a .deb file.

The AstroDMx Capture website is at https://www.astrodmx-capture.org.uk/

When you download the .deb install file it will be downloaded to the Downloads folder in Files on your Chromebook.

Install the AstroDMx Capture .deb file as shown below:


Right click on the file and select Install with Linux


After a few moments, the details of the file will be shown in a dialogue box.


Click on Install.


A small information box appears at the bottom right of the screen to inform you that installation is underway.

When the installation is complete, the AstroDMx Capture icon will appear in your programs just like any other application.

Clicking on the AstroDMx Capture icon will launch AstroDMx Capture. It would be a good idea to right click on the icon and select Pin to shelf. In this way. AstroDMx Capture will always be immediately available to launch.

Other .deb files for other applications can be downloaded from websites and installed in exactly the same way. However, it should not be necessary to go searching for the applications that you want, as they should be available in the Debian repository.

These are the Linux applications that I have installed and grouped together in the Programs window.


I will explain how to install one of them, SER Player. All of them can be installed in the same way.

Type into the terminal window after the :~$ prompt

sudo apt install ser-player

Some lines of text will appear in the terminal window finishing with a question:

Do you want to continue? [Y/n]

Type in y


Then SER Player will begin to install:


When SER Player is installed you will be returned to the :~$ prompt


SER Player is now installed and is available to use.

Running AstroDMx Capture

Just click on the AstroDMx Capture icon and the application will launch:


To get started with AstroDMx Capture, read the article HERE.

Running SER Player

Just Click on the SER Player icon and the application will launch:


This application will enable you to view and even process SER files if required.


Tuesday 27 July 2021

Correcting the green cast in stacked Altair RAW deep sky images

Nicola has been implementing an Altair Hypercam 294C PRO 4BG TEC 14-bit CMOS camera in AstroDMx Capture. One of the things that we noticed was that the preview image and the individual captured images all had a pronounced green cast. Some other cameras produce a similar green cast.

Altair state that this is what to expect from true RAW data and they state that this is normal and that the green cast has to be removed in post-processing. Some astronomical cameras have facility in the camera SDK to white/colour balance the RAW data stream, which is no doubt why Altair describe their cameras' data to be true RAW, i.e. completely unaltered RAW data.

An Altair Hypercam 294C PRO 4BG TEC camera was mounted in the two inch focuser of a Skywatcher 130PDS f/5 Newtonian reflector. The scope was fitted with a guide scope and everything was mounted on a Celestron AVX GOTO EQ mount.

AstroDMx Capture for Windows was used to capture 15 x 2 minute undebayered 16-bit Tiff exposures of M27, the Dumbbell Nebula, with matching dark frames. The best 14 frames were debayered, aligned, dark-frame corrected and stacked in Autostakkert! and the result was saved as a 16-bit Tiff file.

By default, the camera puts the 14-bit data into the lower bits of a 16-bit saved file. This means that when the unprocessed file is simply viewed, it is very dark.


There is very little to see in this image. (see my article 'Hidden in the Dark').

If we were to load this image into The Gimp 2.10 and stretch the curves, we can see that the image has a green cast. So, we don't do that!


Here the unstretched image is loaded into The Gimp 2.10


Then Select Colors, Levels and Auto Input Levels. DO NOT Click OK!


Reduce the white end of the Output Levels until the centre of the nebula isn't burnt out and some structure can be seen. In this example, the white end was reduced to 75.00. Then Press OK.

The image is displayed at 33.3% in the above screenshot. The screenshot below shows the same image displayed at 100%,


The Hue of the image requires correction so we select Colors, Hue-Chroma and pull the Hue slider slowly towards the right until the image has the correct colors.


At this point, the image could be cropped and further processing carried out.
This procedure should work for planetary and lunar images as well.


Thursday 22 July 2021

Reducing the chance of sunlight overheating a camera during solar imaging

The DMK 31AU03.AS monochrome CCD camera has a blue body and when doing solar imaging it absorbs heat from the solar radiation and becomes very hot. 


To protect the camera from excessive heat it was wrapped in aluminium foil to act as a reflector.


The camera attached to the scope and reflecting sunlight


This had the desired effect, and the camera ran much cooler than on previous occasions.

The DMK 31 AU03 camera was placed at the focus of the CaK PST which was mounted on a Celestron AVX mount.

AstroDMx Capture for Linux was used to capture two 1000-frame SER files of overlapping regions of the Sun. The SER files were stacked in Registax 5.1 (Registax is able to stack monochrome SER files but not colour SER files) Registax calls SER files 'LuCam recorder SER' files (because the SER format was originally developed by Heiko Wilkens for Lumenera cameras). The resulting images were stitched into a 2-pane mosaic with Microsoft ICE. The resulting image was post-processed in the Gimp 2.10.


Screenshot of AstroDMx Capture capturing a SER file


Final image of the Sun in Ca K-line light 393.4 nm

There are 6 numbered active regions visible in this image and they are divided into two bands, one in the north and the other in the South. From left to right at the top half of the image are active regions AR2846, AR2848, AR2842. In the bottom half of the image are active regions AR2849, AR2847 and AR2845.
These regions are associated with pale areas of high magnetic flux.

The DMK 31AU03.AS CCD camera has an unfortunate limitation not shared by many other Imaging Source cameras: It will only work with a computer that has a true EHCI USB controller and will not work at all with computers that only have xHCI USB controllers. It is not immediately clear why this should be so, and it is unlikely that the Imaging Source will have any interest in rectifying this. EHCI USB controllers only support USB 2.0 speeds (480 Mbit/s); whereas xHCI USB controllers support all USB speeds, USB 3.0 (4.8 Gbit/s) including Super Speed (5 GB/s). xHCI is supposed to be perfectly backwards compatible, but in cases like the DMK 31AU03.AS, this is clearly not so. It is likely that the firmware does not adhere perfectly to the USB 2.0 standard, which renders it inoperative in a computer with only an xHCI controller. For this reason we use this camera with a Thinkpad X230, which has both types of USB controllers.

The procedure described here of covering a camera with aluminium foil in order to reduce the absorption of heat from solar radiation whilst solar imaging, is a simple. yet effective solution for a simple camera body design such as that of the DMK. If a more complex design, incorporating fins or vents is incorporated into the camera, there is no reason why the aluminium foil solution should not work, as long as vents and features to aid air flow over the camera body are not obstructed.

Tuesday 20 July 2021

Testing an Optalong L-eNhance narrowband filter with an SV305M Pro monochrome CMOS camera and AStroDMx Capture.

Bresser Messier AR 102xs f/4.5 ED refractor was mounted on an HEQ5 GOTO mount. An SVBONY SV305M Pro was fitted with an Optalong L-eNhance narrowband filter. This filter has two bandpass zones with high transmission. The bandpass at the longer wavelengths in the red, includes H-alpha but not SII. The other bandpass includes the peaks of H-beta and OIII.

Transmission curve of the Optalong L-eNhance narrowband filter

The spectral lines of sodium and mercury, two major components of artificial light glow, comprising light pollution, are filtered out as there is zero transmission at their wavelengths. This filter passes about 95% of the light from H-alpha, H-beta and OIII nebulosity, cutting out most of the spectrum that could lighten the background of an image.

This experiment was to capture a monochrome image in the wavelengths of H-alpha, H-beta and OIII, using an SVBONY SB305M Pro monochrome camera.

AstroDMx Capture for Windows was used to capture 60 x 60s exposures with matching dark-frames and 50 x bias frames.

Screenshot of AstroDMx Capture for Windows, capturing data on the Bubble Nebula in Cassiopeia


The images were stacked in Affinity Photo and also in Deep Sky Stacker. The results from these two work flows were further processed in Affinity Photo, The Gimp 2.10, Fitswork and Neat Image.

Final image of the Bubble Nebula NGC 7635


The  Optalong L-eNhance filter is primarily intended for use with an OSC (one shot colour) camera to enable the production of images with palettes comprising H-alpha, H-beta and OIII colours. This will be done in the future, but this filter acquitted itself well in producing a monochrome image, which could, in another narrowband scheme using H-alpha, OIII and SII, be used as luminance data.


Saturday 17 July 2021

Chromebook workflow for a complete lunar imaging session using AstroDMx Capture for Chrome OS Linux.

Chromebook workflow for a complete lunar imaging session using AstroDMx Capture for Chrome OS Linux.

  • The Chromebook used has Linux enabled.
  • The Gimp 2.10 was installed from the repository.
  • Wine (Windows compatibility layer was installed from the repository as well as the 32-bit libraries.
  • AstroDMx Capture for Chrome OS Linux was downloaded and installed from the .deb install file.
  • AutoStakkert!2 was downloaded and moved to the Linux files directory.
  • Registax 5.1 was downloaded and installed with Wine.

These are all of the tools needed for the lunar imaging session reported here.

However, a number of other programs have also been installed that are used for various astronomical imaging processes, but were not used for this session; they are:

Other Linux Programs

  • Siril
  • Hugin Panorama Creator
  • SER Player

Other Windows programs to run in Wine

  • Iris

The Workflow

A Skymax 127 Maksutov was mounted on a Celestron AVX mount and an SVBONY SV305M Pro monochrome CMOS camera was placed at the focus.

The camera was connected to a USB 3.0 port and the camera connected to Linux when prompted.

AstroDMx Capture for Chrome OS Linux was launched and the camera connected.

Click on an image to get a closer view

Screenshot of AstroDMx Capture for Chrome OS Linux capturing a 2000 frame SER file.


Screenshot showing the SER file having been stacked (best 50%) in AutoStakkert! 


Screenshot of the stacked image being wavelet processed in Registax 5.1


Screenshot of the wavelet-processed image being post-processed in the Gimp.


Final image of the Caucasus mountains region of the Moon


This experiment demonstrates that everything that was required for a complete imaging session from image capture right through all of the stages to the final image, could all be done on a Chromebook using the Crostini Virtual Linux machine and the Wine, Windows compatibility layer.

As most Chromebooks have so little storage, it is necessary to limit the amount of data captured in any one session so that the disk space for Linux is adequate.

There are obvious performance penalties for using a virtual Linux System (Crostini) within the Linux distribution Chrome OS, and to running Windows programs in the Wine, Windows compatibility layer, within the Crostini virtual machine container. Nevertheless, it was all possible, and we were able to get good results.

It must also be remembered that at the moment, the only cameras that we have been able to get to work with a Chromebook are the SVBONY SV305, SV305 Pro and SV305M Pro.

We do not know whether, as Google improves the USB support for Crostini, more cameras may be able to be used, or whether the USB support for the SVBONY SV305 series cameras will be broken. It remains to be seen. The only certain thing at the moment is that UVC cameras are not supported, and we at least have three cameras that work perfectly within the system.

There is another way of imaging with a Chromebook and we shall look at this in a future article.


Getting started with AstroDMx Capture

 Getting started with AstroDMx Capture

If you wish to link to this article then please use the URL Below

https://x-bit-astro-imaging.blogspot.com/2021/07/getting-started-with-astrodmx-capture.html

Note that this blog is fully indexed and searchable, so you will be able to find on this blog, other articles relating to this software, simply by searching.

It is hoped that the reader will read and understand the article entitled ‘Hidden in the Dark: A look at 16-bit astronomical imaging’ before she/he proceeds to read the current article.

There are versions of AstroDMx Capture for Windows, macOS, Linux (including the Raspberry Pi), and Chrome OS Linux. They all work in the same way!

This article will guide you through using the software to capture images and video. All supported cameras work the same way. Some have more controls than others, but as AstroDMx Capture is context aware, in general, only the controls that the camera makes available are shown in the GUI (Graphical User Interface).

The best way to learn to use the software is to practice in the daytime. Attach your camera to your telescope and point the scope at a distant object. When the software is running, bring the preview image to focus and then start to learn the software. At night, work initially on the Moon; get a good focus and make sure that you can find the focus again by noting the gradations if you have them on the focuser, or if necessary make a mark on the focuser tube so that you can easily get the same focus again. This is important for deep sky imaging where things are so much easier if you start off more or less in focus.

The first decision that you have to make is whether you are going to do lunar/planetary imaging or Deep Sky imaging.

Launch AstroDMx Capture and make sure that a camera is connected.

Click on the Connect Button at the top left. A Connect camera dialogue will appear near the middle of the screen. 

Select the camera you wish to connect and wait (maybe a few seconds for it to be selected).

Click on Format to select the format of the images you wish to capture.


if you are using a monochrome camera you will be offered two options: MONO 8 and MONO 16.

(If you are using a UVC camera, you may be offered MJPEG or something like YUYV and Y800, and they are all 8-bit formats. However, most of these cameras are only suitable for short exposure work.)

At this point you need to know whether you will be capturing terrestrial, lunar/solar/planetary or Deep Sky images.

If you are capturing Deep Sky images, select RAW 16. Only this format will allow you to capture all of the range of brightness that is present in deep sky images.

If you are capturing  terrestrial or lunar/solar/planetary images, it is best to select RAW 8.

It is best not to use RGB24, which is only an 8-bit format. Using RAW 8 and Full Debayer will apply a high quality debayering algorithm, whereas it is impossible to tell the quality of the debayering algorithm employed by the camera firmware.

Then Select the resolution you wish to capture. In the example here, we shall select the highest resolution of the camera, which in this case happens to be 1920 x 1080. If we had selected a different resolution such as 800 x 600, this would select a Region Of Interest of that resolution in the middle of the sensor. You may wish to do this if you are imaging a planet that is quite small on the screen. Using a Region Of Interest (ROI) will give higher frame rates and will not waste image area on black sky. If the camera does not support ROIs, selecting a lower resolution will simply produce a smaller image.


When you have selected the resolution, Click on the Connect button in the dialogue.

Depending on the camera you have selected, an AstroDMx Tip may appear to give advice. Click OK in the Tip dialogue after you have read it..

The camera will now connect.

The next bit is very important.

At this point, if you are using a colour camera; whether you are using RAW 8 or RAW 16, go to the Controls Camera section near the top at the right side of the GUI. It will look like this:


Change the Colour Display/RAW Out to Debayer: Full

As in the screenshot below.


This will make sure that the image you see on the screen AND the data that you capture are all full colour using a high quality debayering algorithm.

Selecting Gain and exposure. 

Exposure changes the length of exposure of each frame

Gain changes the amplification of the signal produced by the exposure. The higher the gain, the higher the noise.

The frame rate is affected by the exposure. For example, it is obvious that with an exposure of 1s, it is impossible to get higher frame rates than 1fps etc. 

A balance needs to be achieved between gain and exposure.


Note; it is possible to type in gain and exposure values. Just click in the box where the exposure is shown; in the example above the exposure shown is 55ms. If you wanted to change the exposure to say, 64ms, just type in 64ms and press enter. If you had wanted to change it to 2 seconds, just type in 2s and press enter. To type in gain values, click in the box where the gain is shown and just enter the gain you want; just a number without any units.

Alternatively, you can just pull the sliders, but this is probably not the best option for getting things exactly how you want them.

You can change the range of exposures over which the sliders work by selecting the Range from a drop down menu as shown below.

Also, if you Left Click on the handle of any slider to give it focus, you can then change the value by pressing the right or left cursor control keys. This is a really useful function. However, it is probably best not to try to use it with Exposure as most of the ranges are too wide for it to have a noticable effect.

Moreover, if you Right Click on the handle of a slider it sets the slider back to camera default.


If you are doing 8-bit solar, Lunar or planetary imaging, you will be working in the microsecond and millisecond ranges depending on the camera and the telescope.

The aim is to capture a large number of images in a short period of time, when you have got things looking correct on the screen

8-bit Controls

For 8-bit imaging.


The controls fall into different categories:

Camera Exposure

Which includes gain. Depending on how it has been set in ‘Options’ the camera units can be either percentages or Camera Native Units. Sometimes Native Units is the best choice.


As previously stated, the Gain and Exposure values can be typed in. The gain is just a number and does not require a unit.

The exposure does require a unit and can be typed in for example, as 30s or 200ms etc.

Controls Histogram

This displays a histogram of the image and it should be experimented with to see the effects of the various options. The histogram displays but does not change the data streaming from the camera.

Controls Preview Controls

For 8-bit imaging the Preview controls are the Display Performance, which, when activated, can be used to degrade the quality of the displayed image (NOT THE SAVED DATA). This might be useful if you are using a minimal spec computer with a slow CPU. You can keep up the performance of capturing, if required, by using this control.

The Software Controls (Non Destructive), when activated, can be used to change the appearance of the preview image on the screen. They comprise Gamma, Brightness and Contrast. By default, they are non-destructive, i.e. they do not change the data being saved. However, there is a checkbox that allows them to change the saved data. This should generally only be used if the camera you are using has few or no controls, such as some webcams. The option to affect saved data is not available if 16-bit imaging is being done.

Controls Main

These are the actual camera controls and will vary from camera to camera. They, of course, do affect the data that are being saved.

Controls Colour

These are actual camera controls and are presented if the camera is a colour camera. Which controls are available depends on the camera being used. In the camera being used in this example, there is a One Touch white balance control which works as long as enough light is reaching the sensor.

In the daytime, all of these controls should be experimented with in order to become familiar with the operation of the software.

16-bit Controls

For 16-bit, deep sky imaging

A lot of time will be saved if you make sure that your scope and camera is already focused on infinity, so that you will be more or less in focus when you start trying to image, as mentioned at the start of this article.

The difference between the 8-bit and the 16-bit controls is in the Controls Preview Controls.

This is because with 16-bit imaging, what you see is NOT what you get in the saved data.

The details of this are explained in the article  ‘Hidden in the Dark: A look at 16-bit astronomical imaging’. It is important that the article is read, and possibly before this one.

The function of the Preview controls is to make the deep sky image become visible, but not to try to get it to appear as it will after the image has been processed.

It is best to start with a bright deep sky object such as M13 a globular cluster or, if the time of year is appropriate, a bright nebula such as M42.

The 16-bit Display Transform should be changed from Linear to ArcSinH or ArcSinH of ArcSinH, this will brighten up the darker parts of the image.

You may want to increase the 16-bit Brightness control a little, but this is often not required.

You can also use the Software Controls (Non Destructive) to change what the preview image looks like.

Apart from the Controls: Colour for adjusting the white balance, you will probably not adjust any of the camera controls other than Gain and Exposure.


Capturing image data

Clicking the Capture button at the top of the GUI will bring up the capture dialogue in which you can set various parameters to control the file types to be captured and the way they are captured.

Selecting the File type to be captured


Selecting the type of capturing, in this case Frame Limit

Selecting the number of frames to capture


Last words:

Practice and more practice as well as experimenting is the only way to become familiar with the software.


Monday 12 July 2021

Hidden in the Dark: A look at 16-bit astronomical imaging

I first published this article in 2020, in Issue 2 of Redux Cygnus, the e-magazine of the Swansea Astronomical Society. It is presented here as a prelude to the article on: 

Getting Started with AstroDMx Capture.

If you are going to link to this article, please use the following URL:

https://x-bit-astro-imaging.blogspot.com/2021/07/hidden-in-dark-look-at-16-bit.html

Hidden in the Dark

Below is a stacked image of an astronomical object (a stack of 40 x 60s exposures), captured by an Atik 314L 16-bit monochrome camera, with a H-alpha filter, using Nicola Mackin’s AstroDMx Capture for macOS. However, everything would work exactly the same way in AstroDMx Capture for Windows, Linux, Raspberry Pi Linux and Chrome OS Linux.

Can you guess what the object is?

I doubt it because all of the exquisite details of this object are hidden in the dark. But, we shall reveal them in all their magnificent beauty and in the process look at exactly what a 16-bit image is, and why the 16-bit format is so important for deep sky imaging.

The differences between 8-bit imaging and 16 bit imaging

ADC bit depths

Some cameras such as the QHY 5L-II-M and the SVBONY SV305, along with many other astronomy cameras and some DSLRs have 12 bit ADCs (Analogue to digital converters that digitise the analogue signal from the light sensor of the camera)

Other cameras such as the ZWO ASI178MC have 14 bit ADCs as do some other astronomy cameras and some DSLRs such as the Canon 4000D.

Cameras such as the Atik 314L mono have 16 bit ADCs as do a number of other astronomy cameras.

Most cameras with 12 bit or 14 bit ADCs can also save out 8 bit data, which is a rapid process that allows them to have high frame rates when doing lunar, solar and planetary imaging.

What do 8 bit, 12 bit, 14 bit and 16 bit mean in terms of cameras and images produced?

8 bit image data contain 28 that is 256 levels of brightness 

Ranging from 0 (black) to 255 (white)

12 bit image data contain 212 that is 4096 levels of brightness

Ranging from 0 (black) to 4095 (white)

14 bit image data contain 214 that is 16384 levels of brightness

Ranging from 0 (black) to 16383 (white)

16 bit image data contain 216 that is 65536 levels of brightness

Ranging from 0 (black) to 65535 (white)

Astronomical objects have continuous levels of brightness and the larger the number of bits used to capture the data, the more of the intermediate levels of brightness are actually captured and steps in brightness from one digitising level to the next within images are avoided.

Saving 16 bit image data from 12 bit and 14 bit ADC cameras

There are only 8 bit, and 16 bit integer image formats routinely used in astronomical image capture. This means that image data can be saved in 8 bit image containers or in 16 bit image containers (files). Tiff files can be 8 bit or 16 bit. (As an aside, Deep Sky Stacker automatically saves the stacked image in a 32 bit floating point TIFF or FITS file, whatever bit depth and format you chose to save out the stacked image. This is because Deep Sky Stacker, like some other stacking software, sums the registered images into a 32 bit floating point image file). However, the typical images worked on by astronomers are 8 bit or 16 bit integer files. When you save out a stacked image from Deep Sky stacker or Autostakkert! Into a 16-bit file, you are saving the image, scaled to 16 bits, you are NOT saving the average. The Gimp image processor can read and manipulate 32 bit image files and can convert them to 16-bit or 8-bit images AFTER processing is complete.

8 bit data are stored in 8 bit files.

12 bit and 14 bit data are stored and saved in 16 bit files, usually TIFF or FITS files.

All processing is done on the high bit-depth images and only when post-processing is finished is the bit depth converted to 8 bits and saved, usually as an uncompressed PNG file that can then be used for display and sharing.

What to expect when doing 8-bit imaging and 16-bit imaging

8-bit imaging

With 8-bit imaging, what you see on the capture preview screen is what you get in the final data.

Video streams of planets, the Moon or the Sun will appear on the preview screen more or less as they will appear in the final data. 

16-bit imaging

With 16-bit imaging, whether you are using a camera with a 12-bit ADC, a 14-bit ADC or a 16-bit ADC, the image data will be saved in a 16-bit image container. The format I prefer is the TIFF format to the FITS format, although this is very much a personal preference, and Fits files contain rich meta-data that can be very useful.

Unlike 8-bit imaging, what you see in the preview window is not necessarily the same as what you get in the results, although there are several controls that allow you to get a preview that is closer to what you actually save.

I will explain why this is so:

In our example we are using  AstroDMx Capture for macOS to capture the image data. However, everything would work exactly the same way in AstroDMx Capture for Windows, Linux, Raspberry Pi Linux and Chrome OS Linux.

Imagine you are working in 8 bits and that a 1 second exposure makes the image very bright (it will depend what object you are pointing at) and that many of the brighter regions of the image are getting close to say 200 (on the 0 to 255 scale). If you now change to an exposure of 2 seconds, those regions of the image should now have values of about 400; but they can’t because the 8-bit image scale is 0 to 255. Any value of greater than 255 will simply be recorded as 255 and most of the image would be saturated.

However, if the data were not being put into an 8-bit image container, but were being put into a 16-bit container, the values of about 400 would have no trouble going into a container with a brightness range of 0 to 65535. In fact, they would be so far down the bottom of the range that they would be too dim to see.

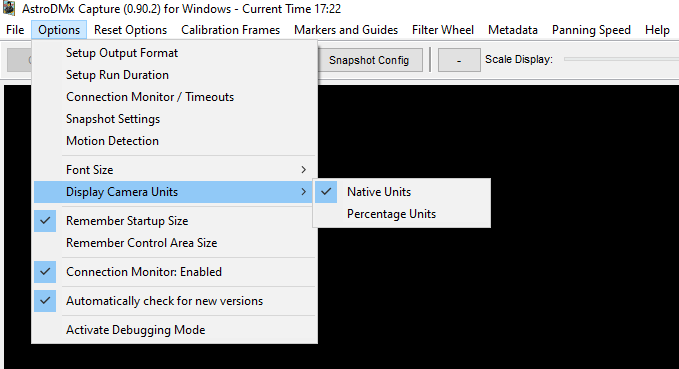
This is where the extra display controls of AstroDMx Capture come in. They are in two categories. 

Transformations

The first category comprises several transformations of the preview display data.

The transformations are applied to the preview image to enable you to see what you are imaging, but they are not applied to the saved data. 

The transformations are:

1 Clipping

2 Linear

3 ArcSinH

4 ArcSinH of the ArcSinH

Transformations 3 and 4 are only for Deep Sky imaging.

There is also a coefficient slider that can be applied to the transformation to control the dark level.

There is a 16 bit brightness control that brings up the brightness of a 16 bit image to help it become visible, and bring it out of the darkness.

Software Controls

The second category of controls  are the non-destructive Software Controls

1 Gamma

2 Brightness

3 Contrast

The term non-destructive means that they only affect the displayed preview image and do not affect the saved data.

By experimenting with the transformations and the other controls it is possible to influence the display  so that you can see what you are imaging. The object is NOT to produce an image that is like the final image once it has been processed, it is just to see what is being imaged and no more.

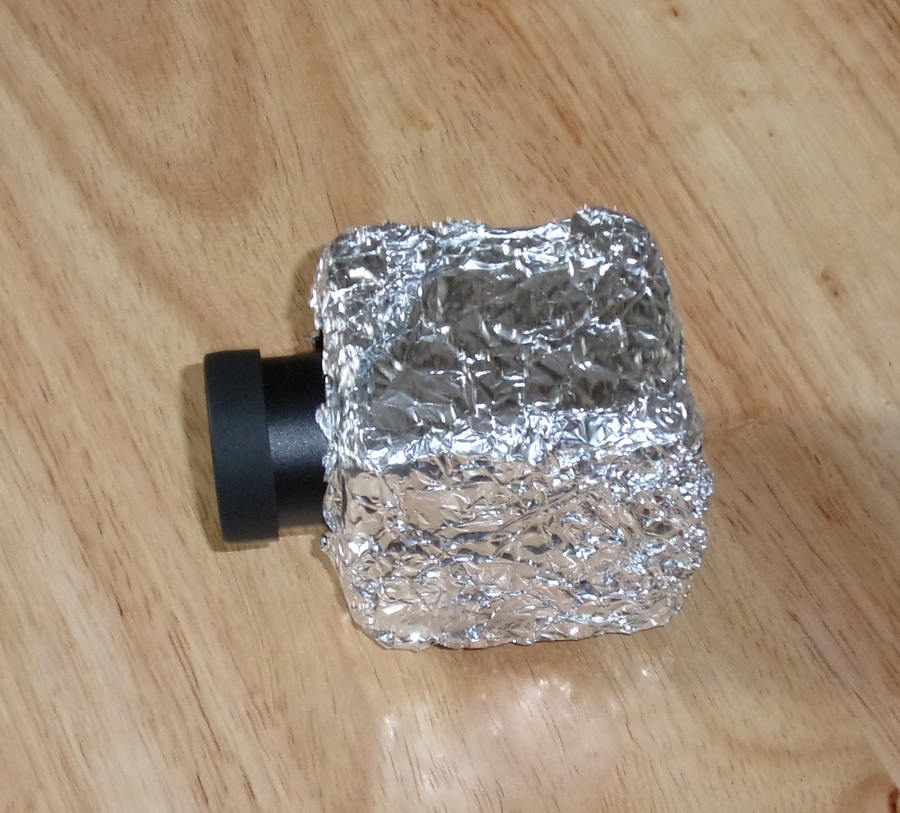
In our example we have the 16-bit Atik camera at the prime focus of a 102mm f/4.5 ED refractor. 40 x 60s exposures with matching dark-frames were captured of our object. A dark frame is an image of the same exposure, captured with the cap on the end of the scope. These dark-frames contain any systematic noise such as hot pixels. Using the transformations and software controls to allow us to see what we are capturing. 

A screenshot of AstroDMx Capture during the capturing process looks like this:

Screenshot of AstroDMx Capture gathering 16-bit image files.


The Transformations and the Software controls have been used to make the object visible (but remember, they do not change the data that are saved). 

However, one of the captured images looks like this:

Everything is hidden in the dark, but we know that it is there! We have another 39 images like this.

We are now going to dark-frame correct and stack the images using Autostakkert! stacking software. Autostakkert will register and stack the 40 images and save out the result in a 16-bit file. (Other software, such as Deep Sky Stacker, Affinity Photo, Registax or Sequator could have been used to do the same job).

When the images are loaded into Autostakkert! and the dark-frame correction applied, (the Master Dark-Frame is subtracted from every image to remove the systematic noise).

This is what the first image looks like in Autostakkert

Once again, everything is still hidden in the dark. However, Autostakkert! has a viewer control that allows the hidden parts to be revealed just to satisfy yourself that it really is there and also help later with alignment points. 

This viewer control does not affect the data, just as the Transformations and Software controls in AstroDMx Capture allowed you to see what you were capturing, but did not affect the data.

The image ‘brightness’ control has been set to 32x.

The object has become visible, but more importantly, the stars in the image have also become visible, so we know where they are.


This allows us to place alignment points/boxes on a large number of stars so that Autostakkert! can use this information to register (align) the images before they are stacked.

Autostakkert Stacks all of the images into a 16-bit file that now contains all of the information accumulated in 40 x 60s exposures i.e. in a total exposure time of 40 minutes.

When we load this file into an image processor such as Photoshop, or as we are using here, The Gimp (GNU Image Processor), as before, everything is hidden in the dark.

However, in this case, there is 40 minutes worth of information hidden in the dark of the 16-bit file.

We now start to apply Curves stretching to the image.

You can see that the Curve has been pulled towards the left. The image is just starting to appear, but clearly more is needed. OK is clicked to preserve the change just made.

Then Curves are invoked more times

This time, when the curve is gently pulled to the left, the object starts to appear. OK is clicked to preserve the change.

Curves are invoked more times and the image gets brighter. The curves are brightening the image in a non-linear way, so that the dimmer regions become brighter without saturating the brighter areas. We pull the curve carefully to make sure that it is not overdone.

When the curve is gently pulled to the left and the base is pulled to the bottom of the histogram at the left, to keep the dark areas dark, the object is made even brighter, with more details appearing in the peripheral areas of the nebula.

Lastly, we invoke Levels to finish the brightening process.

The mid tones have been brightened and the process is virtually finished. The two blue arrows show where the triangular control handles have been pulled.

All that now remains is to save the image and look at the finished image.

This is of course M16, the Eagle nebula. which contains the ‘Pillars of Creation’.

Here are the Pillars of Creation, extracted from the image and placed in a more familiar orientation

 A final word now that all has been revealed.

It might seem that the 40 minutes of exposure time used here is quite a lot, but it is Not! Many astrophotographers will capture many hours of exposure time over many sub frames (individual exposures). This will allow them to extract even more fine and faint detail from the wonderful objects lurking in the dark, night sky.

It is hoped that this article will be studied before doing deep sky imaging, so that the imager properly understands what she/he is doing and what they are trying to acheive.