Saturday 30 September 2023

Walk-through of the processing of Bridge camera solar mages from September 29.

It is sometimes useful to see exactly how an image was produced in terms of its processing:

A Panasonic Lumix DMCFZ72, 60x optical zoom bridge camera fitted with an ICE ND100000 solar filter and mounted on a static tripod was used to capture 93 images of the Sun through high cloud. The images were precisely cropped in Nicola Mackin's AstroCrop before being Stacked in Siril, wavelet processed in waveSharp and post processed in Image Magick and Gimp 2.10.

Capturing through high clouds can stabilise the seeing to an extent. However, a slightly longer exposure is required than would be required when imaging in a clear sky. Any wisps of cloud causing unevenness across the solar disk are averaged out upon stacking.

Click on any image to get a closer view.

The images were transferred from the camera's SD card into a directory (folder) on the computer. It can be seen from the image below that there is a lot of black space around the Sun in the images. The black space is irrelevant to the solar image and would greatly slow down the stacking process.


The data were loaded into Nicola's AstroCrop and a crop-box defined and placed around the Sun in the reference image.

AstroCrop then precisely crops every image so that it matches the cropped reference frame.

The cropped images were placed by AstroCrop into a directory that we called 'cropped'. They were saved as uncompressed .tif files. It can be seen that there is now no wasted black space around the Sun in each cropped image.

The cropped images were then registered and stacked in Siril. The stacked image was saved as a .fit file.

The stacked .fit file was loaded into the Gimp 2.10.

The image was Levels adjusted to improve the contrast and was saved as a .png file.

The .png file was loaded into waveSharp where it was wavelet processed to increase the sharpness.

The sharpened image was largely desaturated in the Gimp.

The colour temperature was adjusted in the Gimp.

The image was given a Sigmoidal contrast Stretch in Image Magick

Animation of the processing results (click to get a better view)

The image was pasted as a new layer onto a new image that was the same colour as the area surrounding the Sun. Then the new layer was given an arbitrary rotation so that it matched the orientation of the Sun as seen in Spaceweather.com. Then the image was flattened and saved.


The final solar image


Sunday 24 September 2023

Imaging the Andromeda galaxy with an Altair Quadband filter

A Stella Mira 66 ED APO refractor with a field flattener and an Altair magnetic 2" filter holder with an Altair Quadband filter was mounted on a Celestron AVX mount. An SVBONY SV405CC 14 bit, cooled CMOS camera was used as a native implemented camera.

Click on an image to get a closer view


The street-light occultation board can be seen on the right of the above image

The Altair Quadband OSC narrowband filter transmits two spectral bands: 

FWHM spans 477.5nm - 512.5nm at the blue-green end of the visible spectrum and FWHM spans 642.5nm - 677.5nm at the red end of the spectrum.

The first band contains the emission lines of H-beta at 486.1nm and OIII at 495.9nm and 500.7nm and is centred on 495nm.

The second band contains the emission lines of H-alpha at 656.3nm and SII at 672.4nm and is centred on 660nm.

The Filter is called ‘Quadband’ because it contains the emission lines of these four elements.

Each of the two transmission bands has a FWHM of 35nm and the rest of the visible spectrum is essentially blocked. The filter’s two spectral bands are quite wide and it is an effective light pollution filter.

Capturing flat fields with an illuminated tracing screen


PHD2 auto pulse-guiding was done by a separate Linux computer also running indoors. An SVBONY SV165 guide scope with a QHY-5II-M guide camera was used for auto-guiding.


AstroDMx Capture captured 1 hour 15 minutes worth of 5 minute exposures of M31 the Andromeda galaxy


The data were calibrated an stacked in Deep Sky Stacker, processed in the Gimp and the Starnet++ Gimp plugin, Neat Image and Photoscape X Pro.

M31 the Andromeda galaxy


Testing the INDI cameras implementation in AstroDMx Capture

Equipment

Stella Mira 66 ED APO refractor with a field flattener and Altair magnetic 2" filter holder with an Altair Quadband filter, mounted on a Celestron AVX mount. An SVBONY SV405CC 14 bit, cooled CMOS camera was used as an INDI camera rather than as a native implemented camera that we would normally use. The cable management was as previously described with the weight of the data and power cables being held by the mount rather than he scope. This leads to better tracking and auto-guiding.


As usual, the mount was placed on marks on the ground which quickly gives quite a good polar alignment if care is taken with the placement of the tripod feet.


Mount and focus control were done by AstroDMx Capture via an INDI server running on the imaging computer indoors.

AstroDMx Capture sent the mount with plate solving, to the star Altair for focusing with a Bahtinov mask


Auto pulse-guiding was done by a separate Linux computer also running indoors (although it could have been done if required, on the imaging computer). An SVBONY SV165 guide scope with a QHY-5II-M guide camera was used for autoguiding.


For testing the INDI cameras implementation in AstroDMx Capture, we chose the SV405CC 14 bit OSC as the example INDI camera.

In the AstroDMx Capture Connect Camera dialogue, there is a drop down menu  that allows the selection of the INDI framework or the Native camera implementations.


Nicola has organised the AstroDMx Capture GUI so that INDI camera controls are presented in the same way as native cameras. However AstroDMx Capture is limited to what camera functions have been implemented in INDI. For example in the native implementation of the SV405CC, Auto white balance and One touch white balance is implemented, but neither of these are implemented in INDI. White balance control is limited to RGB sliders.

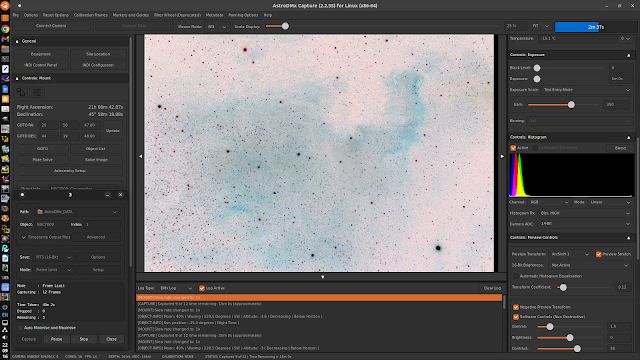
We did not attempt to use the RGB sliders so we left them at the INDI default which produced a very green preview.

AstroDMx Capture captured 1 hour’s worth of 5 minute exposures of the North America Nebula

The overall green hue can be seen clearly.

With a negative preview


AstroDMx Capture has among its preview controls, a non-destructive control that we call DMx Auto WB. This produces a more pleasing white balance for the preview but does not affect the data saved in 16 bit images.


The preview when using the DMx Auto WB control

A much more pleasing preview was produced

With a negative preview


The INDI camera implementation in AstroDMx Capture worked well. The DMx Auto WB proved to be very useful for producing a pleasing preview whilst not affecting the saved data.

 The captured data were calibrated and Stacked in Deep Sky Stacker, processed in the Gimp and the Starnet++ Gimp plugin, Neat Image and Photoscape X Pro. 

The North America nebula


Monday 18 September 2023

Running Microsoft ICE (Image Composite Editor) in UbuntuCinnamon Linux via Wine


For a number of years the Microsoft Research Division of Microsoft Corporation produced, and distributed freely, an advanced panoramic image stitcher called ‘Image Composite Editor’ ICE. Version 1.4.4 released in 2011, was for 32bit Windows and later version 2.0.3 released in 2015, was for 64bit Windows. These were very powerful programs and Windows using photographers were surprised and dismayed when, in 2021 Microsoft discontinued the download site for ICE for no apparent reason.


Fortunately, at the time of writing, version 1.4.4 can still be downloaded from http://www.oldversion.com/windows/download/microsoft-image-composite-editor-1-4-4 and version 2.0.3 can be downloaded from https://archive.org/download/ICE2.0.3For64BitWindows


We have constructed a Wine Vat for version 1.4.4 of ICE that runs well in UbuntuCinnamon Linux with just one limitation that we have not yet resolved: When ICE has stitched a number of images together into a mosaic, it can only save the resulting image as a .bmp image file. This it not a serious limitation in our opinion as .bmp files are uncompressed and can be converted at a later time into another file format if required.

We have not yet tried to build a Wine Vat for version 2.0.3 so at this stage we don’t know whether it would suffer the same limitation or even if it will work at all.

We prefer version 1.4.4 as it does not contain embedded adverts as does version 2.0.3.


Creating a specific, 32-bit Wine ‘Vat’ for Microsoft ICE 1.4.4.0


Please note: we have used a monospaced font in this article so that it is possible to distinguish spaces which are significant in what has to be typed into the terminal.


Download Microsoft ICE, Image Composite Editor into the Downloads directory (folder).


The first thing to do is to download Microsoft Image Composite Editor from www.oldversion.com/ as indicated above.


1      Open a Terminal and type the following

2      cabextract

3      If cabextract exists on your system it will respond  with ‘cabextract: No cabinet  files specified.’ If the response indicates that cabextract is not present then in an rpm based system type

4      sudo dnf install cabextract or in a Debian based system type sudo apt install cabextract

5      export WINEPREFIX=$HOME/.wine32_ICE

6      export WINEARCH=win32

7     winecfg (starts the Wine Configuration tool which will appear as a window.

Set the Windows version to Windows 7

8     mkdir $HOME/ICE

9     cd $HOME/ICE

10   wget https://raw.githubusercontent.com/Winetricks/winetricks/

master/src/winetricks   

11    chmod +x winetricks

12    bash ./winetricks corefonts

13    Wait until the process completes.

14    bash ./winetricks dotnet46

15    Wait until completion. This could take some time At some stage you will have to accept the dot NET Framework licence in setup and click the Install button. Later you will have to tell the process to  proceed and accept more .NET licences and click Install; later click on Finish. Keep going (You will have to accept more .NET licences). You may be invited to restart the computer, but DON'T, you should select Restart Later. Wait for all the procedures to complete and don’t worry about any error messages in the terminal window during these processes.

16    Move the ICE 1.4.4 .msi file from the Downloads directory into the directory created at point 8   

17    In the still open Terminal enter

wine msiexec /i *.msi

This will launch the Microsoft Image Composite Editor Setup Wizard,

ICE will now install on your system and you follow the instructions as usual. We selected ‘Just for me’ and allowed ICE to launch.

ICE can be slow to start on some systems.

Reboot the computer to complete the process.


In UbuntuCinnamon, Microsoft ICE was placed in the menus with All Applications as well as in the Wine menu.


In other distros, this may not happen, and a launcher may have to be made.


What we have called a 'Wine Vat' (others call a 'Wine Bottle') is also called a "Wine prefix." It is a separate directory containing all the necessary files and configurations to run a Windows application within the Wine environment. Each Wine Vat acts as a self-contained environment that isolates the Windows application from the rest of the system.


Testing the ICE installation


To test this Wine Vat installation of ICE on UbuntuCinnamon we stitched together an image of the North America nebula and the Pelican nebula that other stitching programs have found to be challenging due to there being minimal overlap between the images as well as their orientations being somewhat different.


The North America Nebula


The Pelican nebula


Microsoft ICE stitching the two images together


The Saved .bmp image


We cannot guarantee that this procedure will work on your installation of Linux, but we found it to work well on UbuntuCinnamon notwithstanding the .bmp saving limitation.


Friday 15 September 2023

The Tulip nebula SH2-101 with an SV605CC

Two and a half hours of data: H-alpha (1 hour), OIII (40 min) and SII (50 min) on the Tulip nebula captured with AstroDMx Capture through a William Optics 81mm APO refractor fitted with a ZWO EAF focuser, an 0.8 reducer/flattener, an Altair magnetic filter holder v2, a manual camera rotator and an SV605MC cooled monochrome, 14 bit CMOS camera. The equipment was mounted on a Celestron AVX mount. An SVBONY SV165 guide scope with a QHY-5II-M guide camera was used for guiding.

Clicking on an image will give a closer view

The equipment imaging near the zenith

We have adopted a more rigorous cable management system for our testting which can be seen quite well here. Apart from the usual reasons for managig the cables, such as reducing the likelyhood of snagging, neatness and greater ease in putting up and taking down the cables; a major benefit is that there is absolutely no cable weight pulling down from the camera end of the setup. The signal cables are routed via cable management clips on the tube rings to within a cable management tube, and the camera power cable is routed via cable management clips on the tube rings and attached to the outside of the cable managemen tube. However, the cable management tube is suspended from a cable management clip on the mount iteself which takes all of the weight of the cables. The greatest benefit of this is that we experience even better alignment, tracking and guiding. We have adopted this system for all of our test rigs. In some cases the cable management clips are attached to the OTA itself if tube rings are not used.

As usual, the mount was placed on marks on the ground which quickly gives quite a good polar alignment if care is taken with the placement of the tripod feet.

Mount and focus control were done by AstroDMx Capture via an INDI server running on the imaging computer indoors.

Auto pulse-guiding was done by a separate Linux computer also running indoors (although it could have been done if required, on the imaging computer). The way we do it facilitates the involvement by two people. Although it would be possible to just leave the equipment to get on with the imaging, we prefer to be involved with both the imaging and the auto-guiding in real time. 

AstroDMx Capture sent the mount with plate solving, to the star Altair for focusing with a Bahtinov mask.


PHD2 auto pulse guiding was set up and calibrated, and then optimised with Guiding assistant.

The Tulip nebula, SH2-101 has an HD star, HD 189777, conveniently placed within it. Once guiding had been established and guiding assistance performed, guiding was switched off and AstroDMx Capture sent the scope/mount to HD 189777 with repeated plate solves until an accuracy of 5 arc seconds was achieved. Then guiding was switched on again. This placed the Tulip nebula in the middle of the camera’s field of view.

AstroDMx Capture captured 1 hour’s worth of 5 minute exposures of the Tulip nebula and surrounding nebulosity using a H-alpha filter.


Using a negative preview


A meridian flip was performed with repeated plate solving until an accuracy of 5 arcseconds was achieved in the centering of HD 189777.

Then 40 minutes worth of 5 minute exposures were captured using an OIII filter and 50 minutes worth of 5 minute exposures using an SII filter. The number of frames captured was determined by available time and occasional cloud ingress.

Matching Dark frames, Flat fields, Dark Flats and Bias frames were also captured.

The three data sets were calibrated and stacked in Deep Sky Stacker using the best frame from the H-alpha images as the reference frame. This way, all three channels were perfectly co-aligned.

The images were processed in the Gimp 2.10, Starnet++ Gimp plugin, Neat image and Photoscape X Pro.

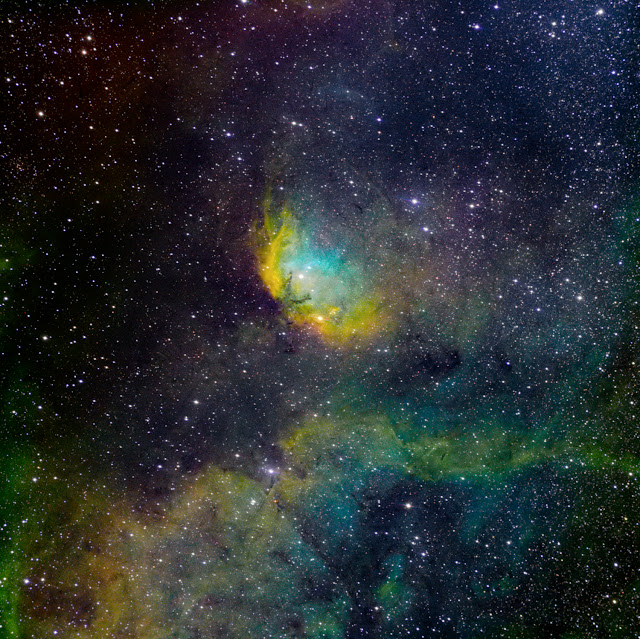
The Tulip nebula in the SHO Hubble palette


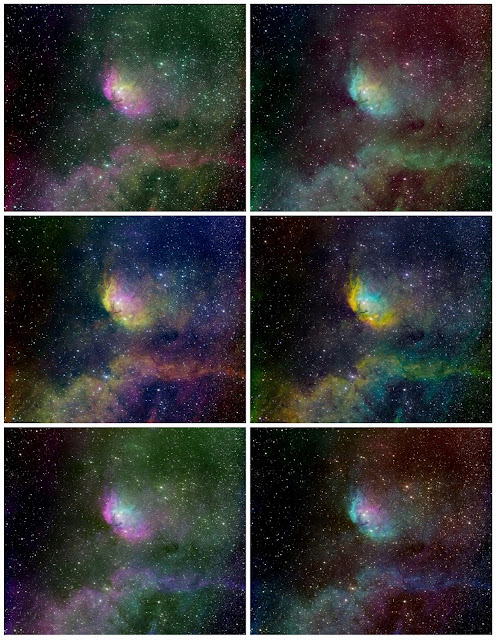
The other named palette; HOS, is the Canada, France, Hawaii telescope palette and is the top left palette in the montage below.

The Tulip nebula was rendered in all 6 of the possible palettes which are presented in the montage below. The Palettes are arranged in the montage according to the following table where H-alpha, OIII and SII are assigned to the RGB colour channels as shown. e.g. SHO means: S assigned to R; H assigned to G; and O assigned to B etc.


Palette Montage


There have been some slight delays in the development of AstroDMx Capture as we have been building a much more powerful Ryzen 9 zen-4 computer for software development. Development is now back on track, and with some improvements to exposure control, and SDK updates, the next release shouldn’t be too long.

Nicola has laid the groundwork for the implementation of the INDIGO framework, which will be the next major advance in this multi platform capture and control software.


Thursday 14 September 2023

Imaging the Sun in white light with an SV705C.

A motor-focus modified Skymax127 Maksutov was fitted with a photographic grade Baader solar filter. An SV705C, fitted with an IR/UV cut filter was placed at the Cassegrain focus.

The equipment


Showing electronic solar finder


The electronic finder comprised an SV905C CMOS camera connected to an Angeleyes solar finder by means of a Barlow body.

The cable management was organised as usual so that the weight of the imaging cables did not pull down under gravity with the possibility of introducing torque forces on the imaging camera and causing slippage and rotation. The cables are supported in such a way that their weight is born entirely by the mount and not by the scope. Another advantageous result of this setup is that tracking is improved.

On a previous night the scope/camera was focused on the bright star Altair using a Bahtinov mask to achieve optimal focus.


This focus was retained until this solar imaging session.

Two instances of AstroDMx Capture were run for a short time. One streaming data from the SV705C imaging camera and the other streaming data from the SV905C based electronic solar finder.

Data streaming from the solar finder

The Sun is centred in the finder which is fairly well co-aligned with the imaging scope and placed the Sun on the sensor of the imagin camera.

Data streaming from the imaging SV705C camera.


When the Sun has been acquired in the imaging camera’s field of view, the second instance of AstroDMx Capture is no longer required and can be stopped to save resources.

Using a resolution (ROI) of 800 x 600, AstroDMx Capture was used to capture a 5000 frame SER file of the active region AR 3423.


The best 20% of the frames in the SER file were stacked in Autostakkert!, wavelet processed in waveSharp and post processed in the Gimp 2.10

AR 3423


The process was repeated for he active regions AR 3425 and AR 3433 to produce details of these areas.

AR 3425


AR 3433


Microsoft ICE was used to make two mosaics from regions that were imaged at full resolution. Due to the limitations of the required overlapping features it was impossible to produce a mosaic of the whole disk. However, the two mosaics were able to show the active regions in relation to each other and the solar disk.

In this mosaic AR 3429, AR 3425, AR 3423, AR 3431 and AR 3430 can be seen.


In this mosaic AR 3433, AR 3429, AR 3425 and AR 3431 can be seen, so all of the sunspot groups are accounted for.

The SV705C OSC CMOS camera proved to be a competent solar imager in this white light imaging session.

In AstroDMx Capture it is now possible to type in values for microsecond exposures whereas previously a slider had to be used. In order to do this ‘us’ is used to represent ‘µs’ this is, of course, because there is no ‘µ’ on the computer keyboard. A ‘u’ is a reasonable approximation to the micro symbol ‘µ’. So, for example, if we wish to type in 200 microseconds, we simply type in ’200us’ and press Enter. The slider is still, of course, available. This feature will be in the next release of AstroDMx Capture, which Nicola is currently updating with new camera SDKs and is also preparing for the implementation if INDIGO.