Tuesday 31 January 2023

M42/43 from very short exposures

An ALTAIR STARWAVE 60 ED Imaging Refractor with an 0.8 reducer/flattener at f/4.8 was mounted on an AVX mount. An Altair Quadband, narrowband filter was placed in the optical train in an Altair magnetic filter holder. An SVBONY SV605CC OSC cooled CMOS camera was mounted on the scope. This camera produces no significant amp glow.

An extension cord was used to connect the mount to the Hand controller which was indoors with the Imaging computer. The hand controller was connected to the imaging computer via USB to connect to the INDI server on the virtual Linux machine.


As usual, the mount was placed on marks on the concrete base which give a reasonable polar alignment. AstroDMx Capture passed the time, altitude and location coordinates to the hand controller via the INDI server. The hand controller which now contained all of the correct information was set to its previous alignment and was unparked by AstroDMx Capture.


These data were obtained during experiments on the spacing for the focal reducer and exploited a short period of relatively clear sky.


AstroDMx Capture for Windows was used  to send the mount/scope to the star Rigel for focusing using a Bahtinov mask, and then to the Orion nebula. The field was plate solved and the object centred.


AstroDMx Capture was used to capture 50 x 5s exposures of the Orion nebula. This exposures enabled the capturing of the trapezium region without overexposing this region


The data were stacked and partly processed in Siril and post processed in the Gimp 2.10 and Neat Image.


The stack was of a total exposure time of only 250s but nevertheless, when the resulting image was stacked, considerable detail was revealed.


The Orion Nebula


The RGB image was derived from quadband narrowband data. By working with colour curves and channel mixing it is possible to produce pleasing alternative renderings


Alternative rendering


It is interesting to note the amount of detail that was captured by 250s worth of 5s exposures. It would have been better to capture 100 images as this would have resulted in an increase in S/N by a factor of 10 rather than the 7.07 that was produced by the 50 images. Also if a number of significantly longer exposures had been captured, considerably more interstitial nebulosity would have been detected whilst overexposing the centre of the nebula. The construction of a high dynamic range image would have been possible, to combine the fine structure of the trapezium region with the billowing nebulosity at the extremities of the nebula and the surrounding region

Sunday 29 January 2023

Advanced AstroDMx Capture for Windows with an INDI server on a Windows computer.

 Advanced AstroDMx Capture for Windows with an INDI server on a Windows computer.


At this point I should point out that it is not obligatory to run an INDI server with AstroDMx Capture. It is best in any case to connect directly to natively supported cameras. The INDI server is only required for the use of the advanced features such as mount control and focuser control.


To date we have been running an INDI server on a Raspberry Pi Linux machine. The Raspberry Pi can be out with the scope as with the setup below where the INDI server is being used by AstroDMx Capture to control the mount, a focuser, and PHD2 auto-pulse-guiding.


The system we have been using is shown in this diagram


With Posix compliant Operating systems such as Linux and macOS, the INDI server could be run on the imaging computer that is running AstroDMx Capture.


The problem for Windows computers however, is that Windows is not sufficiently Posix compliant to be able to run an INDI server directly.


Not everyone has a Raspberry Pi computer. Moreover, at the time of writing, due to global supply problems, it is almost impossible to obtain a Raspberry Pi at its intended very low cost. Not everyone has an older computer that they could rejuvenate by putting a Linux operating system on it and also install an INDI server, so the following system is probably the most appealing solution.


As we showed HERE in February 2020, it is a simple matter to install a virtual Linux machine on a Windows computer. (That was back in the days before Nicola had ported AstroDMx Capture over to Windows, and this was a way of running AstroDMx Capture on a Windows computer).


Screenshot of a Windows 11 computer running an Oracle Virtual Box Lubuntu virtual machine.


The USB ports have to be set to pass through to the virtual Linux machine so they are accessible to the INDI server running on it.


Now the virtual Linux machine running on Windows is still useful but this time for running an INDI server on the Imaging computer that is running AstroDMx Capture for Windows.


This is the system that we have been testing recently using a single Windows computer to run AstroDMx Capture for Windows plus the INDI server.


Nicola has implemented an experimental dark theme for AstroDMx Capture for Windows, bringing it into line with the versions for the other operating systems. She has also made some improvements to the UI that will make their way into the release version.


We normally use a separate Linux computer on which to run the PHD2 guiding software which connects via the network to the same INDI server. However, it is possible to run PHD2 also on the imaging machine whatever the operating system. It is best to run the different pieces of software on different desktops of the OS.


For these experiments two telescope/camera systems were used:


An Altair Starwave ASCENT 60ED doublet refractor with an 0.8 reducer/flattener and an Altair quadband filter in conjunction with a prototype SVBONY SV605MC monochrome, 14 bit CMOS camera using a beta Windows SDK, or a William Optics 81 mm ED APO refractor with a 0.8 flattener/reducer and an Altair quadband filter and an SV605CC OSC 14 bit CMOS camera.


On two evenings the scopes were separately mounted on a Celestron AVX GOTO mount and an extension cord was used to connect the mount to the Hand controller which was indoors with the Imaging computer. The hand controller was connected to the imaging computer via USB to connect to the INDI server on the virtual Linux machine.


PHD2 autoguiding the Altair session


An SVBONY SV165 guide-scope fitted with a QHY-5II-M guide camera was mounted on the imaging scope and both the imaging scope and the guide scope were fitted with Kiwi USB powered dew heater strips. The USB power was provided by a mains USB adapter.


As usual, the mount was placed on marks on the concrete base which give a reasonable polar alignment. AstroDMx Capture passed the time, altitude and location coordinates to the hand controller via the INDI server. The hand controller which now contained all of the correct information was set to its previous alignment and was unparked by AstroDMx Capture.


First setup: 

Altair Starwave ASCENT 60ED doublet refractor with an 0.8 reducer/flattener and an Altair quadband filter in conjunction with a prototype SVBONY SV605MC monochrome 14 bit CMOS camera.


The mount/scope was sent to a bright star to check focus with a Bahtinov mask


The mount/scope was sent by AstroDMx Capture for Windows to the Horsehead/Flame nebulae, plate solved and the object centred in the field of view.


AstroDMx Capture for Windows was used to capture 20 x 3min FITS exposures.


The data were stacked and partly processed in Siril, and post processed in the Gimp and PT Photo Editor-Pro.


The Horsehead and Flame nebulae


The mount/scope was sent by AstroDMx Capture for Windows to the California nebula, plate solved and the object centred in the field of view.


AstroDMx Capture for Windows was used to capture 16 x 2min FITS exposures.


The data were stacked and partly processed in Siril, and post processed in the Gimp and PT Photo Editor-Pro.


The California nebula


Second Setup: 

William Optics 81 mm ED APO refractor with a 0.8 flattener/reducer and an Altair quadband filter and an SV605CC OSC 14 bit CMOS camera.


The mount was set up exactly as before. AstroDMx Capture passed the time, altitude and location coordinates to the hand controller via the INDI server. The hand controller which now contained all of the correct information was set to its previous alignment and was unparked by AstroDMx Capture.


AstroDMx Capture for Windows sent the mount/scope to the bright star Betelgeuse to check focus with a Bahtinov mask.


The field of view was plate solved:


And the star was centred in the field of view to facilitate focusing.


The mount/scope was sent by AstroDMx Capture for Windows to NGC2264 The Cone  nebula/Christmas Tree cluster,  plate solved and the object centred in the field of view.


AstroDMx Capture for Windows was used to capture 18 x 3min FITS exposures of NGC2264


The data were stacked and partly processed in Siril, and post processed in the Gimp, Starnet ++ v2 and PT Photo Editor-Pro.


NGC2264


The mount/scope was sent by AstroDMx Capture for Windows to The Monkeyhead nebula,  plate solved and the object centred in the field of view.


AstroDMx Capture for Windows was used to capture 20 x 3min FITS exposures of The Monkeyhead nebula


The data were stacked and partly processed in Siril, and post processed in the Gimp, Starnet ++ v2 and PT Photo Editor-Pro.


The Monkeyhead nebula


Channel mixing and colour curves in the Gimp were used to produce an alternative rendering of the Monkeyhead nebula.


Other features of AstroDMx Capture that were explored and worked correctly were:


(1) When the mount is overdue for a meridian flip, AstroDMx Capture can capture a snapshot of the field of view being imaged. Then AstroDMx Capture can instruct the mount to perform a flip.

When the flip is completed AstroDMx Capture can plate solve the snapshot and then instruct the mount/scope to centre the field of view so that exactly the same field of view as before the flip is available for capture. The Flip and Flop controls can be used to place the orientation of the image to be the same as before the meridian flip.

If a camera is used that produces no amp glow such as the two cameras used in these sessions (the SV605CC and the SV605MC), then imaging can be resumed and the two data sets combined (assuming no dark frames are used) for stacking. If calibration frames are used (and it is the conventional wisdom that they should be) then the pre and post median flip image sets must have their own calibration frames. Nevertheless, plate solving a snapshot to exactly relocate the field of view can be very useful.


(2) Planetarium software, such as Stellarium, can be set up to use the same INDI server and can be used to select a star or extended object and instruct the mount/scope to go to the object. In setups such as the one we use where the mount is placed on marks on the concrete base, the polar alignment is not perfect, and is slightly different with each imaging session. This results in Stellarium not pointing at exactly the same point in the sky after plate solving because Stellarium knows nothing about the pointing error of the mount. This does not matter at all. AstroDMx Capture has an update button that updates the RA and DEC values from the mount after slews have been initiated by external software.


(3) AstroDMx Capture now has available for selection the Hip and HD star catalogues so that any one of a huge number of catalogued stars can be selected and the mount/scope sent to the star. This can be very useful for composing the image of an extended object by centering the selected star which is suitably located ‘within’ the extended object.


Sunday 22 January 2023

First Light for AstroDMx Capture for macOS with advanced functionality and a paradigm shift in practice.

First Light for AstroDMx Capture for macOS with advanced functionality and a paradigm shift in practice for object placement.

Nicola has implemented the advanced functionality in AstroDMx Capture and improved the dark theme rendering for macOS.


Equipment used


A Celestron AVX mount was placed on marks on the concrete base where it is polar aligned if placed carefully. Of course, the accuracy of the polar alignment under these circumstances varies from session to session, depending on the fine placement of the tripod feet on the concrete base.


An ALTAIR STARWAVE 60 ED f/6 Imaging Refractor with field flattener was mounted on an AVX mount. Either a UV/IR cut filter or an Altair Quadband, narrowband filter was placed in the optical train in an Altair magnetic filter holder. 


An SVBONY SV605CC OSC 14 bit CMOS camera was attached. An SVBONY SV165 guide-scope fitted with a QHY-5II-M guide camera was mounted on the imaging scope and both the imaging scope and the guide scope were fitted with Kiwi USB powered dew heater strips. The USB power was provided by a mains USB adapter.


The hand controller of the mount was connected to a Raspberry Pi running an INDI server and communicated with the MacBook Air indoors computer, running AstroDMx Capture for macOS, via WiFi.


AstroDMx Capture passed the time, altitude and location coordinates to the hand controller via the INDI server. The hand controller which now contained all of the correct information was set to its previous alignment and was unparked by AstroDMx Capture.


Of course, using the ‘previous alignment’, which could actually have been aligned several sessions previously, means that the alignment is far from perfect. However, the place-solving functionality means that this doesn’t matter at all.

A UV/IR cut filter was placed in the magnetic filter holder.


The mount/scope was sent by AstroDMx Capture to Deneb so that the scope could be focused using a Bahtinov Mask.

The mount/scope pointed in the close vicinity of Deneb. The field was plate solved and the scope was sent to Deneb which was centred. A Bahtinov mask was placed on the imaging scope and the star was brought to focus.


Screenshot of Deneb focused with the aid of a Bahtinov mask


The mount/scope was sent to M31 by AstroDMx Capture. The galaxy was in the field of view but not centred. (It could just as easily have been just outside the field of view, depending on the quality of the alignment). 


The field of view was then plate-solved by AstroDMx Capture for macOS


Now M31 was centred in the field of view


AstroDMx Capture for macOS was used to capture 38 x 1m FITS exposures of the Andromeda galaxy.


The images were stacked and partly processed in Deep Sky Stacker and post processed in the Gimp 2.10.


The Andromeda galaxy


The IR/UV cut filter was replaced by an Altair Quadband narrowband filter and the scope was refocused on another star.


AstroDMx Capture for macOS then sent the mount/scope to the Seagull nebula, but a method was used that amounts to a paradigm shift in the composing of images for capture.

It is frequently found that if an extended object such as the Seagull nebula is centred in the field of view by plate solving, the composition is not quite what the imager would have wanted. It is often better to centre the field of view on a selected star, such that the positioning of the extended object is improved.


To this end, Nicola has now implemented the HiP and the HD star catalogues with options to be selected for searching purposes.


If the mount/scope was sent to the star HiP 34234, HD 53755, plate solved and centred:


The Seagull nebula is better placed giving a better composition for imaging


AstroDMx Capture for macOS captured 10 x 6m FITS exposures of the Seagull nebula which were stacked and part processed in Siril and post processed in the Gimp 2.10 and Neat Image.


MacBook Air computer indoors capturing data on the Seagull nebula


The Seagull nebula. IC 2177


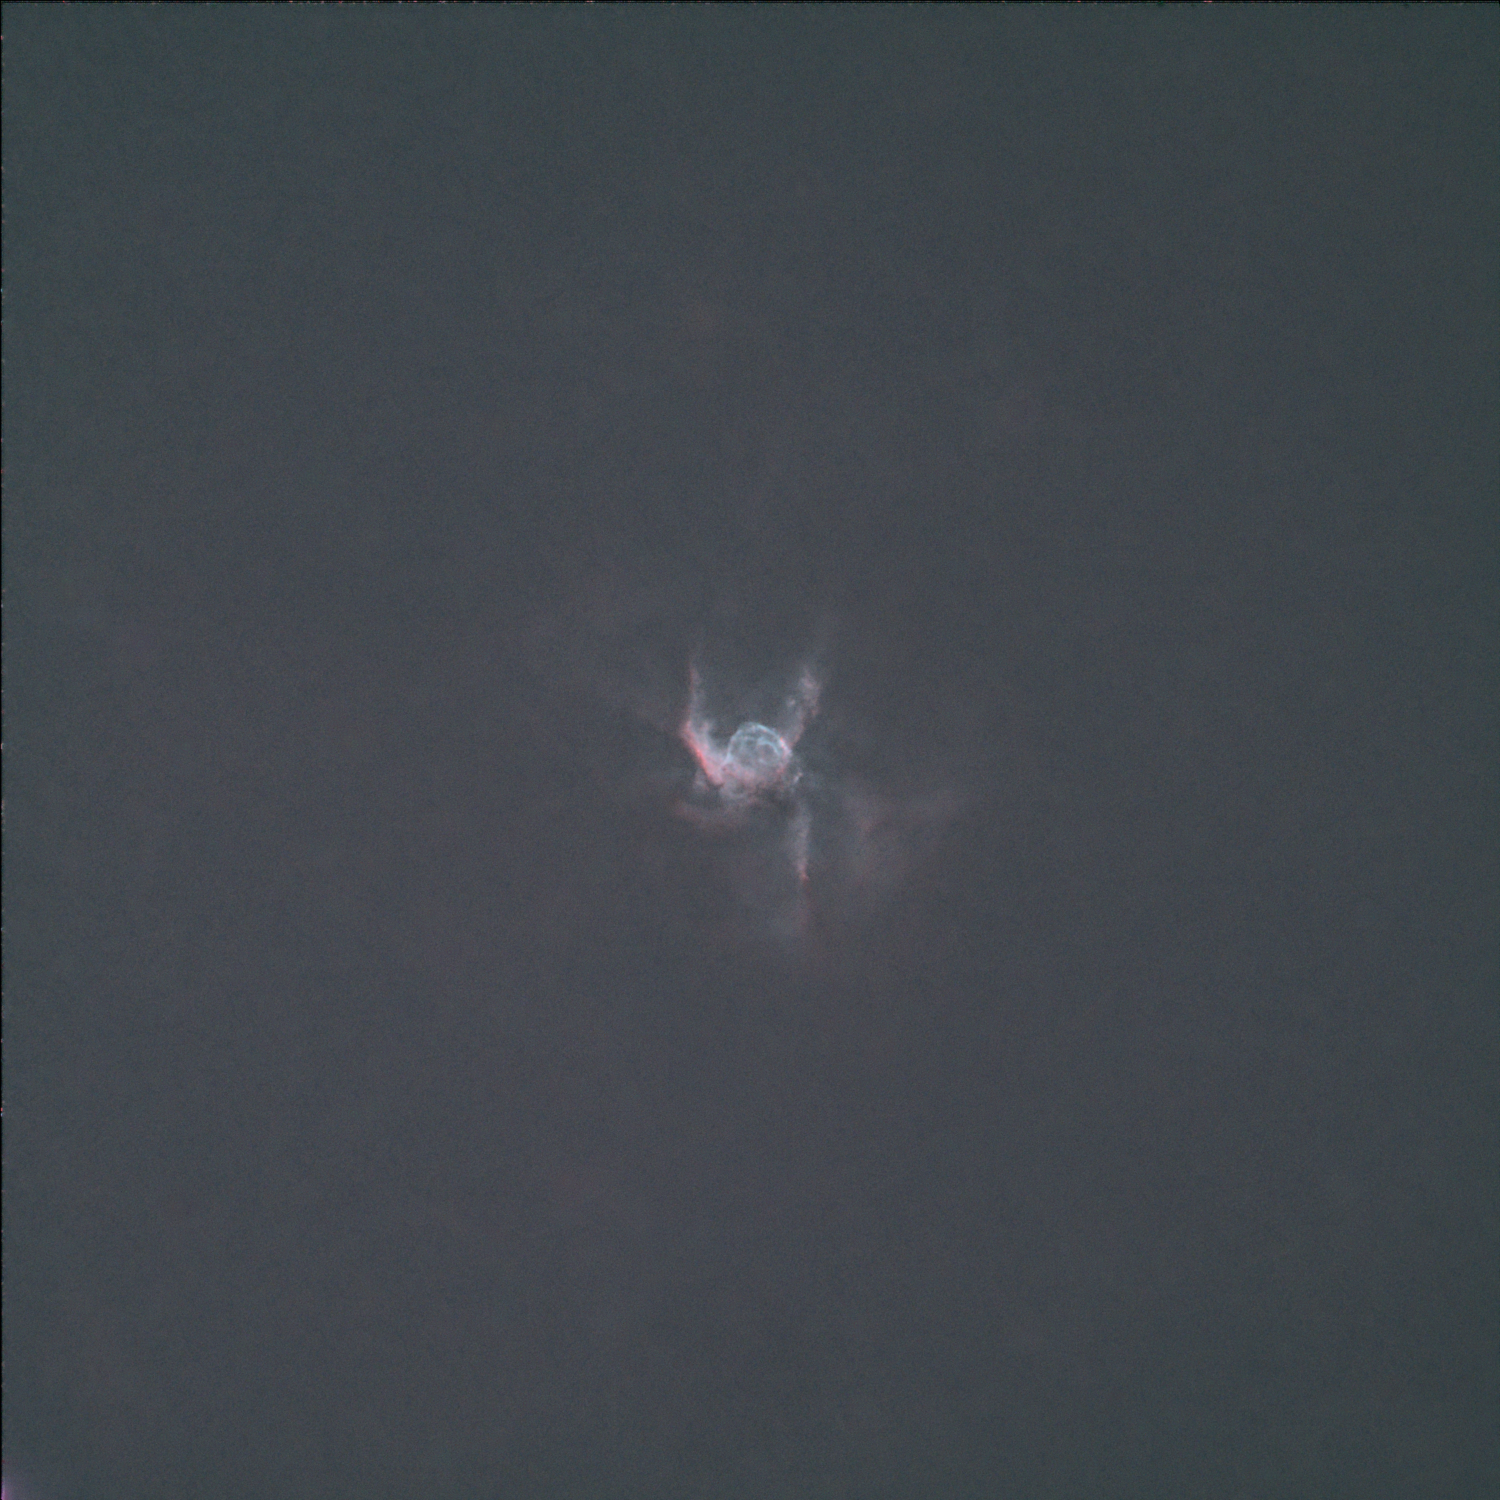
The mount/scope was then sent by AstroDMx Capture for macOS to Thor’s Helmet. This object is quite small so the field of view was plate solved and the object was centred in the field of view.


AstroDMx Capture for macOS was used to capture 15 x 6m FITS exposures. The images were stacked and mildly stretched in Siril.


Starnet ++ v2 was used to remove the stars from the image revealing just the nebula and background.


By subtracting the above image from the original image, an image containing just the stars was produced which was then processed slightly to reduce the false colours and prominence of the stars.


The starless image of the nebula was noise-reduced in Neat image and further enhanced in the Gimp 2.10 and PT Photo Editor. Finally the processed star image was added to the processed nebula image to reconstruct the field of view showing Thor’s Helmet in the starfield.


AstroDMx Capture for macOS worked well with the equipment used and with the advanced functionality. The procedure for centering a field of view on a star rather than on an extended object demonstrated that this can be a superior way of positioning an extended object in the field of view.


Thursday 19 January 2023

Combining images from different telescopes with SV605CC and SV605MC cameras.

Combining images from different telescopes with different cameras.

The telescope/camera combinations were:

  • William Optics Super Zenithstar 81mm ED Doublet APO refractor at f/5.5 with x0.8 reducer/flattener, (F=445.5mm) and an SVBONY SV605MC mono camera fitted with an Altair quadband filter. The field of view of this setup is FOV: 1.45° x 1.45° Resolution, 2.12 sq°.
  • ALTAIR STARWAVE 60 ED f/6 Imaging Refractor with field flattener (F=360mm) and an SVBONY SV605CC OSC colour camera fitted with an Optolong LeNhance triband filter. The field of view of this setup is FOV: 1.80° x 1.80° Resolution, 3.24 sq°.

Both cameras use a Sony IMX533 CMOS sensor. The SV605CC uses the colour sensor and the SV605MC uses the monochrome version of the sensor. The pixels in these cameras are 3.76µm x 3.76µm in size.


AstroDMx Capture was used to capture data from the two systems described above.


One reason for combining data from a monochrome camera and a colour camera is to increase the detail in the final image by incorporating the extra detail from the monochrome image. One shot colour cameras lose some spatial detail during the debayering process, although with small pixels, this is not usually serious.  Due to the different focal lengths of the two systems, images are at different scales and this must be corrected for when combining the colour image captured with the Altair system and the monochrome image captured with the William Optics system.


Picture Window Pro 2.5 running in Wine was used to combine the two images. Picture Window Pro 8.0 will also do the job, but I prefer the interface and modus operandi of 2.5.


Colour image of the Rosette nebula with the Altair 60mm scope


Monochrome image of the Rosette nebula with the William Optics 81mm scope


It can be seen that the monochrome image scale is larger than the colour image scale


Picture Window Pro 2.5 running in Wine was used to combine the two images. Picture Window Pro 8.0 will also do the job, but I prefer the interface and modus operandi of 2.5.


Picture Window Pro 2.5 combining the images using  2 points, shift, rotate and scale

The difference in image scale can be seen nicely in this screenshot


The colour data have been overlaid on the monochrome data to combine the images into one with less saturation.


The saturation can be increased as required in Picture Window Pro or another application such as the Gimp 2.10.


By mixing channels and varying the colour components of Curves, it is possible to render the image in a variety of ways, including a palette resembling the Hubble palette.


Pleasing and valuable results can be obtained by manipulating the colour channels from images produced by OSC narrowband filters. OSC narrowband filters can also be used with monochrome cameras to produce luminance data and the high resolution monochrome data can profitably be combined with colour data to produce high resolution colour images.