Tuesday 29 March 2022

Selected SVBONY cameras for solar imaging.

Selected SVBONY cameras for solar imaging.

The cameras examined here are the SV305M Pro 12 bit monochrome CMOS camera and the SV405CC OSC TEC Cooled 14 bit CMOS camera.

SV405CC

The SV405CC was placed at the Cassegrain focus of a Skymax127 Maksutov mounted on a Celestron AVX mount. The telescope was fitted with a photographic grade Baader solar filter and the camera was fitted with a Baader Ca K-line filter. AstroDMx Capture was used to capture two overlapping SER files with the camera in mono mode.


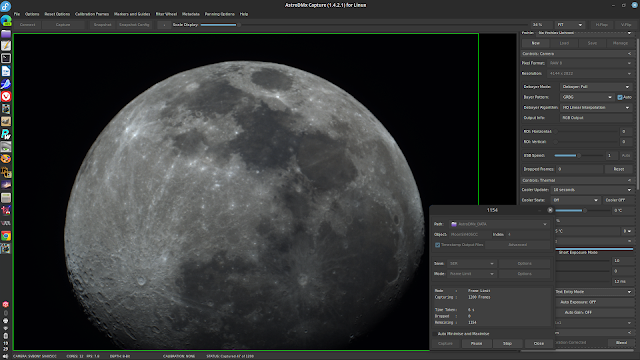
Screenshots of AstroDMx Capture saving the overlapping 2000-frame SER files at maximum resolution of 4144 x 2822


The best 1000 frames from each SER file were stacked in Autostakkert! The resulting overlapping images were stitched into a 2 pane mosaic using Microsoft ICE. The resulting mosaic was wavelet processed in Registax 6, post-processed and colourised in the Gimp 2.10.30.

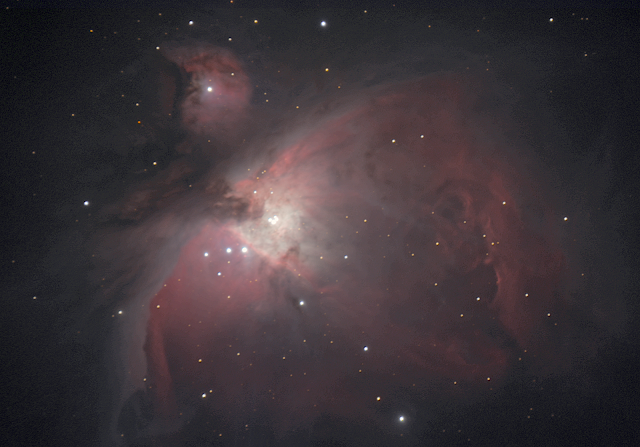
Ca K-line image of the Sun


Active regions as well as regions of high magnetic flux in the chromospheric network can be seen in the image.

The use of a long focal length telescope matched the image scale of the large sensor in the camera and worked well as a solar imager.

This camera has, with appropriate telescopes and filters, proved itself to be a versatile, Solar, Lunar and Deep Sky imager.

SV305M Pro

This monochrome HD CMOS camera was used in conjunction with three telescopes to explore its potential as a solar imager.

The SV305M Pro was fitted with a Baader Ca K-line filter and placed at the focus of a 66mm APO refractor, fitted with a Baader visual solar filter.


AstroDMx Capture was used to capture two overlapping 2000-frame SER files.


The best 75% of the frames in the SER files were stacked in Autostakkert! The two resulting images were stitched into a two-panel mosaic using Microsoft ICE, wavelet processed in Registax 6, post-processed and colourised in the Gimp 2.10.30

Ca K-line solar image


The SV305M Pro was placed at the focus of a Solarmax II 60, BF15 H-alpha scope.


AstroDMx Capture was used to capture two overlapping 2000-frame SER files.


The best 75% of the frames in the SER files were stacked in Autostakkert! The two resulting images were stitched into a two-panel mosaic using Microsoft ICE, wavelet processed in Registax 6, post-processed and colourised in the Gimp 2.10.30

H-alpha solar image


Picture Window Pro 8 was used to merge the uncolourised Ca K-line and H-alpha images. The merged Ca K-line-H-alpha image was post-processed in the Gimp 2.10.30.

Overlapping 2000-frame H-alpha SER files were also captured at higher gamma to reveal the prominences.


The resulting images were combined in iMerge and processed in the Gimp


The combined Ca K-line-H-alpha image was merged with the prominences image and colourised in the Gimp.


This combined wavelength image reveals a considerable amount of structure in the chromosphere.

Using the SV305M Pro with a 2x Barlow and the Solarmax II 60, BF15 H-alpha scope avoiding Newton’s rings.

A ZWO tilter was used with the camera in conjunction with the Barlow to avoid Newton’s rings.

The tilting device can be seen between the camera and the Barlow.

AstroDMx Capture was used to capture a 5000-frame SER file of the active region AR2976-2975.

The best 50% of the frames in the SER file were stacked in Autostakkert! The resulting image was wavelet processed in Registax 6 and post-processed in the Gimp 2.10.30

AR2976-2975 in H-alpha light

There are no signs of Newton’s rings in the image.

Using the SV305M Pro with a dedicated CaK PST Ca K-line scope


AstroDMx Capture was used to capture overlapping 2000-frame SER files.


The best 75% of frames in the SER files were stacked in Autostakkert! The two resulting images were stitched into a two-panel mosaic. The resulting image was wavelet processed in Registax 6, post-processed and colourised in the Gimp.

The narrower bandpass of the CaK PST of 0.22nm revealed more details of the chromospheric network than the broader bandpass of 8nm of the Baader Ca K-line filter in conjunction with a Baader white light filter.

These investigations showed that both the SV405CC and the SV305M Pro make good solar imagers with the appropriate telescopes. The sensor of the SV305M Pro is far enough forward that the CaK PST can be brought to focus easily. In conjunction with the tilting device and a Barlow lens, Newton’s rings were completely avoided in these tests with the SV305M Pro.

AstroDMx Capture can be downloaded HERE.

Thursday 17 March 2022

Capturing a high resolution lunar image with an SV405CC OSC and AstroDMx Capture

An SVBONY SV405CC OSC fitted with an SVBONY IR/UV cut filter was placed at the Cassegrain focus of a Skymax 127 Maksutov that was mounted on a Celestron AVX GOTO mount.

The equipment used


AstroDmx Capture for Windows was used to capture two overlapping 1500-frame SER files of the 97.7% waxing Moon with the SV405CC uncooled.

An Acer Swift 3 Windows 11 laptop running AstroDMx Capture


Screenshots of AstroDMx Capture capturing 1500-frame lunar SER files at maximum resolution of 4144 x 2822


The best 75% of the frames in the SER files were stacked in Autostakkert!, stitched into a 2-pane mosaic by Microsoft ICE, wavelet processed in Registax 6 and post-processed in the Gimp 2.10.30.

ALLOW TIME FOR THE LARGE LUNAR IMAGE TO LOAD

97.7% waxing, Moon


The centre left of the image shows Craters Copernicus, Kepler,  Aristarchus and Herodotus, with Schröter's Valley and the lunar swirl Reiner Gamma.

The SV405CC OSC is a high-resolution camera well suited to capturing high-resolution lunar images in addition to its primary role as a Deep Sky OSC.

AstroDMx Capture can be downloaded HERE.

AstroDMx Capture is available for Windows, macOS, Linux including Raspberry Pi OS and ChromeOS.


Tuesday 15 March 2022

The stars of the Trapezium

Imaging the six bright stars of the The Orion Trapezium Cluster

The Trapezium Cluster is an open cluster at the centre of the Orion Nebula (M42). It has an apparent magnitude of 4.0 and lies at a distance of 1,600 light years. It subtends 47 arc seconds of sky.

It is also known as the Orion Trapezium Cluster or Theta-1 Orionis, the Trapezium Cluster can be resolved in 5-inch telescopes, which reveal six of the cluster’s stars if observing conditions are good. The cluster is easy to identify because the brightest four stars form an asterism shaped like a trapezium after which it was named. Robert Julius Trumpler was the first to use the name 'Trapezium'. The stars are luminous X-ray sources and are responsible for most of the glow of the surrounding nebula.

The Trapezium Cluster was discovered by Galileo Galilei in 1617, who sketched three of the cluster’s stars, but not the surrounding Orion Nebula. This is an interesting fact and the very narrow field of view of his telescope could have been a contributing factor. However, the Orion nebulosity was not noted in Ptolomy's 'Almagest' where the Trapezium was recorded as a bright star, or Al Sufi's 'Fixed Stars', both of which recorded nebulosity in other parts of the sky. In 1603 Johann Bayer catalogued the ‘star’ as Theta Orion in Uranometria.  It may be that increased activity of the illuminating stars has increased the brightness of the nebulosity rendering it more readily visible since those times. It is possible to speculate that the sky transparency due to humidity, smoke or moonlight (which does not interfere with the observation of stars) contributed to the obscuration of the nebula for some observers.The discovery of the Orion nebulosity is credited to Nicolas-Claude Fabri de Peiresc in 1610. His patron, Guillaume du Vair, purchased a refracting telescope in 1610 with which de Peiresc likely observed the Orion nebulosity. As the discovery of the nebulosity predates Galileo’s discovery of the Trapezium by seven years, it is an open question as to why Galileo missed it, and indeed, why other, superbly competent observers made no mention of it. Christiaan Huygens independently discovered the three stars in 1656. The fourth member, Theta-1 Orionis B, was discovered by Jean Picard in 1673, completing the Trapezium. Huygens also observed the fourth component in 1684.

Several more stars were discovered in 1673 and, by 1888, a total of eight members were known; some of which are binaries. The cluster contains many more stars too faint to be easily visible, including a number of brown dwarfs.

Attempts to resolve the stars of the Trapezium

We used a Skymax 127 Maksutov SV305-F (minus IR/UV cut filter) combination mounted on a Celestron AVX mount,  aimed at the Trapezium region of the Orion nebula and 93 x 15s, 16-bit exposures were captured using AstroDMx Capture for macOS with matching dark-frames: all under a full Moon. We obtained these results over 14 months ago.

Screenshot of AstroDMx Capture for macOS capturing data on the Trapezium region of the Orion nebula.


The data were stacked to produce the final image of the Trapezium region.


The six stars of the Trapezium can be seen as bright stars against a bright nebulosity background. The bottom left star of the Trapezium is just about resolving into two components and the bottom right star is more clearly resolved.

Various processing techniques were used to reveal the six stars more clearly.

The Trapezium region cropped out of the main image


Negative image with adjusted levels

The six stars are more evident in this image.

Unsharp-masking by Fitswork’s Special Filter

The six components of the Trapezium stars are more readily discerned

The Trapezium region cropped out of the main image

As well as a general sharpening, the unsharp masking Fitswork’s special filter has darkened the background nebulosity and to a degree the bottom four component stars of the Trapezium which are just resolved in the image.

Negative image with adjusted levels

These images leave little doubt that six stars have been revealed if not fully resolved.

Star map of the Trapezium to clarify the positions of the partially resolved stars

The six stars of the trapezium are labelled A through F. The positions of two other much fainter stars are shown as G and H.

Negative image

The stars of the Trapezium pose an interesting challenge to observers and imagers attempting to resolve them. Observers in locations such as the UK which frequently suffers from the disruptive effects of the jet stream and poor seeing, and where Orion is quite low in the sky, are less likely to be able to achieve the resolving of the component stars on an average night. More southerly locations where the jet stream is out of the way and Orion is higher in the sky are likely to facilitate the resolution of the Trapezium's component stars.


More testing of the versatility of the SV405CC

An SV405CC TEC-cooled OSC was placed at the Cassegrain focus of a motor-focus modified Skymax 127 Maksutov. The camera was fitted with a 1.25" adapter and an SVBONY IR/UV cut filter. The equipment was mounted on a Celestron AVX mount.

Click on an image to get a closer view

The Equipment used


SV405CC OSC and the Maksutov

A 17" Fedora Linux laptop running AstroDMx Capture for Linux was used to capture 120 x 20s FITS  exposures of the Orion Nebula with matching dark-frames; all under an 87.6% Moon.

Screenshot of AstroDMx Capture for Linux capturing FITS images of the Orion nebula

Even with a long focal length Maksutov, the large sensor of the SV405CC is large enough to capture a large portion of M42/43.
The data were stacked in Deep Sky Stacker and Affinity Photo running in a Virtual Win 10 machine running on the Fedora laptop. The resulting images were combined and post-processed in the Gimp 2.10.30. The image was post processed to show details of the Trapezium area as well as the surrounding nebulosity.

M42/43


There is no doubt that the SV405CC performed well with the Maksutov, which is probably more suited to lunar and planetary imaging.


The equipment was aimed at the 87.6% waxing, gibbous Moon.
AstroDMx Capture for Linux was used to capture two, overlapping, 1200-frame SER files of the Moon at maximum resolution (4144 x 2822).

Screenshots of AstroDMx Capture for Linux capturing lunar SER files


The best 95% of the frames in the SER files were stacked in Autostakkert!, Stitched into a 2 panel mosaic using Microsoft ICE, wavelet processed in Registax 6 and post processed in the Gimp 2.10.30.

Click on the image and click again to get a much closer view.
Give the large image chance to load.

87.6% waxing, gibbous Moon

Once again, the SV405CC OSC proved to be a very capable, sensitive and versatile camera.

Tuesday 8 March 2022

Testing the versatility of the SV405CC OSC camera

An SV405CC OSC was placed at the Cassegrain focus of a Skymax 127 Maksutov that was modified for motor focus. The scope was mounted on a Celestron AVX GOTO mount

AstroDMx Capture for Windows was used to capture a 1200-frame SER file of the 25.3%, waxing, crescent Moon. The SV405CC was un-cooled for this experiment.

Click on an image to get a closer view

Screenshot of AstroDMx Capture for Windows capturing the lunar SER file.


The sensor is large enough to capture the whole lunar crescent.

The best 95% of the frames in the SER file were stacked in Autostakkert! and post-processed in the Gimp 2.10.

Final image of the 25.3% waxing, crescent Moon


Full Size image

Give the image time to load.

Scroll to see the whole image


The SV405CC OSC is clearly a capable lunar imager in addition to its primary role as a deep sky imager.


Monday 7 March 2022

Astronomical imaging with Crouton in Chrome OS using AstroDMx Capture

We have already described imaging with AstroDMx Capture for Chrome OS using the Crostini virtual Linux machine HERE. We now describe the other way of doing Astronomical imaging with AstroDMx Capture for Linux in Crouton

What is Crouton?

Crouton stands for  ‘ChRome Os Universal chrooT envirONment’.  In common with virtual machines, chroots (changeroot) provide the guest OS with their own, segregated file system to run in, allowing applications to run in a different binary environment from the host OS. However, unlike a virtual machine, you are not booting a second OS; instead, the guest OS is running using the Chromium OS system. The benefit to this is that there is no speed penalty since everything is run natively, and RAM isn't being wasted to boot two operating systems at the same time. You must be running the correct chroot for your hardware, the software must be compatible with Chromium OS's kernel, and machine resources are inextricably tied between the host Chromium OS and the guest OS. What this means is that while the chroot cannot directly access files outside of its view, it can access all of the hardware devices, including the memory. 

AstroDMx Capture for Linux does not support antediluvian distributions of Linux, so the default distribution of Crouton’s Linux, Debian Xenial which is now in maintenance mode, isn’t new enough. We have installed Debian Buster in our Crouton chroot and it works fine. For this purpose we are using a Lenovo AMD A6 based Chromebook with 4GB RAM and 64GB storage.

The internet is replete with instructions on how to install Crouton, so that will not be covered here. Just remember to choose Debian Buster as the Linux distribution to install and specify xfce as the desktop environment to use. You will need to install the Crouton integration extension into the Chrome browser.

When you turn on a Chromebook with Crouton installed you will be presented with a screen offering you to press the spacebar to return to a verified operating system. DO NOT press the spacebar, or you will invoke a powerwash and remove everything you have done with Crouton and with Chrome OS locally. If left alone, the machine will give a beep sound and after a few seconds, will start normally. Alternatively, pressing ctrl d will move straight to a normal start without sounding a beep.

Having installed Crouton you can toggle between the Chrome OS and the Debian desktops using the key combination shift ctrl alt together with the back-arrow at the top left of the keyboard.

Screenshot of the Chrome OS desktop


The first time you wish to switch to the Debian desktop having just turned on the machine you just use the key combination ctrl alt t  This will invoke the crosh (Chrome shell) terminal in the browser. Simply enter the word shell and press return and you are ready to type sudo startxfce4 to invoke the Debian xfce desktop.

Screenshot of the crosh terminal


Screenshot of the Debian xfce desktop on the Chromebook


All it takes to toggle back and forth between the Debian and Chrome OS desktops is to use the keyboard combination shift ctrl alt and the back arrow at the top left of the keyboard.

In the screenshot you can see shortcuts on the desktop to Registax 5.1 and Deep Sky Stacker and in the panel at the bottom, launchers for AstroDMx Capture and Microsoft ICE.

As we have seen previously, we have used a Wine ‘Vat’ for ICE constructed by Nicola some years ago. However, you can just as easily install Autostitch in Wine or the Linux program Hugin, both of which are panorama creators and suitable for stitching together multi-panel images.

At the command line in Debian, we installed from the repositories The Gimp, Siril, SER-player and Firefox, a better browser than the one that comes with the Buster distribution.

Testing the SVBONY SV405CC TEC cooled OSC with Chromebook Crouton

The equipment used


The scope was a Bresser AR 102xs ED, f/4.5 refractor modified for motor focusing, a red-dot finder and a forward mounted SVBONY SV165 guide scope. The guide camera was a QHY 5-II-M camera used for pulse-guiding. The mount was a Celestron AVX GOTO mount. The imaging camera was an SVBONY SV405CC fitted with a 2” adapter and a 2” Optalong LeNhance tri band narrowband filter. This filter is variously described as a tri band or a dual band filter. Strictly speaking, it is a dual band filter as it transmits light in two bands of the visible spectrum. However, one of the transmission bands is wide enough to include the H-beta and OIII spectral lines, the other transmission band covers the H-alpha spectral line.

Transmission spectrum of the Optalong LeNhance narrowband filter. The white line is the filter transmission and the other lines represent the emission lines of various elements that are components of light pollution.


The pulse auto-guiding was done with PHD2 running on a Linux laptop.

The imaging computer was a Lenovo A6 based Chromebook with 4GB RAM and 64GB storage. This is a relatively low spec Chromebook with limited RAM and storage and a 2 core AMD A6 processor. Many Chromebooks, and this is no exception, don’t have a particularly good screen colour gamut. Many have only 45% NTCS as opposed to 72% NTSC gamut. Whilst this is perfectly adequate for most computer usage, it is not ideal for image processing. Nevertheless, it can be used, and in an ideal situation, the captured data can be offloaded to a computer with a wider colour gamut for final processing.

AstroDMx Capture for Debian Linux was installed on the Crouton Linux machine and was used to capture 13 x 4 minute exposures of the Rosette nebula with matching dark-frames and previously captured flat fields.

Screenshot of AstroDMx Capture for Linux capturing 4 minute exposures of the Rosette nebula.


The data were calibrated and stacked with Deep Sky Stacker


The image was post-processed in the Gimp 2.10

The final image of the Rosette nebula captured by AstroDMx Capture for Linux running in Chrome OS Crouton.

This experiment showed that AstroDMx Capture for Linux runs like a native application in Chrome OS using the Crouton environment, and that it was able to control the camera SV405CC to capture the data.

The Crouton way is the way to use lower powered Chromebooks to achieve astronomical deep sky imaging with a Chromebook. The Crostini way of virtualising Linux is a way that can be successful with more powerful and higher spec Chromebooks.

The SVBONY SV405CC camera performed flawlessly with AstroDMx Capture for Linux in a Crouton environment in a Chromebook.