Thursday 31 December 2020

Feature release of AstroDMx Capture for All platforms Version 0.84.7

Feature release of AstroDMx Capture for All platforms

Version 0.84.7


The new version can be downloaded from https://www.astrodmx-capture.org.uk


We are pleased to say that AstroDMx Capture for macOS now supports the SVBONY SV305 and SV305 Pro cameras.


Nicola has made a feature release of AstroDMx Capture on all platforms.


It features a new, non-destructive, incremental 16-bit brightness control that can be used either on its own in Linear mode, or in association with the other visualisation transforms as well as the Transform coefficient. This control is to facilitate the visualisation of 16-bit image data as they are captured, but being non-destructive, does not affect the data that are saved.


It also features an optional exposure delay function.


Various bug fixes have been implemented.


The Windows version of AstroDMx Capture is now installed into a location that does not require administrator rights to launch.


The debug mode now launches from a toggle in the Options drop-down menu. This means that there is now just one launch icon rather than two as in the past.


A considerable amount of work has gone into the coding of new installers and launchers


Experience has shown that many people don’t read the instructions before downloading and installing the appropriate version for their computer. 

If you install a version intended for an advanced CPU and your computers CPU doesn’t have the correct instruction sets, the software will not work. Also, if you install a version for an older CPU, and your computer has a modern CPU, you may not get the performance that your computer is capable of. 

Nicola has put an inordinate amount of work into coding smart launchers to prevent these things from happening. 

AstroDMx Capture launchers now make sure that the correct version runs on the user’s computer depending on the computer’s CPU and its instruction set.


Beginners are often confused about exactly what debayering is… A colour camera has a monochrome sensor with red, green or blue filters over each of the pixels. The exact pattern of the order of the colours of the filters varies from camera model to camera model. This is called the Bayer pattern. 


Bayer pattern of colour filters over the monochrome sensor


The signal produced by a given pixel has come through one of the R, G or B filters. The process of decoding the information coming from the pixels and combining it into a colour image is called debayering.
 

In AstroDMx Capture debayering can be switched on or off both for display and for saving. The default is for the display to be debayered (full colour) but for the saved data to remain undebayered. It should be remembered that undebayered data contain all of the colour information, but if they are displayed, the result is a monochrome image with a small-scale pattern in it. Many beginners are confused as to why their captured data looks like this.


Some stacking software such as Autostakkert! Is able to detect the Bayer pattern and to debayer the data, so that the final result is a colour image. Other stacking software may not be able to do this.


So, what is the advantage of saving undebayered image/video data? The main advantage of saving undebayered data is that, depending on your computer, you may get faster frame rates when saving undebayered data. For long exposures however, there is no advantage.


AstroDMx Capture now has an automatic warning that you are about to save undebayered data when you start to capture. You are given the option to save debayered, full colour data before the capturing starts. This reminder can be turned off for the remainder of the session if required.


Another reminder is given when you are choosing the format, that RGB24 is, in fact an 8-bit format. It is called RGB24 because there are three colour channels and each channel is 8-bits, hence the 24. If you choose RGB24 then you are forcing the camera to use an 8-bit format, and to debayer the data on camera, which could slow things down a little. If you are capturing deep sky images, then RAW16 should always be used. Whether your camera has a 12-bit, 14-bit or 16-bit ADC, the data will be saved into a 16-bit image container, TIFF or FIT. Never use RGB24 for capturing Deep sky objects otherwise you will be saving you data with only 28 levels of brightness, that is, 256 levels. If you save as RAW16 you will be saving data with 212(4096) levels if your camera has a 12-bit ADC; 214(16384) levels if your camera has a 14-bit ADC; or 216(65536) levels of brightness if your camera has a 16-bit ADC. 


Windows 7

Nicola intends to release a version of AstroDMx Capture for Windows 7 almost immediately. This version will work with all of the supported astronomy cameras and DSLRs but will have no support for UVC cameras (webcams and USB capture cards). The reason that UVC devices will not work in the Win 7 version is that the technology used for the UVC implementation is Win 10 technology that does not work with Win 7. There are no plans to implement UVC devices on the Win7 version of AstroDMx Capture.

Saturday 26 December 2020

Evaluating the Raspberry Pi High Quality Camera as a possible astronomical imaging camera.

The HQ Picamera uses a Sony IMX477 backlit sensor which has 10-bit and 12-bit ADC resolution. The sensor has a rolling shutter. It is a 12.3MP sensor. Sensor size: 7.564 (H) x 5.476 (V) mm. A UV/IR cut filter is fitted on the camera.

Comparion of the HQ PiCamera with the V1 and V2 Raspberry Pi cameras

                    V1 (5MP)     V2 (8MP)         HQ Camera (12.33MP)

Pixel size     1.4 µm × 1.4 µm     1.12 µm x 1.12 µm 1.55 µm x 1.55 µm

This is a preliminary test of the capability of the Raspberry Pi HQ camera as an astronomical imaging camera. These tests are not exhaustive and do not explore all of the properties of the camera. The camera was controlled by a short Python program that I have written for the purpose of these tests.

The Raspberry Pi computer was a Pi4B with 4GB RAM. The Pi was fitted with heat sinks and a fan arranged to blow down onto the heat sinks and out of the open sides of the case. A 14” portable monitor was used to facilitate accurate focussing and to provide a good preview.

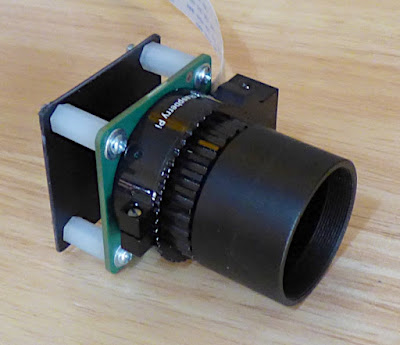
The HQ PiCamera is fitted with a C/CS mount to which a Mogg telescope adapter can be fitted. The back of the camera’s circuit board is open and slightly vulnerable. To protect the back of the circuit board, a square plasticard back was attached via bolts and nylon stand-off legs,


This arrangement protects the back of the camera circuit board and provides the necessary ventilation to allow heat dissipation.

The tests were done using two telescopes: a Skymax 127 Maksutov for large scale lunar imaging and an 80mm, f/5.5 ED refractor for wide-field Lunar imaging and long exposure deep-sky imaging of the Orion nebula. These tests were all done with a Python program I developed for image preview and capture. The data were captured in 8-bits, which is fine for lunar imaging, but far from ideal for deep-sky imaging. The deep-sky data were collected as unsaturated .BMP s as I haven’t yet got the white balance under control for long exposures.

The HQ PiCamera mounted at the Cassegrain focus of the Skymax 127 Maksutov mounted on a Celestron AVX GOTO mount


The preview overlay showing the region of the 75.1% waxing Moon being imaged


Single pane (stack of 100 images)


Mosaic of eight panes


The Moon captured as a single wide-field image with the 80mm refractor


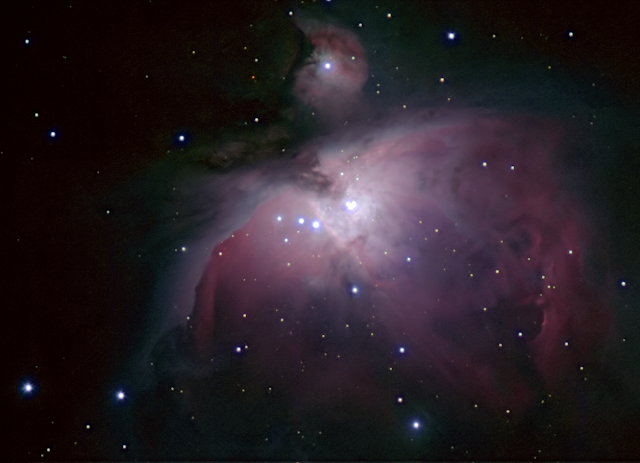
Stack of 84 images of the Orion Nebula captured as 10s exposures with 10 matching dark-frames


The images were only 8-bit images, but they were summed by Deep Sky Stacker into a 32-bit floating point image which could then be stretched by the Gimp to reveal the nebulosity. Obviously, it would be much better to have stacked 12-bit data saved in 16-bit image containers, but that was not possible here.

There is a V4L2 driver available, so it will be interesting to see if it includes all of the important features of the camera such as 12-bit RAW data streams.

However, the main conclusion from these experiments is that the High Quality Raspberry Pi camera  is very promising as an astro-imaging camera. There is no pixel vignetting, something that affects many small-chip webcams. It also remains to be seen what the longest exposure is that the camera can deliver

We shall look into these things and report back in the future.

Monday 21 December 2020

Removing stars from an image

 Starnet++ software, a program for the removal of stars from an image.  

The Starnet++ program is written by Nikita Misiura, an astrophotographer who has placed the software on SourceForge where it is available free of charge. 

There are various ways to remove stars from an image, but many of them involve a complex workflow and expensive software. Starnet++ is a solution that involves virtually no workflow and will remove stars in what appears to be a single step. This article is intended to provide a semi qualitative appreciation of what is involved with software of this kind.

Starnet++ is a neural network, or to be more precise, an Artificial Neural Net, ANN program. It is a convolutional neural network with encoder-decoder architecture, a type that is often used for image recognition and classification. The encoder is a convolution that acts as a feature extractor and the decoder is a deconvolution that recovers image details.

An ANN is a simulation in algorithms of the way that a brain is constructed from neurons. In fact, only between 10% to 50% of a brain is made of neurons. The rest is made from a variety of glial cells, which do not produce electrical impulses, but service and protect the neurons, providing support and services such as providing the neurons with oxygen and nutrients, and destroying pathogens. 

The Neurons themselves, viewed simply, comprise; the main body of the cell, the soma, with extensions or dendrites that are the data input part of the neuron, and an axon, pipe-like structure that carries the output signal away from the main cell towards the branched axon terminals. The dendrites of one neuron receive signals from the axon terminals of another neuron via a junction called a synapse. The majority of signal propagation from neuron to neuron takes place via a chemical synapse or an electrical synapse. The electrical synapse uses ion channels, that allow an electrical current to flow between neurons. The electrical synapse is fast but does not carry the variety of signal that the slower, chemical synapses carry via their large variety of neurotransmitter biochemicals. In a real neural network, every neuron in the vicinity is connected to every other neuron. The majority of synapses in a mammal are chemical synapses. 

The idea of an ANN was developed in 1943, when Warren McCulloch and Walter Pitts made a computational model for neural networks using algorithms. The model was called the 'McCulloch-Pitts neurons.' Of course, they were way ahead of their time in that the computational resources required did not exist at the time. However, computers and computer languages have since developed, so that artificial neural networks can be put to work on modern consumer computational devices. 

How does an ANN work? 

Remember that the artificial neural network is attempting to simulate how a real neural network works. Real neural networks learn by receiving lots of input data and processing them to produce an output. The output then feeds back into the network where it is compared with the goals of the operation. If the goals are partially achieved, (say the fairly reliable recognition of a particular type of animal) then the positive feedback reinforces the ongoing learning process. If you are shown lots of examples of dangerous insects then you will learn to recognise this sort of dangerous insect, as well as those that go along for the ride as evolutionary mimics. This sort of learning can take place in the classroom, but also in the experiences of everyday life.  

An ANN works in an analogous way. However, there are no physical neurons as there are in a biological brain, Instead, there are software nodes. The nodes are connected (i.e. can affect each other) by software and each node contains two functions: a linear function and an activation function. The linear function does a specific calculation and the activation function, depending on the value computed by the linear function, ‘decides’ whether to ‘fire’ (i.e whether to send a signal to a connected node or not). The connection between two nodes has a value called a weight. Its magnitude determines the size of the effect of one node on another and the sign of the weight determines whether the effect is to reinforce or suppress the connected node. As the signal propagates through the network, it moves through sections whose calculations look at small groups of pixels 'looking' for small details and on to regions of the network that find larger features in the pixels. The system is learning to recognise stars, and then, to remove them. The neural network is based on linear algebra and GPUs are optimised for working with matrices, so powerful GPUs can facilitate the functioning of a neural network.

A typical artificial neural network has three groups of interconnected nodes. First is a ‘layer’ of input nodes that receive the input data. Second is a layer, or several layers of so-called hidden nodes. The hidden nodes receive data from the input nodes and the signal propagates according to the weights and the results of the calculations in the linear function, and the activation function, across the layers of hidden nodes. Finally, the signals that have got through to the output nodes, produce the output signal. What we want to give to the ANN is an image with stars and nebulosity, and to get out of it, an image with just the nebulosity and the stars removed. 

The ANN will ‘learn’ by feedback, or backpropagation. This involves comparing the actual output with the intended output, in other words, to look for the differences between the output and the intended output. The difference is used to modify the weights of the connections between nodes in the network, going backwards from the output nodes, through the hidden nodes to the input nodes. This is what causes the network to learn and reduce the differences between the output and the intended output. Eventually, the process reduces the differences between the output and the intended output, until they are one and the same. In the case of our astronomical application, the input is an image with stars and nebulosity and the intended output is an image with the stars removed. 

The teaching process involves training the network with many images from a particular type of system so that it can cumulatively learn from all of them. In the case of Starnet++ the ANN was taught with many images from a refractor system. The author of the program says that as a result of this, the software will not deal well with images from Newtonian telescopes which have diffraction spikes. It follows however, that if the software was to be trained with Newtonian images, it should be able to deal with the diffraction spikes and all.  

Starnet++ doesn’t work on the whole image at once. The image is divided into square tiles, the size of which is controllable by the user via a variable called 'stride'. Stride defaults to 64 x 64 pixels. If the tiles are smaller, then the program runs slower, but produces an overall smoother result, and vice versa. 

We present here two examples of the use of Starnet++. The first is the Orion nebula with the stars in place alternating in an animation with the nebula with the stars removed. This type of procedure enables the astronomer to study and appreciate the structure of the nebulosity without the distraction of the stars. 

The Orion Nebula 


The second example is Comet C/2020 F3 (NEOWISE). In this case, the star removal enables the structure of the comet to be studied without interference from the rich field of Background stars. 

Comet C/2020 F3 (NEOWISE) 


There are other reasons for removing stars from images, but those reasons will not be discussed here.

It is interesting that an aspect of AI can be used to perform an operation like star removal from astronomical images.

Monday 7 December 2020

Maintenance Release for AstroDMx Capture for all platforms

 Maintenance Release of AstroDMx Capture 


Nicola has made a maintenance release of AstroDMx Capture for Windows, macOS, Linux, including the 32-bit and 64-bit ARM versions for the Raspberry Pi.

This release fixes an issue that could impact long exposures.

The new version of AstroDMx Captue can be downloaded HERE.


Recent Results with the SVBONY SV305

Below is a Screenshot of AstroDMx Capture for Windows capturing 30s exposures of M42/43 as 16-bit Fits files. The scope was an f/5.5, 80mm, ED refractor.


Final image of The Orion Nebula


Screenshot of AstroDMx Capture for Windows capturing a 2000-frame SER file of the 75.5% waning Moon using the same 80mm, ED refractor.


The Moon was imaged in two overlapping panes. The best 50% of the frames in the SER files were stacked in Autostakkert! The resulting images were stitched in Microsoft ICE, wavelet processed in Registax 5.1 and post-processed in Affinity Photo and the Gimp.

The 75.5% waning Moon


Saturday 5 December 2020

Changing the DSLR driver in Windows so that supported Canon and Nikon DSLRs will work in AstroDMx Capture for Windows

Note that AstroMx Capture for Windows can control Canon and Nikon DSLRs as long as the specific model is supported for USB tethering by the camera manufacturer.


If you try to use a DSLR without changing the Driver, This will be the result:

NB Bringing this article up to date for December 2021:

Note that since this article was originally written, the version of Zadig downloaded should now be 2.7 NOT 2.5 as described below

The driver (as described below) should now NOT be changed to libusb-win32 (v1.2.6.0); it should be changed to WinUSB (v6.1.7600.16385)

Click on the image to get a closer view


It is a simple matter to change the driver (quite reversibly) so that the DSLR will work with AstroDMx Capture for Windows.

You will need to download a Windows tool called Zadig in order to change the driver. 

Zadig can be downloaded from HERE.

Zadig will soon be downloadable from the Download site for AstroDMx Capture for Windows.

Installing Zadig

Double click on zadig-2.5.exe


Windows will ask 

Click on Yes

Then this dialogue will appear

Click on No

This dialogue will appear

Click on Options and List All Devices

Your camera should appear in the list and you should select it.


Make sure that libusb-win32 (v1.2.6.0) is selected in the drop down menu to the right of the green arrow

Click on Replace Driver


The Driver is then installed


Then Click on Close

Here is the Driver Installation SUCCESS dialogue. Click on the X to dismiss it

Do NOT click on Reinstall Driver

Now when you attempt to connect to your DSLR you will be able to, as long as the model is supported by the manufacturer for USB tethering.

Click on the image to get a closer view.


If for any reason in the future you wish to remove the  libusb-win32 (v1.2.6.0) driver that you have just installed, simply go to Device Manager and delete it there while the camera is connected.

AstroDMx Capture for Windows, macOS or Linux (Including Raspberry Pi) can be downloaded freely here:

Friday 4 December 2020

Downloading and Installing AstroDMx Capture for Windows

Downloading and Installing AstroDMx Capture for Windows


Please note that this software is not for Windows 7.

Click on an image to get a closer view

Windows makes it quite difficult to simply install a program that hasn't been through their very expensive checking procedures. This is for the protection of the Windows user, to try to make sure that he/she doesn't install any software from a source that the user doesn't trust. Once a program has been downloaded enough times, Windows stops trying to protect the user from the program.

For this example we used the Microsoft Edge browser. (With a different browser, things may not be exactly the same, but will essentially end up in the same place)

The browser was directed to the download site https://astrodmx-capture.org.uk

Downloads was selected and then, under Page Navigation,

AstroDMx Capture - Download Current Version was selected

Then, under AstroDMx Capture Downloads, Windows was selected

Then, under Windows 64-bit, AstroDMx Capture: 0.82.1 (Windows 64-bit) was selected.


At the bottom left of the browser window, the following text appears:

AstroDMx_Capture_0....exe was blocked

because it could harm your device.         (N.B. of course it can’t harm your device).

We are given two options, Delete or a button with ... three dots on it.

We clicked on the button with the three dots ... and we were given three options.

Keep

Report this file as safe

Learn more

We selected Keep

Then Microsoft Defender SmartScreen goes into action and informs you that this application is not commonly downloaded. (When enough people have downloaded the software, all of this will stop happening)


We then clicked on Show more, and the following message appeared.

We clicked on Keep anyway.

Then we double clicked on the AstroDMx Capture install .exe file and immediately Windows starts protecting us again.

This message appeared.


We selected More info and the following message appeared.


We finally get the chance to install the software.

We select Run anyway and the program starts to install.

This is the dialogue that appears


We clicked on Next.


 We clicked on the checkbox that says Create a desktop shortcut. We then clicked on Next.


Now we were ready to install. 

We clicked on Install.

When setup had completed, we checked the Launch AstroDMx Capture checkbox and then clicked on Finish.


Just when you thought it was safe, Windows Defender jumps in one last time, Saying that Windows

Defender Firewall has blocked some of the features of this app

Just click on Allow access and from here on, there will be no problems.

We hope that you enjoy using AstroDMx Capture for Windows.

AstroDMx Capture for Windows Released

 AstroDMx Capture for Windows Released


I am pleased to announce that Nicola has released AstroDMx Capture for Windows. alongside major releases of AstroDMx Capture for macOS, and Linux, including the Raspberry Pi 64-bit and 32-Bit ARM architectures.

All of the software can be downloaded at https://www.astrodmx-capture.org.uk/

Some notable features of AstroDMx Capture

  1.      AstroDMx Capture has a context aware UI which presents only relevant functions to the user.
  2.     Where the camera supports a Region Of Interest, AstroDMx Capture allows the Shift, and cursor control keys to be used to nudge the ROI in order the track the planet or other feature if it is tending to drift out of the ROI.
  3.     Controls tethered Canon and Nikon DSLRs and enables them to be used to capture images just like any astronomy camera. The camera control is direct not via a secondary abstraction layer. This support is for camera models that the manufacturer supports for tethering. This is quite a long list of Canon and Nikon models. In the Windows version, the camera driver must be changed via software that can be downloaded from the same site as AstroDMx Capture. The driver change is easily reversed if this is ever required.
  4.     Has real-time image calibration with dark-frames and or flat-fields. The calibration frames can be captured and saved by AstroDMx Capture.
  5.     Has frame-integration to sum up to 250 short, 8-bit exposures. The summed frames can be saved as 16-bit images if required. This can be useful to increase the sensitivity of a short exposure, 8-bit camera.
  6.     Has non-destructive Software Controls of Gain, Gamma, Brightness and contrast. These can be used to make a more pleasing image on the display without affecting the data that are saved. However, if required, the applied controls can be applied to 8-bit saved data. This can be very useful if a camera with few if any controls is being used.
  7.     AstroDMx Capture has a group of Transforms that can be applied to the preview image to enable 16 bit images to become visible while they are being captured. These Transforms in combination with the non-destructive Software Controls allow the optimisation of the preview image of a 16-bit Deep Sky Object.
  8.     Motion detection can be set so that the camera only saves images if motion has been detected. The sensitivity of the detection can be controlled. This function has a variety of uses and one example is the monitoring of nest boxes.
  9.     AstroDMx Capture has a connection monitor that attempts to re-establish connection with the camera if the connection is lost for any reason, for example accidentally knocking the USB cable in the USB port, or if the camera for any reason drops its connection with the computer. This feature usually re-establishes connection and the capturing carries on as if undisturbed.
  10.     A histogram can be enabled or disabled and displayed in linear or logarithmic mode.
  11.     Markers and guides can be set to show a variety or reticles and saturation markers of various colours if required.
  12.     AstroDMx Capture can control ZWO filter wheels.
  13.     AstroDMx Capture allows the user to specify custom metadata for FITS output as well as automatically adding camera specific metadata (Exposure, Gain, Gamma etc.) to the FITS header.
  14.     AstroDMx Capture has a snapshot mode that saves a high quality, uncompressed Tiff image, or Fits image into a snapshots folder. This is useful for microscopy.
  15.     AstroDMx Capture provides four run modes. They are as follows: Frame Limit - To capture a specific number of frames; Time Limit - To capture as many frames as possible until the user specified time has elapsed; Time-lapse - To capture a specific number of frames after a specified time interval; Manual - To capture continually until the stop button is pressed.
  16.     AstroDMx Capture has a dynamic file naming system. It allows for a user specified file prefix, configurable file index, time-stamped files in two different formats and saves individual image files (Not AVI or SER) into a time-stamped sub-directory. This sub-directory is created each time a new data-set is captured. The time-stamp and sub-directory are optional.
  17.     Saved file formats are Tiff, Fits, BMP, SER, AVI. The Fits files are saved to the latest Fits standard.

Results from different cameras and scopes and AstroDMx Capture for Windows

Recent test results from AstroDMx Capture for Windows with a QHY 5M-II-C camera or a USB tethered Canon 4000D DSLR with an f/5.5, 80mm ED refractor mounted on a Celestron AVX EQ, GOTO mount.

The equipment with the QHY 5M-II-C


Screenshots of AstroDMx Capture for Windows capturing 16-bit data on the Orion Nebula with a QHY 5M-II-C camera.


Final image of M42/43


The equipment with the Canon 4000D DSLR

f/5.5, 80mm ED refractor mounted on a Celestron AVX EQ, GOTO mount.

Screenshot of AstroDMx Capture for Windows capturing 16-bit data on the Orion Nebula with a USB tethered Canon 4000D DSLR camera.


Final image of M42/43 and the Running Man Nebula


Using the f/5.5, 80mm ED refractor mounted on a Celestron AVX EQ, GOTO mount and a QHY 5L-II-C camera.

AstroDMx Capture for Windows was used to capture 16-Tiff data on the globular cluster M2


Using the f/5.5, 80mm ED refractor mounted on a Celestron AVX EQ, GOTO mount and a QHY 5L-II-M camera.

AstroDMx Capture for Windows was used to capture 16-bit Tiff data on the globular cluster M15

Using the same refractor plus the 
QHY 5L-II-M camera, the 88.8% waxing Moon was captured as 8-bit SER files using AstroDMx Capture for Windows. 
The data were stacked in Autostakkert! and stitched using Microsoft ICE.

88.8% waxing, gibbous Moon


H-alpha Solar Imaging

AstroDMx Capture for Windows was used with a DMK 21AU04.AS camera and a Coronado Solarmax II, 60, BF15 H-alpha scope mounted on a Celestron AVX EQ, GOTO mount.

Screenshot of AstroDMx Capture for Windows capturing a SER file of H-alpha solar data

Final Mosaic of 4 overlapping panes, stitched in Microsoft ICE


Screenshot of AstroDMx Capture for Windows capturing H-alpha data using a x 2.5 Barlow

Final image of AR 2786 and AR 2785 made by stacking the best 5000 frames of a 10000 frame SER file


Calcium K-line Solar Imaging

AstroDMx Capture for Windows was used with a DMK 21AU04.AS camera and a Coronado CaK PST scope mounted on a Celestron AVX EQ, GOTO mount.

Screenshot of AstroDMx Capture for Windows capturing Ca K-line data in a 1000 frame SER file


Final image of AR 2786 and AR 2785 made by stacking the SER file in Autostakkert!


AstroDMx Capture is now available for 

    • Windows, 

    • macOS, 

    • Linux, 

        ◦  Including Raspberry Pi 64-bit and 32-bit ARM architectures

Nicola has worked strenuously to bring AstroDMx Capture to all of the major computer operating system platforms. As well as working on the common code-base to bring more features and to rectify any issues that may arise, she also intends to complete the work that she started earlier in the year, and bring a version of AstroDMx Capture to the FreeBSD operating system. Because of lack of SDKs for this platform, the FreeBSD version will be limited to UVC devices and USB tethered DSLR cameras. 

It is important to be able to move between operating systems and still be able to use the same imaging software, and this is what can be done with AstroDMx Capture. 

You might think that preparing software for release 'simply' involves writing the code. Of course, writing the code is necessary but not sufficient for the release of a piece of software. AstroDMx Capture now has more then 55 Klocs (50 thousand lines of code), so it is obvious that this will have to be checked every which way to make sure that it works as intended. Checks have to be made for deadlocks, memory leaks, data races and race conditions as well as tiny logical errors that can make the program work incorrectly or not at all. Worst of all are heisenbugs, named after the Heisenberg uncertainty principle. A heisenbug is a bug that disappears or changes its behaviour when you try to study it. They are real and we partly understand why they might behave the way they do. However, it adds to the difficulty in tracking them down.

When you are working with a single code base across three different platforms (operating systems), with two of them being essentially Unix systems (macOS and Linux), and one of them (Windows) working in a significant number of ways, differently from the other two, it is not surprising that new ways have to be invented to get the single code base to run on all of the platforms. Even when you are working within a given OS (Linux), there is a wide range of distributions ranging from the cutting edge Fedora that has for example, kernel updates every week, to Debian and Debian-based distributions which tend to track older kernels and libraries. This means that it is vital to check that the dependencies are always satisfied correctly, whatever distribution you are using. Then, of course, there are different architectures to take into account such as the 32-bit and 64-bit ARM architectures used by the Raspberry Pi computer as well as the X86-64 architecture of Intel and AMD processors supported by the software. 

So, you have to compile the compilers required to compile for the different operating systems and to set up independently the different environments for each of the operating systems so that the code can be compiled for that platform.

There are other factors to be considered, such as the age of the CPU which can vary quite considerably among computers used by users of the software. It would be possible to compile for the lowest common denominator, but that would compromise the performance achievable by more modern CPUs. AstroDMx Capture uses hardware acceleration in all versions and optional software acceleration in the  Linux versions. 

The Linux version checks on the CPU in the computer on which it is installed before it attempts to run to make sure that the CPU has the Intel Haswell microarchitecture. There are versions of AstroDMx Capture for Linux that will run on pre-2013 CPUs before the Haswell architecture was introduced, and for more modern CPUs with the Haswell architecture. The checks are made  in case the user has downloaded the wrong version, and to prevent the software from just crashing, as well as advising the user that they have downloaded and installed the wrong version.

This brings us to the delivery of the software to the user via the download website. The website has to be maintained in such a way that it is search engine optimised, and structured so that the visitor will be able to find the software that they are looking for. Also, explanations have to be presented that will assist the user to download the correct version of the software (assuming the user takes the time to read the instructions). It is a shame to receive a crash report, only to find that the user has downloaded and attempted to run the wrong version of the software. Then there is the protection of the website itself from vulnerabilities by making sure, for example, that website security is kept up to date and that the certification is in date. Of course a problem reporting system has to be incorporated into the website.

Before any release is made, be it a maintenance release or a major release, exhaustive testing has to take place

It has been a mammoth task for Nicola to bring a common code base to Linux, macOS and then to Windows, which as I mentioned earlier, is different in many significant ways from Unix systems. Many problems have had to be solved in order to do this and Nicola has done an inordinate amount of work to bring it to fruition. I have enjoyed being a lesser part of the process by suggesting, testing and obtaining image data. We hope that you will enjoy using AstroDMx Capture.

I shall be writing a number of short tutorial type articles on how to use different functions of AstroDMx Capture that will supplement the articles that I have already written on this blog.