Monday 30 March 2020

Improving control of QHY cameras in AstroDMx Capture for Win/Mac/Linux

The initial testing of Nicola's re-written QHY SDK interface code to fix a QHY SDK exposure-length bug was done with AstroDMx Capture for Windows. However, the improvements are also in the Linux and macOS versions. This will be available in the maintenance release that will shortly be made for Linux.

A Skymax 127 Maksutov was mounted on a Celestron AVX, EQ, GOTO mount. A QHY5L-II-M camera fitted with a Schüler 850nm IR Pass filter was placed at the Cassegrain focus. The filter was used to image the Moon in the daytime sky.

AstroDMx Capture for Windows was used to capture three, 2,500-frame SER files of overlapping regions of the 24.1% waxing, crescent Moon


The best 2000 frames from each SER file were stacked in Autostakkert!2, wavelet processed in Registax 6 and post-processed in the Gimp 2.10. The three images were stitched in Microsoft ICE.

3 pane lunar mosaic


Nicola continues to work on AstroDMx Capture for Windows with a unified code base for all three platforms.

Saturday 28 March 2020

Linux controlling a Windows 10 imaging laptop running AstroDMx Capture for Windows

As a continuation of our testing of AstroDMx Capture for Windows, we used Ethernet over mains to control the Windows 10 imaging computer in the observatory, using a Fedora Linux computer in the house.

As reported on October 28th 2019, we can use Ethernet over mains to remotely control a laptop in the observatory located about 20m from the house.

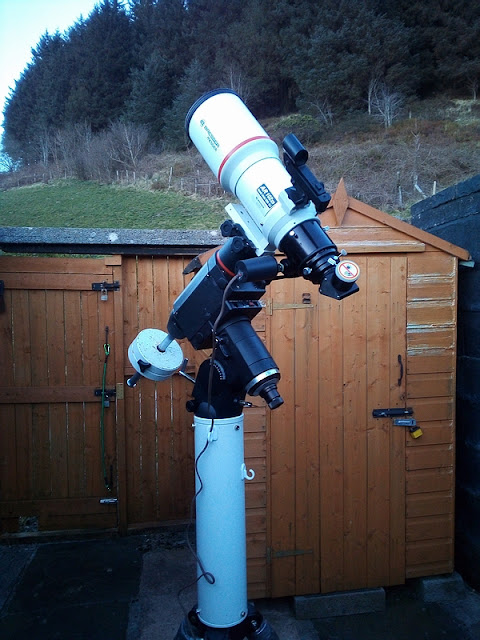
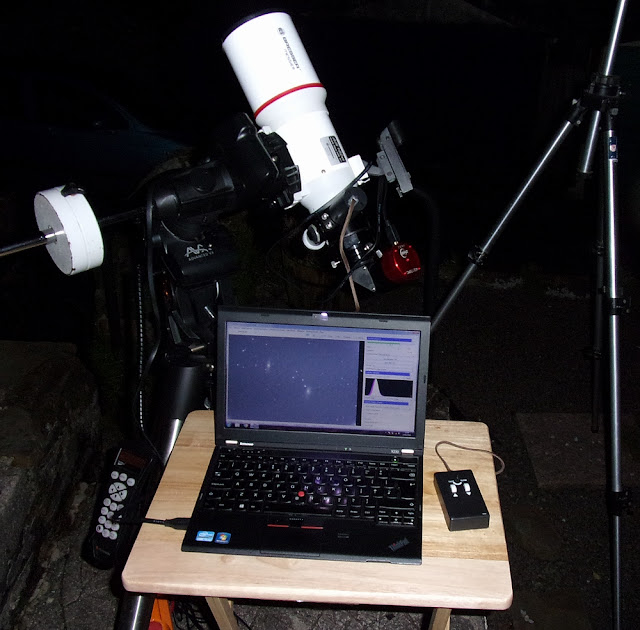
A motor-focuser-adapted Bresser Messier AR 102xs f/4.5 ED refractor was mounted on the HEQ5 Synscan GOTO mount in the observatory. Using a 2" adapter, a Canon EOS 4000D DSLR was placed at the prime focus of the refractor. The DSLR was USB tethered to the observatory Windows 10 imaging laptop running AstroDMx Capture for Windows.

The equipment setup

The mount was powered by mains from an extension lead and a powerline Ethernet adapter was also plugged in, and was connected by an Ethernet cable to the Windows laptop.

Ethernet over mains adapter plug

The extension lead powering the Mount via a power supply and also connecting the Ethernet over mains adapter plug.

The Windows 10 imaging computer in the observatory was running a Tight VNC server and the Fedora Linux laptop used to control the Windows imaging computer was running the Remmina VNC client.

Fedora Linux control laptop indoors

The Fedora laptop displayed the Windows 10 desktop running AstroDMx Capture for Linux, and everything on the Windows laptop could be controlled using the Fedora machine’s keyboard and mouse.

Screenshot of the Fedora desktop showing the Windows desktop in the VNC client. The Windows laptop was capturing data on M101

Screenshot of the Fedora desktop showing the Windows desktop in the VNC client. The Windows laptop was capturing data on M37

M101 and M37 were both imaged capturing both Camera RAW and Tiff images.
Eleven 3 minute exposures at ISO 6400 with matching dark-frames were captured for M101 and twenty 90s exposures with matching dark frames were captured for M37.

The images were stacked in Deep Sky Stacker and post processed in The Gimp 2.10, Fitswork and Neat image.

M101

Closer view


M37

We have used Ethernet over mains previously to control an imaging computer in the observatory with a control computer in the house. However, this is the first time that we have used a Fedora Linux computer to control a Windows 10 computer running AstroDMx Capture for Windows.

Friday 27 March 2020

More testing of USB DSLR tethering with AstroDMx Capture for Windows.

As Nicola makes progress with the implementation of AstroDMx Capture for the Windows platform, testing of its features is vital.

A USB tethered, 14-bit Canon EOS 4000D DSLR was placed at the prime focus of a 102mm, f/4.5, ED refractor mounted on a HEQ5 Synscan GOTO Mount.

The scope and mount


The camera was controlled by AstroDMx Capture for Windows. 150s exposures were captured of Comet C/2019 Y4 (ATLAS) and a stack (made in Deep Sky Stacker) of 3 exposures was used to show the un-trailed comet.

Screenshot of AstroDMx Capture for Windows capturing data on Comet C/2019 Y4 (ATLAS)


The resulting image was post processed in the Gimp 2.10 and Neat Image

Comet C/2019 Y4 (ATLAS)


Thirty 60s exposures were captured of M81/M82 with matching dark-frames. The images were stacked in Deep Sky Stacker, and post-processed in the Gimp 2.10.

Screenshot of AstroDMx Capture for Windows capturing data on M81 and M82


M81 and M82


USB DSLR tethering enables the DSLR camera to be controlled as a regular astronomy camera, with the images being save to disk rather than to the camera SD card. It is a far more convenient and controlled way of gathering data than using a manual capturing system such as IR controller.

Tuesday 24 March 2020

The Orion Nebulae with AstroDMx Capture for Windows

A Bresser AR 102xs f/4.5, ED refractor was mounted on a Celestron AVX, GOTO mount. A Canon EOS 4000D DSLR camera was placed at the prime focus by means of the 2" adapter.

Using AstroDMx Capture for Windows, the tethered Canon EOS 4000D, controlled by AstroDMx Capture for Windows was used to capture 10 x 4s, 30 x 30s and 15 x 60s exposures at ISO 3200 as camera RAW files, with matching dark-frames.

The frames were stacked in Deep Sky Stacker using Auto adaptive weighted average for the light frames. The Image was post processed in the Gimp 2.10 and Neat Image.

M42/43 and the Running Man nebula

Being able to treat the 14-bit DSLR as a regular astronomy camera controlled by AstroDMx Capture for Windows is a huge advantage. There is still some work to do, but a release will be made in the not to distant future. It is possible that the macOS version will be released at the same time, as well as a service release for Linux, now that Nicola has unified the code-base for the AstroDMx Capture project.

Monday 23 March 2020

The Orion Nebula and Venus with AstroDMx Capture for Windows


As reported in earlier posts, Nicola has been working hard to port AstroDMx Capture for Linux over to Windows as she has already done for the soon to be released macOS version of the software. She has been concentrating on the implementation of USB tethered DSLR camera models that are supported by the manufacturer for tethering, in addition to a number of USB astronomy cameras.

Capturing the Orion Nebula with a USB tethered Canon EOS 4000D DSLR, a Skymax 127 Maksutov and AstroDMx Capture for Windows.

Screenshot of AstroDMx Capture capturing data on the Orion Nebula with the tethered Canon EOS 4000D.

It will be noticed that the display has been zoomed to 54% of its maximum to facilitate focusing on the stars of the Trapezium. The camera is actually capturing a much wider field of view over the whole sensor.

30 x 20s exposures were captured at ISO 3200, with matching dark-frames. The images were stacked in Autostakkert 3.0 with dark-frame correction. The resulting image was post-processed in the Gimp 2.10 and Neat Image.

The Orion Nebula


Capturing Venus with a ZWO ASI178MC 14-bit CMOS camera and a Skymax 127 Maksutov and AstroDMx Capture for Windows.

A ZWO ASI178MC 14-bit camera fitted with a x2.5 Barlow was placed at the Cassegrain focus of a Skymax 127 Maksutov, mounted on a Celestron AVX, GOTO mount.

AstroDMx Capture for Windows was used to capture a 15,000 frame SER file of Venus. Autostakkert 3.0 was used to stack the best 1,500 frames. The resulting image was post-processed in the Gimp 2.10.

Screenshot of AstroDMx Capture capturing data on Venus with a ZWO ASI178MC

The seeing was poor. A region of interest of 640 x 480 was used to capture the Venus data.

Venus


Capturing the Trapezium of the Orion Nebula with the ZWO ASI178MC 14-bit camera, a Skymax 127 Maksutov and AstroDMx Capture for Windows.

50 x 18s exposures were captured with matching dark-frames. The images were stacked in Autostakkert 3.0 with dark-frame correction. The resulting image was post-processed in the Gimp 2.10.

Screenshot of AstroDMx Capture for Windows capturing data on the Trapezium with a ZWO ASI178MC

The Trapezium stars and surrounding nebulosity

AstroDMx Capture for Windows allows a tethered, supported DSLR camera to be fully controlled and used as a proper astronomy camera. The Canon 4000D as with most modern DSLRs, is a 14-bit camera, but other supported cameras may be 12-bit cameras.
Nicola is making significant progress. There is still a way to go, but she is getting there.

Monday 16 March 2020

Update on AstroDMx Capture for Windows

On February 10th I reported that Nicola was working on a Version of AstroDMx Capture for Windows.


This is not a re-write from scratch, it is a port of the Linux version to Windows, although a large amount of re-factoring of the code is required because of the substantial differences between the two platforms. It is a work in progress but first astronomical light has been achieved with both Windows 10 and Windows 7. It was decided to test on a Windows 7 machine as well as a Windows 10 machine because at the moment it seems that there are still huge numbers of people who are keeping Win 7, and not upgrading to Win 10. The reasons for this could be manifold, but one reason is that astronomers may well have their astronomy software running well on Win 7, and they don’t want to risk some of it not running as expected in Win 10.

Windows 7 testing of AstroDMx Capture for Windows on Deep Sky imaging

A Bresser AR 102xs f/4.5 ED refractor was mounted on a Celestron AVX, GOTO mount. A ZWO ASI 178MC 14-bit camera, fitted with an SVBONY UV/IR cut filter was placed at the prime focus.

The equipment setup

The three galaxies of the Leo triplet were imaged with 30 x 80s, 16-bit exposures with matching dark-frames, in two separate frames. M65 and M66 were captured in one frame and NGC3628, the Hamburger galaxy was imaged in the other. Deep Sky Stacker was used to stack the images. The Gimp 2.10 and Neat Image were used to post-process the images.

The globular cluster M3 was imaged with 30 x 30s, 16-bit exposures with matching dark-frames. Deep Sky Stacker was used to stack the images. The Gimp 2.10 and FastStone was used to post-process the images.

Screenshot of AstroDMx Capture for Windows capturing data on M3 in Win 7


M3

Screenshot of AstroDMx Capture for Windows capturing data on NGC 3628 in Win 7


NGC 3628, The Hamburger galaxy

Screenshot of AstroDMx Capture for Linux capturing data on M65 and M66 in Win7


M65 and M66


Windows 10 testing of AstroDMx Capture for Windows on the Moon

A QHY5L-II-M camera was placed at the Cassegrain focus of a Skymax 127 Maksutov, mounted on a Celestron AVX, GOTO mount. 1500-frame SER files were capture of various regions of the 91.5% waning, gibbous Moon at 30fps.

The best 90% of the frames in the SER files were stacked in Autostakkert! 3.0. The resulting images were wavelet processed in Registax 5.1 and post processed in the Gimp 2.10.

Screenshot of AstroDMx Capture for Windows capturing data on the Janssen region of the Moon in Win10


Janssen, Fabricus, Metius, Brenner region of the Moon


Screenshot of AstroDMx Capture for Windows capturing data on the Tycho region in Win 10

Tycho region of the 91.5% waning Moon

I shall report any further progress with AstroDMx Capture for Windows.


Thursday 12 March 2020

There’s Linux and all the rest

I was recently reading an article by Jack Wallen in TechRepublic entitled ‘The rise of the Linux distribution-specific laptop’. The article is quite incisive and gave me cause to think about an issue that I have considered many times before, but this time in a different way.

Jack states that the average computer user has no idea what Linux is and suggests that if you make a post on Facebook or Twitter, the majority will just let it scroll by unless they are specifically searching for it. I think that they do know what Linux is in a sense, but they are just not interested. It doesn’t matter if you point out things like the high security of Linux systems, the huge customisability of the Desktop environment, they probably don’t even really know what a desktop environment is.  they are just not interested, so they scroll on to the next post about rescuing cats or whatever.

The point is, you don’t purchase Linux, so you will take no notice of it if you come across it. Come to that, you don’t purchase macOS, Chrome OS or even Windows (unless you are building your own machine and intend to install Windows on it).

What you do buy is a computer, more than likely a laptop, and that Laptop will have Windows, macOS or Chrome OS already installed on it. You just buy it and use it.

There is a growing number of users of Chrome OS. Chrome OS does most things in a browser (Chrome) and is quintessentially a cloud-based computer, which might suit some, but which would be of rather less value to an astronomer who will usually be doing cloud-resistant computing such as image capture and processing. Most Chrome OS users may not even know that their OS is based on the Linux kernel, although they may be aware that on the newer Chromebooks, they can, by using a virtualisation system called Crostini, run many Linux apps. (I hate that term ‘App’; it trivialises the application to which it refers. The application could contain scores of hundreds of lines of code, but all of this is transparent to the user of the ‘app’). Since 2016, Chromebooks have also been able to run Android apps although not all Android apps are suitable for use with a keyboard and mouse (trackpad), as they were designed to be used with touch screens. The users may also be unaware that Android also has the Linux kernel at its heart. The first Chromebooks were underpowered and cheap devices, but now some are more powerful and commensurately priced. You just buy a Chromebook and you just use it.

MacOS is UNIX (so is Linux in all but name, in fact, there are two CentOS Linux based Linux distributions that actually have UNIX certification). So, it may not come as a surprise to find that under the hood, in many ways, macOS and Linux are very similar, particularly when using the command line to perform tasks. There are differences between macOS and Linux because macOS has its own XNU kernel. However, you don’t go out and buy macOS, you buy a MacBook or an iMac. You don’t think about the desktop environment because you are stuck with whatever macOS provides, which is quite nice to use. You buy it and you just use it.

The same goes for Windows. When you buy a Windows computer, a component of the price is for the Windows operating system, but you don’t consider that, you just look at the specs, the build quality and the price to make your decision. You are stuck with the Windows desktop environment. You even, like with macOS, have the ability to use virtual desktops or workspaces that help with your workflow (although many Windows users are unaware of how to get at their virtual desktops, or even that they exist!). You go out and buy the computer that has the Windows operating system and you just use it. Sounds familiar?

Nowhere in the above discussion have we talked about going out and buying Linux. Linux, or more correctly GNU/Linux is an operating system (as are Windows, macOS and Chrome OS) The only way that there can be a level playing field is if you can go out and buy a computer that has a Linux distribution operating system already on it, so you can buy it and just use it; just like any of the other systems.

Now you can go out (or go online and buy a Linux laptop or desktop machine, even on Amazon!). Linux computers are not for computer specialists or nerds! They are for ordinary computer users, just like the others. There are thousands of free programs of exceptional quality available for easy download and installation. Moreover, because of the Wine system, many Windows programs can be run in Linux. There are great Linux communities online, so most problems can be solved by simply Googling; not that, in day-to-day computing, problems arise very often. Unlike Windows or macOS, there is a wide range of desktop environments to choose from, although each distribution comes with a given desktop as standard. You can choose a desktop environment that resembles Windows or macOS, or others completely different. The desktop is where you work, so it is important to use one that suits you best. Then, virtual desktops or workspaces are just there and not hidden away like some afterthought. You can change Linux distribution any time you want. They are all free!

The Linux laptops and desktop computers are now liberating Linux from being an operating system looking for a computer. It is now a computer system you can buy like any other, only arguably better. Some companies like HP and Dell have for some time offered Linux laptops, but for some reason, have done virtually no advertising; you have to go searching for them. However, there are other companies that have made their business providing high quality Linux computers. One such company is Juno Computers which offers first rate Linux laptops across the price range. Another is Star Labs offering high quality laptops with a choice of Linux, and yet another is the KDE Slimbook. System 76 provide top of the range laptops. Then there is the Penguin M3 GNU/Linux laptop. The Chinese company Huawei which has been the centre of some controversy if offering high end Linux laptops, although not as expensive as MacBooks. Huawei is one of the two Chinese companies to have had their in-house Linux distribution certified as UNIX. Pinebooks have been ridiculously low priced, low spec Linux laptops. This list is not exhaustive. Then there are other companies such as the UK PCSpecialist and others, who build high quality laptops over the whole price range, that can be purchased without an operating system. This means that the cost of Windows is deducted from the total cost. You can install Linux on such a machine without ‘wasting’ a Windows OS. This article is being written on such a computer running Fedora Linux and using MS Office Online.

Linux Laptops are starting to make a foray into the Laptop marketplace. The more they are marketed, the more they will become popular and all of the unjustifiable myths about Linux being hard will be dispelled once and for all. Up until Jun11th 2011, no-one had ever heard of a Chromebook, but marketing has made them popular; marketing, nothing more or less. People have been persuaded by marketing (by Google, whose parent company Alphabet, overtook Apple in 2019 to become the most cash rich company in the world). With this kind of marketing power, they could ‘sell coal to Newcastle’. It follows that Linux laptop computer companies will struggle to compete in marketing and that notwithstanding the ‘subtle’ pressure from Microsoft with respect to their OEM licencing if they also produce Windows laptops. Nevertheless, advertising and ‘word of mouth’ will gradually spread the message.

Now that Linux laptops are here and for sale, the Rubicon has been crossed. As Caesar said, ‘The die is cast’, and that die will shape the future of laptop and desktop operating systems. The Cloud, the Internet, telescopes and Hadron colliders are all controlled by Linux. Soon Linux will take its place among the pantheon of desktop and laptop operating systems, maybe at the head!

When I started to write this article, I was put in mind of one of my earliest and finest research students, the late Dr, David Stanley Chase. He told me that he wanted his research to be the best. I told him that it was good and if it got him his PhD, that would be fine for starters. His response was: ‘Nah, there are winners and all the rest!’ Well, there is Linux and all the rest!

Friday 6 March 2020

Full control of a USB tethered DSLR by AstroDMx Capture for Linux in a Lubuntu Linux virtual machine in Windows 10

For many people a DSLR is their main if not only camera for astronomical imaging. It is good to be able to use software that treats the DSLR as an astronomy camera and to be controlled by software just like any other astronomy camera. AstroDMx Capture for Linux does just that, and by using an easy to set up virtual Linux machine, it can be run on a Windows 10 laptop.

A Skymax 127 was mounted on a Celestron AVX GOTO mount and a Canon 4000D DSLR was placed at the Cassegrain focus of the Maksutov.

A Lubuntu virtual machine using Oracle VM VirtualBox was running on a Windows 10 laptop.
AstroDMx Capture for Linux was running in the virtual machine and was used to fully control and capture images from the USB tethered Canon 4000D DSLR.

The software was set to automatically capture a set of 60 TIFF files from each of 3 overlapping panes of the 88.4% waxing Moon.

The three sets of 60 images were stacked using the best 95% of the images in Autostakkert! 3.0. The resulting images were wavelet processed in Registax 5.1, stitched together by Microsoft ICE and the final image post processed in the Gimp 2.10.

The imaging setup


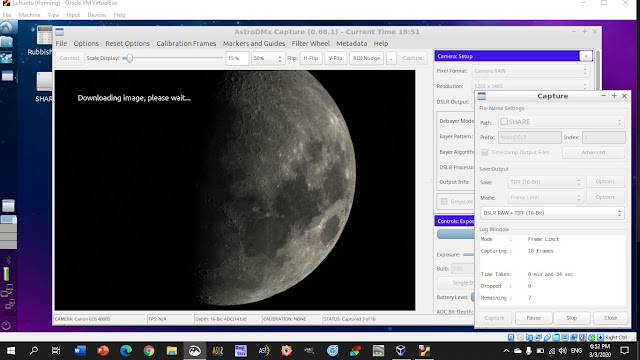
Screenshot of AstroDMxCapture for Linux running in the Lubuntu virtual machine on the Windows 10 laptop and capturing data.

88.4% waxing, gibbous Moon

Closer view

The virtual machine is just part of the software required to run AstroDMx Capture on the Windows 10 laptop.

You can think of a virtual machine as a program that lets you run software on your operating system that you otherwise wouldn't be able to run.

Download an instructions PDF on how to set up a virtual Lubuntu Linux machine on a Windows 10 or a macOS computer.

Thursday 5 March 2020

Thinking about Virtualisation

Recently, I have been writing about using virtualisation in order to run our AstroDMx Capture for Linux on other operating system such as Windows 10 and macOS; platforms, currently onto which the software has not yet been ported.

I have given detailed instructions on setting up an Oracle VirtualBox system on a Windows 10 or a macOS computer. The instructions are downloadable as a PDF file HERE.

Because the concept of virtualisation is not familiar to most people, and that many people have not used Linux; there is an unjustified mystique about setting up and running virtual machines, and another unjustified mystique about using Linux as the operating system running in the virtual machine. I describe both of these mystiques as being unjustified. The unfortunate consequence of the idea that you need to be some sort of computer wizard to use virtualisation and then to use Linux in a virtual machine, leads to hesitation and unwillingness to give it a try.

If you do give it a try, you will succeed and then you will be able to explore any operating system you like from within the comfort and total safety of a virtual machine. Moreover, you will be able to run our AstroDMx Capture for Linux on your own computer without having to give up your familiar operating system.

To create a virtual machine on your computer you need to install a piece of software. You do this just as you would any other program on your operating system. The program is called a Hypervisor and the one I have been writing about recently is Oracle VM VirtualBox.

A Hypervisor is computer software that enables a user to create and run one or more virtual machines simultaneously. Another name for a hypervisor is a virtual machine monitor (VMM).

A key function of a hypervisor is that it provides isolation, which means that a Guest OS cannot affect the Host OS or any other Guest OS, even if it crashes.

A Type 2 or hosted hypervisor is installed as a software application on a Host operating system, such as Windows, macOS or Linux. Oracle VirtualBox is an example of a Hosted Hypervisor.

A Guest operating system is the operating system that you install onto the hypervisor.

If the Guest operating system is to be, for example, Lubuntu, then you will have to go to the Lubuntu website and download the Lubuntu iso file. This is the file that VirtualBox will use to install Lubuntu into the virtual machine. One advantage of using a virtual machine is that has an extra layer of security. Another advantage is that you will be able to run software that will not run on the Host operating system. This adds enormous flexibility to what you are able to do with your computer.

Once you have installed a VirtualBox virtual machine you will wonder what you were ever worried about. It is a simple process and is not beyond the capabilities of any ordinary computer user.

You don’t have to have a very high spec computer in order to run VirtualBox. Here are the basic requirements:

Any AMD or Intel CPU
At least 512 MB of RAM (You need whatever your Host OS needs plus what the Guest OS will need)

Then all you need is the curiosity to give it a go and discover new horizons in your astronomical and general computing.

Tuesday 3 March 2020

Tethered DSLR imaging with AstroDMx Capture for Linux on Windows 10 in a Lubuntu Virtual Machine

A USB-tethered Canon EOS 4000D DSLR was placed at the Cassegrain focus of a Skymax 127 Maksutov, mounted on a Celestron AVX GOTO mount.

A Lubuntu Virtual machine was running on a Windows 10 laptop and within the Virtual Machine, AstroDMx Capture for Linux was running. The DSLR was USB tethered and was passed through to the Virtual machine as a USB device.

The virtual machine was installed according to the method explained in the PDF file found HERE

For demonstration purposes 10 frames were captured by AstroDMx Capture for Linux, of each of two overlapping sections of the 59.7% waxing Moon.

Screenshots of capturing DSLR data with AstroDMx Capture for Linux on Windows 10, in a Lubuntu Linux Virtual Machine


The two groups of images were stacked in Autostakkert! 3.0 and wavelet processed in Registax 5.1.
The two resulting images were stitched in Microsoft ICE and post Processed in the Gimp 2.10.

59.7% Waxing, Gibbous Moon

Closer view

Full tethered control of a Canon or Nikon DSLR that has tethered control supported by the manufacturer, and the capturing of sets of images with long or short exposures is achieved flawlessly by using Virtualisation in a Windows 10 computer.
Particularly for Deep Sky imaging, using AstroDMx Capture enables the DSLR to be used in the same way as an astronomy camera. The Software can be set up with appropriate ISO and exposure values and then left to gather the required number of images.

Below is the log file from one of the sets of captures used here:

Camera Log File: AstroDMx Capture (0.68.1)
--------------------------------------------

AstroDMx Mode           = Software Acceleration

Camera Name             = Canon EOS 4000D
Camera Format           = Camera RAW
Resolution              = 5202 x 3465
Output Format           = TIFF (16-Bit)
Capture Mode            = Frame Limit

Colour Mode             = RGB (Debayered in Application)
Debayer Algorithm       = LibRaw Internal
Bayer Pattern           = RGGB
Frame Integration       = NOT ACTIVE / NOT SUPPORTED

Bulb:                   = Inactive
Shutter Speed:          = 1/500
F-Stop:                 = implicit auto
ISO:                    = 6400
White Balance:          = Daylight
Quality:                = RAW
Colour Mode:            = AdobeRGB
Image Target:           = Internal RAM
Power Saving:           = Not Supported

Flip Position           = NOT ACTIVE
Bit Depth               = ADC = 14 bits
Realtime Calibration    = NOT ACTIVE

Frames Saved            = 10
Histogram Mode          = LINEAR
Histogram Channel       = RGB

Data Collection Started = 2020/3/3 at 18:51:31
Data Collection Ended   = 2020/3/3 at 18:53:1

Connection Monitor resets: 0 events

Monday 2 March 2020

Lunar Imaging with an SV305 camera on a MacBook with AstroDMx Capture for Linux in a Lubuntu Linux Virtual Machine

An SVBONY SV305 camera fitted with an SVBONY UV/IR cut filter was placed at the Cassegrain focus of a Skymax 127 Maksutov mounted on a Celestron AVX, GOTO mount.
A MacBook (13-inch, Late 2009) with 8Gb RAM and a 480Gb SSD, running High Sierra was used as the test computer. A Lubuntu Virtual machine was installed in Oracle VM VirtualBox as explained in the previous post, HERE
AstroDMx Capture for Linux was installed on the virtual machine and imaging was carried out as usual.
Screenshot of AstroDMx Capture for Linux capturing lunar data

Stack of 225 frames

The images were stacked in Autostakkert! 3.0 and wavelets processed in Registax 5.1.
The resulting image was post processed in The Gimp 2.10 and Affinity photo.

This experiment demonstrates that the SV305 can be used successfully, even in an old MacBook, by using a Virtual machine.

Sunday 1 March 2020

Download PDF Instructions for setting up a Lubuntu Linux Virtual Machine in Windows 10 (or macOS) using Oracle VM VirtualBox

Windows 10 or macOS users.

If you want to take a look at a Linux distribution by using a Virtual machine, then you can download a pdf file with full instructions on how to do it.


Then click on the download icon to download it to your machine.

You will be able to use this Virtual machine within your present operating system to install and run
  AstroDMx Capture for Linux.


On Windows 10 or macOS

Think of a virtual machine as a program that lets you run software on your operating system that you otherwise wouldn't be able to run.