Getting started with AstroDMx Capture
If you wish to link to this article then please use the URL Below
https://x-bit-astro-imaging.blogspot.com/2021/07/getting-started-with-astrodmx-capture.html
Note that this blog is fully indexed and searchable, so you will be able to find on this blog, other articles relating to this software, simply by searching.
It is hoped that the reader will read and understand the article entitled ‘Hidden in the Dark: A look at 16-bit astronomical imaging’ before she/he proceeds to read the current article.
There are versions of AstroDMx Capture for Windows, macOS, Linux (including the Raspberry Pi), and Chrome OS Linux. They all work in the same way!
This article will guide you through using the software to capture images and video. All supported cameras work the same way. Some have more controls than others, but as AstroDMx Capture is context aware, in general, only the controls that the camera makes available are shown in the GUI (Graphical User Interface).
The best way to learn to use the software is to practice in the daytime. Attach your camera to your telescope and point the scope at a distant object. When the software is running, bring the preview image to focus and then start to learn the software. At night, work initially on the Moon; get a good focus and make sure that you can find the focus again by noting the gradations if you have them on the focuser, or if necessary make a mark on the focuser tube so that you can easily get the same focus again. This is important for deep sky imaging where things are so much easier if you start off more or less in focus.
The first decision that you have to make is whether you are going to do lunar/planetary imaging or Deep Sky imaging.
Launch AstroDMx Capture and make sure that a camera is connected.
Click on the Connect Button at the top left. A Connect camera dialogue will appear near the middle of the screen.
Select the camera you wish to connect and wait (maybe a few seconds for it to be selected).
Click on Format to select the format of the images you wish to capture.

At this point you need to know whether you will be capturing terrestrial, lunar/solar/planetary or Deep Sky images.
If you are capturing Deep Sky images, select RAW 16. Only this format will allow you to capture all of the range of brightness that is present in deep sky images.
If you are capturing terrestrial or lunar/solar/planetary images, it is best to select RAW 8.
It is best not to use RGB24, which is only an 8-bit format. Using RAW 8 and Full Debayer will apply a high quality debayering algorithm, whereas it is impossible to tell the quality of the debayering algorithm employed by the camera firmware.
Then Select the resolution you wish to capture. In the example here, we shall select the highest resolution of the camera, which in this case happens to be 1920 x 1080. If we had selected a different resolution such as 800 x 600, this would select a Region Of Interest of that resolution in the middle of the sensor. You may wish to do this if you are imaging a planet that is quite small on the screen. Using a Region Of Interest (ROI) will give higher frame rates and will not waste image area on black sky. If the camera does not support ROIs, selecting a lower resolution will simply produce a smaller image.

When you have selected the resolution, Click on the Connect button in the dialogue.
Depending on the camera you have selected, an AstroDMx Tip may appear to give advice. Click OK in the Tip dialogue after you have read it..
The camera will now connect.
The next bit is very important.
At this point, if you are using a colour camera; whether you are using RAW 8 or RAW 16, go to the Controls Camera section near the top at the right side of the GUI. It will look like this:

Change the Colour Display/RAW Out to Debayer: Full
As in the screenshot below.

This will make sure that the image you see on the screen AND the data that you capture are all full colour using a high quality debayering algorithm.
Selecting Gain and exposure.
Exposure changes the length of exposure of each frame
Gain changes the amplification of the signal produced by the exposure. The higher the gain, the higher the noise.
The frame rate is affected by the exposure. For example, it is obvious that with an exposure of 1s, it is impossible to get higher frame rates than 1fps etc.
A balance needs to be achieved between gain and exposure.

Note; it is possible to type in gain and exposure values. Just click in the box where the exposure is shown; in the example above the exposure shown is 55ms. If you wanted to change the exposure to say, 64ms, just type in 64ms and press enter. If you had wanted to change it to 2 seconds, just type in 2s and press enter. To type in gain values, click in the box where the gain is shown and just enter the gain you want; just a number without any units.
Alternatively, you can just pull the sliders, but this is probably not the best option for getting things exactly how you want them.
You can change the range of exposures over which the sliders work by selecting the Range from a drop down menu as shown below.
Also, if you Left Click on the handle of any slider to give it focus, you can then change the value by pressing the right or left cursor control keys. This is a really useful function. However, it is probably best not to try to use it with Exposure as most of the ranges are too wide for it to have a noticable effect.
Moreover, if you Right Click on the handle of a slider it sets the slider back to camera default.

If you are doing 8-bit solar, Lunar or planetary imaging, you will be working in the microsecond and millisecond ranges depending on the camera and the telescope.
The aim is to capture a large number of images in a short period of time, when you have got things looking correct on the screen
8-bit Controls
For 8-bit imaging.

The controls fall into different categories:
Camera Exposure
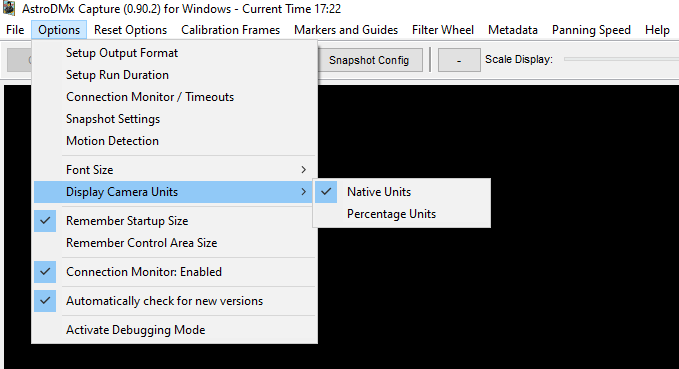
Which includes gain. Depending on how it has been set in ‘Options’ the camera units can be either percentages or Camera Native Units. Sometimes Native Units is the best choice.
As previously stated, the Gain and Exposure values can be typed in. The gain is just a number and does not require a unit.
The exposure does require a unit and can be typed in for example, as 30s or 200ms etc.
Controls Histogram
This displays a histogram of the image and it should be experimented with to see the effects of the various options. The histogram displays but does not change the data streaming from the camera.
Controls Preview Controls
For 8-bit imaging the Preview controls are the Display Performance, which, when activated, can be used to degrade the quality of the displayed image (NOT THE SAVED DATA). This might be useful if you are using a minimal spec computer with a slow CPU. You can keep up the performance of capturing, if required, by using this control.
The Software Controls (Non Destructive), when activated, can be used to change the appearance of the preview image on the screen. They comprise Gamma, Brightness and Contrast. By default, they are non-destructive, i.e. they do not change the data being saved. However, there is a checkbox that allows them to change the saved data. This should generally only be used if the camera you are using has few or no controls, such as some webcams. The option to affect saved data is not available if 16-bit imaging is being done.
Controls Main
These are the actual camera controls and will vary from camera to camera. They, of course, do affect the data that are being saved.
Controls Colour
These are actual camera controls and are presented if the camera is a colour camera. Which controls are available depends on the camera being used. In the camera being used in this example, there is a One Touch white balance control which works as long as enough light is reaching the sensor.
In the daytime, all of these controls should be experimented with in order to become familiar with the operation of the software.
16-bit Controls
For 16-bit, deep sky imaging
A lot of time will be saved if you make sure that your scope and camera is already focused on infinity, so that you will be more or less in focus when you start trying to image, as mentioned at the start of this article.
The difference between the 8-bit and the 16-bit controls is in the Controls Preview Controls.
This is because with 16-bit imaging, what you see is NOT what you get in the saved data.
The details of this are explained in the article ‘Hidden in the Dark: A look at 16-bit astronomical imaging’. It is important that the article is read, and possibly before this one.
The function of the Preview controls is to make the deep sky image become visible, but not to try to get it to appear as it will after the image has been processed.
It is best to start with a bright deep sky object such as M13 a globular cluster or, if the time of year is appropriate, a bright nebula such as M42.
The 16-bit Display Transform should be changed from Linear to ArcSinH or ArcSinH of ArcSinH, this will brighten up the darker parts of the image.
You may want to increase the 16-bit Brightness control a little, but this is often not required.
You can also use the Software Controls (Non Destructive) to change what the preview image looks like.
Apart from the Controls: Colour for adjusting the white balance, you will probably not adjust any of the camera controls other than Gain and Exposure.

Capturing image data
Clicking the Capture button at the top of the GUI will bring up the capture dialogue in which you can set various parameters to control the file types to be captured and the way they are captured.
Selecting the File type to be captured

Selecting the type of capturing, in this case Frame Limit

Selecting the number of frames to capture

Last words:
Practice and more practice as well as experimenting is the only way to become familiar with the software.