Nicola has implemented the SVBONY SC432M solar camera in AstroDMx Capture. It works fine but we have requested that SVBONY make certain modifications to the SDKs for all platforms to present only cooling data relevant to the camera.
The SC432M Mono Solar Camera IMX432 - Global Shutter, Large Pixels, greyscale camera for Moon Sun and Planets. It has a silver coloured body that effectively reflects sunlight. The camera is fan cooled with the fan being powered by a USB C port connected to a 5v USB supply. This system helps to maintain the system several degrees cooler than if the cooling fan is not employed.
The 9um pixel size of the IMX432 has a well depth of 100ke with a total of 1.7MP (the resolution is 1608*1104
The large pixel size means that it works at longer focal ratios, such as Maksutovs, SCTs and Daystar quarks. If one is using a shorter focal length telescope, a Barlow lens can be used to increase the focal length of the system
Skymax 127 modified for motor focus, fitted with a photo grade Baader solar filter (OD 3.7) and an SC432M placed at the focus.
Screenshot of AstroDMx Capture streaming data from the SC432M through a Baader Ca K-line filter and the Skymax 127 + solar filter
Four overlapping 1000-frame SER files were captured, the best 90% of the frames stacked in Autostackert!, stitched in Microsoft ICE, wavelet processed in waveSharp and post processed in the GIMP 2.10.
The Sun in Ca K-line light
Closer view
The Skymax 127 fitted with a dew shield and the SC432M placed at the focus.
Two overlapping 1000-frame SER files were captured in AstroDMx Capture for Windows.
The best 90% of the frames stacked in Autostackert!, stitched in Microsoft ICE, wavelet processed in waveSharp and post processed in the GIMP 2.10.
The Moon April 16th
Two overlapping 1000-frame SER files were captured in AstroDMx Capture for Linux on the next night.
The best 90% of the frames stacked in Autostackert!, stitched in Microsoft ICE, wavelet processed in waveSharp and post processed in the GIMP 2.10.
The Moon April 17th
Closer view

A Meade RB70 f/10 doublet refractor was fitted with a x 2 Barlow and the SC432M camera and mounted on the Celestron AVX mount.
Four 1000 frame overlapping SER files were captured in AstroDMx Capture. The best 95% of the frames in each SER file were stacked in AutoStakkert! , stitched in Microsoft ICE, wavelet processed in waveSharp and post processed in the GIMP 2.10.
One pane of the mosaic
Final 4 pane mosaic of the Moon
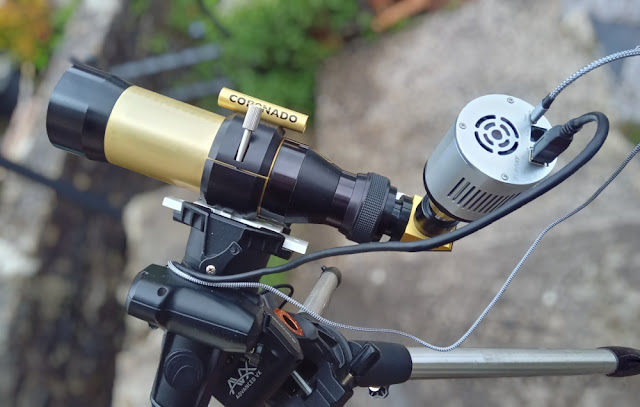
A Coronado Solarmax II, 60, BF15 H-alpha scope was fitted with a x2 Barlow and the SC432M camera and was mounted on the Celestron AVX mount. A 1000 frame SER file was captured in AstroDMx Capture.
The data were part processed in SER player, stacked in Autostakkert!, wavelet processed in waveSharp and post processed in GIMP 2.10.
The Sun in H-alpha light
Closer view

The SC432M camera was fitted with the lens from a x2 Barlow and placed at the focus of a CaK PST solar scope.
Screenshot of AstroDMx Capture for Linux capturing a 200-frame SER file in Ca K-line light using a region of interest.
The SER file was stacked in Autostakkert! , wavelet processed in waveSharp and post processed in the GIMP 2.10.
The Sun in Ca K-line light
By using a long focal length scope or using Barlow lenses, it was possible to match the camera to the scope fairly well.
The SC432M has a global shutter which means that the information from the sensor is read out instantly instead of gradually across the chip as with a rolling shutter. Zoltan Trenovszki states that a global shutter will prevent the occurrence of Newton's rings. It is not immediately clear why a global shutter would avoid Newton's rings. However, with charge/voltage conversion in a CCD sensor, a vertical and horizontal charge transport first takes place. The serial charge/voltage conversion of all pixels takes place outside the sensor in the camera’s electronics. In contrast, the charge/voltage conversion in CMOS sensors occurs in every pixel on the sensor. This difference in charge handling could potentially contribute to the appearance of Newton’s rings in CMOS sensors.
Considering the shutter mechanism: Most CCD sensors use a global shutter, which exposes the entire image simultaneously. On the other hand, most CMOS sensors use “rolling shutters,” which expose different parts of the frame at different points in time. This difference in exposure mechanism might also play a role in the formation of Newton’s rings.
With the SC432M we saw no sign of Newton's rings, even when using a Barlow lens which is the classical situation for causing the phenomenon. If this proves to be general, it will be a great benefit for H-alpha imaging without having to tilt the camera in the optical axis.


.png)


.png)


