Tuesday, 28 February 2023

Exploring bi-colour palettes with an SV605MC, a William optics 81mm APO refractor and AstroDMx Capture

Bi-colour images of the Horsehead and Flame nebulae

The Horsehead and Flame nebulae were imaged with AstroDMx Capture, a William Optics Super Zenithstar 81mm ED Doublet APO refractor at f/5.5 with x 0.8 reducer/flattener, (F=445.5mm) and an SVBONY SV605MC monochrome, cooled CMOS camera fitted with a 7nm H-alpha, or a 6.5nm OIII filter or an Altair Quadband filter whose transmission curve extends to long enough wavelengths to include SII. 

As usual, the mount was placed on marks on the concrete base which give a fairly good polar alignment. AstroDMx Capture passed the time, altitude and location coordinates to the hand controller via the INDI server. The hand controller which now contained all of the correct information was set to its previous alignment and was unparked by AstroDMx Capture.

AstroDMx Capture was used to send the scope/mount to a bright star to check focus with a Bahtinov mask. 

Then AstroDMx Capture sent the scope/mount to the mag 7.5 star HD37805, which lies roughly central within the Horsehead-Flame nebulosity. This is a preferred way to compose the image, than sending the scope/mount to the published coordinates of the Horsehead or the Flame nebula.

AstroDMx Capture plate-solved the field of view and centred the selected HD37805 star

6 x 5min exposures were captured with each of the OIII and H-alpha filters, giving 1 hour total exposure time, plus 15 x 2min exposures through the Quadband filter, extending the total exposure time to 1 hour 30 minutes. All of the captured images at all wavelengths were stacked together to produce a luminance image.

AstroDMx Capture capturing H-alpha data


AstroDMx Capture capturing O3 data


The data were stacked and partly processed in Siril and post-processed in the Gimp 2.10 and Neat Image.

Three false-colour palette rendering of the results are shown here:

The first bi-colour image maps HOO to RGB and then the luminance is blended into the image


The second bi-colour image uses a synthetic green channel produced as the stretched product of the H and O images and then the luminance channel is blended into the image.


The third bi-colour image maps OHO to RGB and then the luminance is blended into the image.


There are, of course, a number of possible combinations of the two colour channels O and H:

The SV605MC camera performed flawlessly with AstroDMx Capture and will be supported by the imminent release of Version 2.


Saturday, 25 February 2023

Bicolour narrowband images with the SV605MC camera and AstroDMx Capture

The Rosette nebula was imaged with AstroDMx Capture, a William Optics Super Zenithstar 81mm ED Doublet APO refractor at f/5.5 with x 0.8 reducer/flattener, (F=445.5mm) and an SVBONY SV605MC monochrome, cooled CMOS camera fitted with a 7nm H-alpha, or a 6.5nm OIII filter. 6 x 5min exposures were captured with each filter, giving 1 hour total exposure time. 

Nicola has implemented two additional preview stretching functions that are more aggressive than those already present, to facilitate the visualisation of dim objects being imaged.

Click on an image to get a closer view

AstroDMx Capture capturing FITS data in H-alpha light


AstroDMx Capture capturing FITS data in OIII light


The data were stacked and partly processed in Siril and post processed in the Gimp 2.10, Neat image and Starnet++ v2.

Making bicolour images

The raw data are stacked monochrome images captured through either a H-alpha or an OIII narrowband filter.

To have a colour image it must have RGB colour channels. The question is: What must be mapped to the RGB channels to produce a false colour, bicolour image?

The test example here is the Rosette nebula with 6 x 5min exposures through a H-alpha filter and 6 x 5min exposures through an OIII filter. 

The monochrome images have been stretched by curves to produce images of approximately the same brightness.

H-alpha monochrome image


OIII monochrome image


The simplest way of constructing a bicolour image is to use the HOO, RGB method; that is Halpha is mapped to Red and OIII is mapped to both Green and Blue channels. Then the colour balance and saturation are adjusted to produce a neutral dark background and distinctly coloured mid tones.

HOO image


Other methods of bicolour image construction involve the making of a synthetic green channel.

One way to do this is to simply blend the H-alpha and OIII monochrome images 50% each and adjust the curves so that this synthetic green channel has approximately the same brightness as the H-alpha (Red) and OIII (Blue) channels. The synthetic green channel is effectively the mean of the Red and Blue channels.

This method could be called the HO(meanHO) method.Then the colour balance is adjusted to produce a neutral dark background and distinctly coloured mid tones.

The three monochrome images are used to compose an RGB image.

Then the colour balance and saturation are adjusted to produce a neutral dark background and distinctly coloured mid tones.

HO(meanHO) image


Another way of constructing a synthetic green is to paste the OIII monochrome image onto the H-alpha monochrome image as a new layer and to combine them by using the multiply method. The resulting synthetic green image is flattened and curves are used to bring the brightness of the synthetic green monochrome channel to approximately the same brightness as the OIII and H-alpha monochrome channels.

This method could be called the HO(multiplyHO) method. Then the colour balance and saturation are adjusted to produce a neutral dark background and distinctly coloured mid tones.

The three monochrome images are used to compose an RGB image.

Then the colour balance is adjusted to produce a neutral dark background and distinctly coloured mid tones.

HO(multiplyHO) image


In the HOO method, the blue (OIII) channel was also used as the green channel.

In the HO(meanHO) and HO(multiplyHO) methods the red channel is combined with the blue channel in different ways to produce a synthetic green channel. The justification for doing this is that a green channel is required to produce the final false colour bicolour image.

It therefore seems reasonable to blend the results of all three methods to produce a sort of average bicolour image.

Bicolour blend image


As each of these methods is equally valid, it is the personal preference of the imager to choose between them.

One final thing to be done is to remove the stars with software such as Starnet++v2 and de-noise with software such as Neat Image.

Stars removed and de-noised


Subtracting the original starless image from the bicolour blend image gives an image of the stars which can then be saturation-reduced to reduce the false colour of the stars.

Extracted stars


Levels are then applied to enhance the starless, de-noised image.

Enhanced, starless, de-noised image


The stars are then added back to produce the final image.

Final Bicolour image


Of course, the star removal, de-noising and nebula enhancement could have been done for any of the bicolour images with some likely concomitant improvement. I left it until the end because I elected to use a blend of all three methods of making bicolour images.


H-alpha and OIII data were also collected on the Thor's Helmet nebula. Ten x 3 minute exposures were captured at each wavelength giving a total exposure time of 1 hour.


 Using similar techniques, a bicolour image was produced

Thor's Helmet


Nicola is now tidying up some loose ends before making a release of Version 2 of AstroDMx Capture. 

Thursday, 16 February 2023

Working with OSC filters and advanced functionality AstroDMx Capture

Working with OSC filters and advanced functionality AstroDMx Capture


These imaging experiments were done with no Moon in the sky.


Experiments with Astronomik UHC-E or Optalong LeNhance filters with an SVBONY SV605CC OSC 14bit cooled camera and an ALTAIR STARWAVE 60 ED Imaging Refractor with an 0.8 reducer/flattener at f/4.8, mounted on a Celestron AVX mount controlled by AstroDMx Capture for Linux via an INDI server running on a Raspberry Pi.

AstroDMx Capture was used to capture FITS images.


As usual, the mount was placed on marks on the concrete base which give a fairly good polar alignment. AstroDMx Capture passed the time, altitude and location coordinates to the hand controller via the INDI server. The hand controller which now contained all of the correct information was set to its previous alignment and was unparked by AstroDMx Capture.


Astronomik UHC-E OSC filter


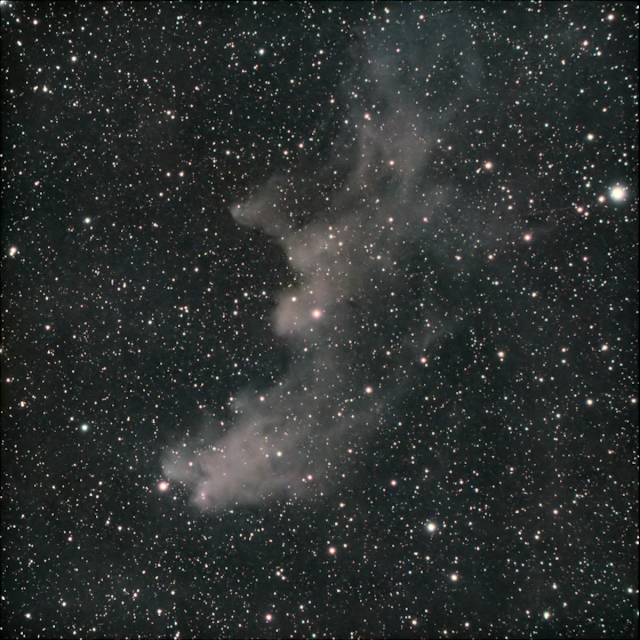
The Witchhead nebula NGC 1909


AstroDMx Capture was used to send the scope/mount to a bright star to check focus with a Bahtinov mask. 

Then AstroDMx Capture sent the scope/mount to the mag 8.15 star HD32841, which lies roughly central within the Witchead nebulosity. This is a preferred way to compose the image, as sending the scope/mount to the published coordinates of the Witchhead nebula actually places the nebulosity off to the side of the field of view. HD32841 is the star that is in the middle of the final image. AstroDMx Capture plate-solved the field of view and centred the selected star


15 x 5min exposures were captured of the Witchhead nebula.


The Witchhead nebula is a low contrast object but was just visible in the preview window.

The data were stacked and partly processed in Siril and post processed in the Gimp 2.10 and Neat image. Star removal and replacement techniques were used to facilitate noise reduction and slightly reduce the saturation and prominence of the stars.


The Witchhead nebula NGC 1909 rotated into a more familiar position


Optalong LeNhance narrowband OSC filter


The Seagull nebula IC2177


AstroDMx Capture sent the scope/mount to the mag 6.5 star HIP34234, which is central to the nebulosity and is the star in the middle of the final image. AstroDMx Capture plate-solved the field of view and centred the selected star.


12 x 5min exposures were captured of the Seagull nebula


1h 15min of 5min exposures of the Spaghetti nebula on the East of the Meridian, plus 1h 20min of 10min exposures on the West of the meridian after a meridian flip. Giving a total of 2h 35min of exposures. Captured with AstroDMx Capture for Linux, an SVBONY SV605CC OSC 14bit cooled camera and an ALTAIR STARWAVE 60 ED Imaging Refractor with an 0.8 reducer/flattener at f/4.8 with an Optalong LeNhance filter. 

The data were stacked and partly processed in Siril and post processed in the Gimp 2.10 and Neat image. Star removal and replacement techniques were used to facilitate noise reduction and slightly reduce the saturation and prominence of the stars.


The Seagull nebula IC2177


The Spaghetti nebula SH 2-240


This experiment involved combining 1h 15min of 5min exposures of part of the Spaghetti nebula when on the East of the meridian, plus 1h 20min of 10min exposures on the West of the meridian after a meridian flip. Giving a total of 2h 35min of exposures.


AstroDMx Capture sent the scope/mount to the mag 8.3 star HD 37537 which is located close to a loop of nebulosity in an interesting part of the nebula. This is the star in the centre of the final image.


The two sets of images were independently stacked in ASTAP. One of the stacked FITS images was flipped and flopped and then the two Stacked FITS images were registered, stacked and part processed in Deep Sky Stacker. 


The image was post processed in the Gimp 2.10 and Neat image. Star removal and replacement techniques were used to facilitate noise reduction and slightly reduce the saturation and prominence of the stars.


Combination of 2h 35min of exposure on the Spaghetti nebula


These experiments were concerned with testing the two filters with the SV605CC and the  ALTAIR STARWAVE 60 ED Imaging Refractor with an 0.8 reducer/flattener at f/4.8. 


These imaging sessions were part of the testing of the advanced functionality in AstroDMx Capture. The software appears to be stable and all known bugs have been dealt with.
Nicola is currently implementing an improved preview stretching control and we anticipate that a new release of AstroDMx Capture for all operating systems will take place within the next couple of weeks.

The new version of AstroDMx Capture will have support for the prototype SVBONY SV605MC monochrome, 14 bit, cooled CMOS camera.


Thursday, 9 February 2023

An experimental imaging session with an Astronomik UHC-E filter


The Astronomik UHC-E filter is quite a gentle filter with two quite wide pass bands that include the wavelengths of H-beta and OIII in the blue/green pass band and H-alpha and SII in the red pass band. The filter also passes the strongest emission line typically seen in comets at about 520nm, so in theory might be useful for observing and imaging comets. The filter is intended for visual and photographic work and transmits quite a lot of light. It is an effective light pollution filter cutting out the wavelengths between 540nm and 630nm.

Transmission curve of an Astronomik UHC-E filter


An ALTAIR STARWAVE 60 ED Imaging Refractor with an 0.8 reducer/flattener at f/4.8 was mounted on an AVX mount. An Astronomik UHC-E filter was placed in the optical train in an Altair magnetic filter holder. An SVBONY SV605CC OSC cooled CMOS camera was mounted on the scope.


An extension cord was used to connect the mount to the Hand controller which was indoors with the Windows imaging computer. The hand controller was connected to the imaging computer via USB to connect to the INDI server on the virtual Linux machine running on the Windows machine.


As usual, the mount was placed on marks on the concrete base which give a reasonable polar alignment. AstroDMx Capture passed the time, altitude and location coordinates to the hand controller via the INDI server. The hand controller which now contained all of the correct information was set to its previous alignment and was unparked by AstroDMx Capture.


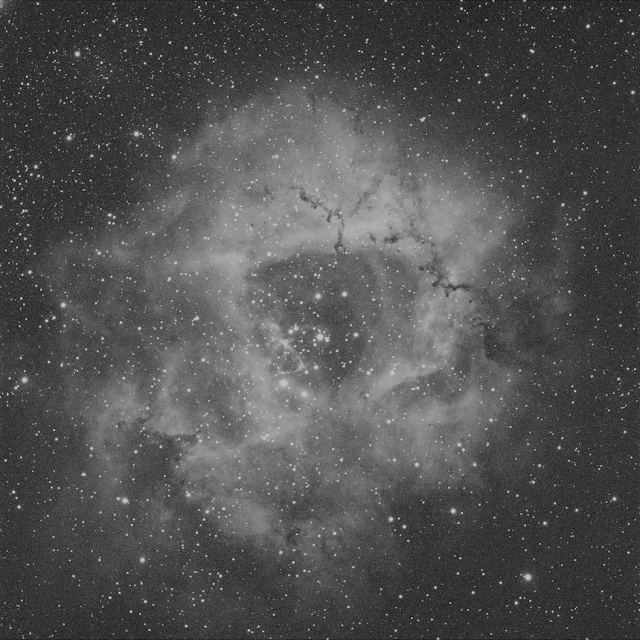
AstroDMx Capture for Windows was used to send the mount/scope to the star Rigel for focusing using a Bahtinov mask, and then to the Satellite cluster at the centre of the Rosette nebula. The field was plate solved and the cluster centred.


We were limited to capturing 5 x 3min exposures during our available time, because an overhead cable started to intrude into the field of view. Nevertheless a total of 15min of exposure was sufficient for the purposes of the session.


Here we shall show the complete workflow to produce the final image of the Rosette nebula.


AstroDMx Capture for Windows capturing 3min FITS images of the Rosette nebula


The images were registered and stacked in the Open Source,  cross-platform software ASTAP (Astrometric Stacking Program and fits viewer). ASTAP also has limited image stretching capabilities and can export stretched images in various formats, or just the unstretched, stacked FITS image.


Stacking and stretching in ASTAP


The stacked image of the Rosette nebula exported from ASTAP.


Starnet++ v2 was used to remove the stars from the image, leaving just the nebula.


Starless image of the Rosette nebula


In the Gimp, the starless image was subtracted from the original image with stars to produce an image of the stars. The star image was reduced in saturation, and curves adjusted slightly to make the stars less prominent.


Stars image


The background of the starless image was extracted in Siril


After the background extraction a little histogram stretching in Siril

The starless, histogram-stretched image was noise reduced in Neat Image. 


The starless image after noise reduction


The denoised image was then further processed in the Gimp 2.10.


Denoised, starless image following some levels adjustment


Using the Gimp 2.10 the stars were added back into the image


Stars added back


The gimp was then used to post process the image to produce the final image.


The Rosette nebula with an Astronomik UHC-E filter


The star removal technique is variously used by astrophotographers. It allows the processing of an image to bring out and balance dimmer parts of an image without causing the stars to become bloated. It also allows for the correction of star colours introduced by the filter used.


The Astronomik UHC-E filter is a challenging filter to use and should be used in the absence of moonlight and under reasonably dark skies. The skies under which these experiments were carried out are Bortle 4, but on this occasion, the full moon had just risen so there would have been more blue sky light than would have been ideal for this filter. Nevertheless, an acceptable result was produced with only a short total integration time.


A similar workflow was used to stack and process 25 x 2min exposures of the Seagull nebula to produce the final image.


Seagull nebula


These should be regarded as guidelines rather than a rigid set of procedures. For example is it best to extract the background in Siril or to use auto colour correct in ASTAP which produces similar results? The point is that a set of procedures such as these presented here can produce the results required. We have used free, open source software wherever possible and where inexpensive paid-for software has been used, free, open source alternatives are available for example, for noise reduction. we have chosen to use Neat Image, but alternative software such as Free Photo Noise Reduction, a free subset of the low cost PT Photo Editor are available. The removal of artefacts left over from the removal of very bright stars can be done with healing tools in the Gimp, or clone tools such as that provided in Free Clone Stamp tool, another free subset of PT Photo Editor.


Wednesday, 1 February 2023

Comet stacking with Deep Sky Stacker

 Comet stacking with Deep Sky Stacker


This article is to show how to do all three types of comet stacking with Deep Sky Stacker.
Unfortunately I only have some mediocre data on Comet C/2117 K2 (Panstarrs) so the final result is not as pleasing as I would have wished. Nevertheless the data serve to illustrate how to do comet stacking.

The images were captured with a zero amp glow camera attached to an average quality refractor. Calibration frames could have been used if they were required.

It should be noted that it is not possible to take any short-cuts and still have the method work.

Click on any image to get a closer view

Below is an image of the DSS menu located at the left of the application window.


The first thing to do is to select Open Picture files (light frames) and upload them into Deep Sky Stacker.

Then click on Check all to select all of the picture files


At this point you can select Settings within Options and select Stacking settings.
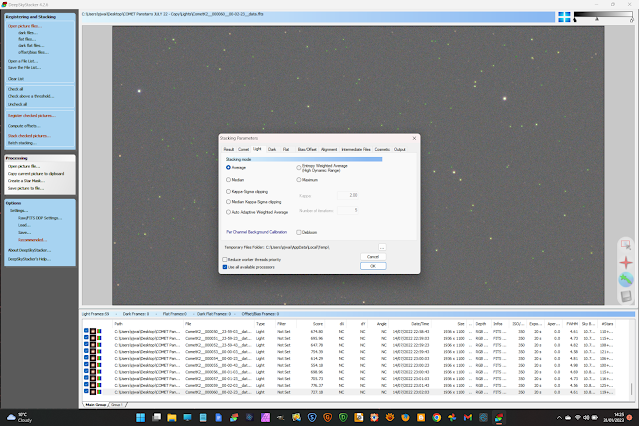
Then click on the Comet tab and select the type of stack you wish to do. Here we have selected Stars + Comet Stacking


Then click on Register Checked Pictures and make sure that Stack after registering is NOT checked.


Then click on the Advanced tab, use the slider at the top and click on Compute the number of detected stars. Repeatedly try the slider and computing the number of stars until you are detecting about 100 stars if possible. Do not allow it to detect huge numbers of stars.

Then click on OK and registration of the frames will begin.


Select the first image in the list as shown by the arrow below

Then use the sliders at the top right of the application window to make the image (in particular the comet) visible

At the right hand side of the preview window there are 4 icons. We are interested in the bottom two; an icon of a comet and an icon if a disk drive.

The comet icon is to put the system into Edit Comet mode and the disk drive icon is to save the changes to the comet selection and the stars for the current image.

First of all we select Edit Comet mode by clicking on the comet icon to put the system into the mode where we can indicate the position of the comet's nucleus.

We hold down Shift and move the cursor over the comet. How good the position selection is can be seen in the small window at the top left of the preview screen. The selection cursor is green and a message is shown by the cursor that says 'Click to set the comet here'. When you are satisfied that the selection cursor is positioned correctly, then left Click.

Close up of the selection cursor

When you have left clicked, the cursor changes to a purple circle around the comet nucleus and the message changes to 'Click to remove the comet'. Only click on this if you think you need to select the comet nucleus better than you have. If you do click on it, the cursor will change back to the selection cursor.

Close up of the selected comet cursor
When you have clicked on the comet's nucleus and got a purple circle around it, then click on the disk drive icon to save details of the stars and comet position for this image. Then select the next image and repeat the process, remembering to click on the disk drive icon once the comet position has been selected. Repeat this process for every image in the list.

At this point select Settings within Options and select Stacking settings. Click on the Light tab and select Kappa Sigma clipping as the method of combining the images, although you may have to experiment with this setting. This setting can eliminate some possible artifacts..

Click on Stack checked pictures, then click on OK.

Deep Sky Stacker will then compute offsets:

And then automatically proceed to stack the images according to the Comet stacking method chosen.
Be patient when it is stacking both comet and stars. It can take some time depending on the computer you are using. Take the dog for a walk or go and make a cup of tea. Eventually it will finish!

Comet and stars stacking

Comet stacking

Regular (stars) stacking

When stacking has completed for the first method, you can click on Open Picture files and dismiss the folder you will be presented with. Then just at this point you can select Settings within Options and select Stacking settings. Then click on the Comet tab and select the type of stack you wish to do.

When stacking is complete, a file called autosave.tif will have been saved in the Light Images folder. This is a 32 bit stack of the images, which can then be stretched and processed in other software.
Note, it is possible to set the autosaved file to be a FITS file, but I have elected to save the final 32 bit image as a TIF.

Comet + stars stack with no trailing of comet or stars


If you stack by all three methods, three autosave.tif files will be saved; one for each method and numbered so that they are not overwritten.

Comet stack with the stars trailed


Regular stars stack with the comet trailed


I look forward to having other, better data sets to work with. The Comet + stars stack did have a slight artefact of some of the brighter stars flaring slightly. At this point I don't know whether this is a general problem with the procedure, or a property of the data set used. Nevertheless, all three comet stacking methods worked and gave usable results.


A final result
Using the Stars + Comet stacked image and the Stars stacked image, and using a technique of star-removal with StarNet++ V2 , star addition and image blending, I produced this final image without artefacts.