Thursday, 28 January 2021

The Horsehead, Flame and Rosette nebulae with AstroDMx Capture

A William Optics apochromatic refractor was mounted on a Celestron AVX EQ, GOTO mount. An Atik 314L monochrome 16-bit CCD camera fitted with a narrowband H-alpha filter was placed at the focus of the telescope and AstroDMx Capture for Linux was used to capture 16-bit FITS files. (AstroDMx Capture for Windows or macOS could have been used as they are essentially identical in operation).

The equipment used


40 x 60s exposures of the Horsehead and Flame nebulae were captured with matching dark frames. The images were registered and stacked in Deep Sky Stacker and the autosaved 32-bit file was post processed in the Gimp 2.10, Afinity Photo and Neat Image.

Screenshot of AstroDMx Capture for Linux capturing data on the Horsehead and Flame nebulae.


Various Preview and Software controls were used to visualise the 16-bit image. It should be noted that whilst it is possible to make adjustments to these controls so that the preview is more pleasing to view, the purpose of these controls is to make the preview visible so that the image can be composed and checked during capture. The preview controls have no effect on the saved data. The same is true of the Software controls. 

Example of the Preview and Software controls


The Horsehead and Flame nebulae Stack of 40 x 60s exposures


Screenshot of AstroDMx Capture saving Data on the Rosette nebula


Clouds prevented more than 16 x 60s exposures of the Rosette nebula. Nevertheless, a pleasing image was obtained when the 32-bit autosaved file was post processed in the Gimp, Affinity Photo and Neat image.

The Rosette nebula stack of 16 x 60s exposures


Despite the fact that there was a gibbous Moon in the sky close to Orion, the H-alpha filter allowed the moonlight to be filtered out revealing the H-alpha content of the nebulae.

Modifications to the 16-bit Preview controls were being tested and following some more refinements, will shortly be included in a new release of AstroDMx Capture for Windows, macOS and Linux (including AstroDMx Capture for the Raspberry Pi).

AstroDMx Capture for Windows, macOS or Linux (Including Raspberry Pi) can be downloaded freely here:

Wednesday, 27 January 2021

The Moon at different scales with an SVBONY SV305 camera

 An SVBONY Full Spectrum SV305 camera (an SV305 manufactured with an optical window in front of the sensor rather than a UV/IR cut filter, which allows the sensor access to a wider range of wavelengths at the red and the blue end of the spectrum; of value for deep sky imaging) was used for these tests. The camera was fitted with a Baader UV/IR cut filter as a soft focus is likely, particularly with a refractor (although a Newtonian should not be affected).

The first experiments used a William Optics ZenithStar 66 SD Apochromatic refractor was mounted on a Celestron AVX EQ, GOTO mount and an SV305 Full spectrum camera fitted with  a Baader UV/IR cut filter.

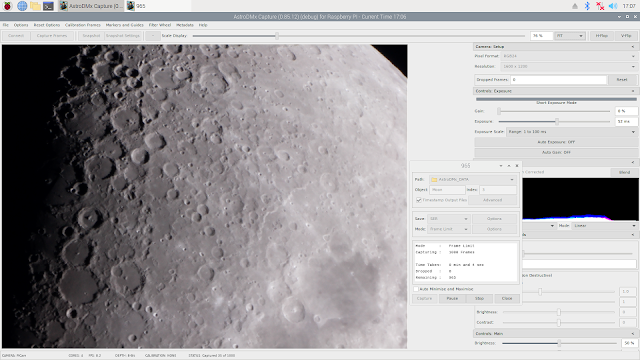
A 2000 frame SER file was captured using AstroDMx Capture.

Click on an image to get a closer view

Screenshot of AstroDMx Capture for Linux capturing a SER file


The best 90% of the frames were stacked in Autostakert!, wavelet processed in Registax 6 and post processed in the Gimp 2.10.


Closer view

The telescope was then changed for an 8" Celestron SCT fitted with a 0.6 focal reducer and AstroDMx Capture was used for capturing 5000 frame SER files of selected regions of the Moon using a Region Of Interest of 800 x 608

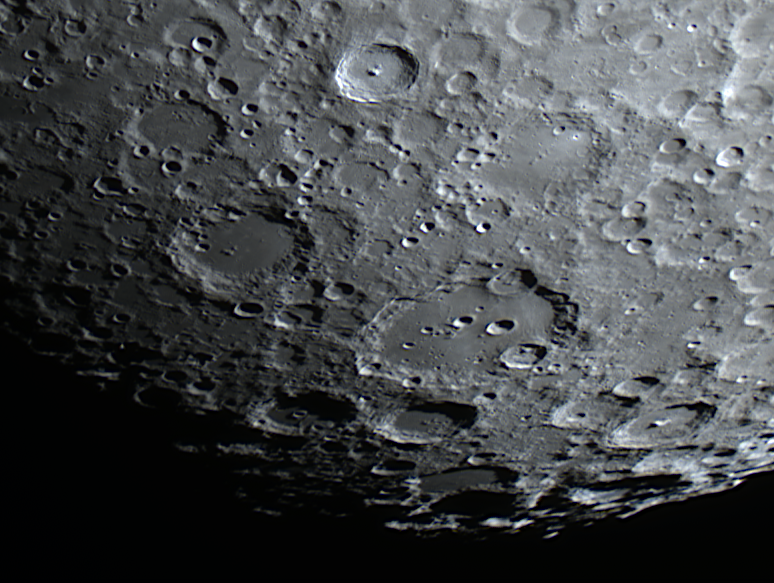
Screenshot of AstroDmx Capture for Linux capturing a SER file of the Clavius/Tycho region of the Moon


The best 20% of the frames in the 5000 frame SER files were stacked in Autostakkert, wavelet processed in Registax 6 and post processed in the Gimp 2.10.

Clavius region


Copernicus

Plato region

The focal reducer was then removed from the SCT and using AstroDMx Capture, 5000 frame SER files were captured using a Region Of Interest of 800 x 608, and using Region of Interest Nudge, to prevent the image from drifting during the capture process.

Screenshot of AstroDMx Capture for Linux capturing a 5000 frame SER file of the Plato region


The best 20% of the frames in the SER files were stacked in Autostakkert!, wavelet processed in Registax 6 and post processed in the Gimp 2.10.

Plato


Clavius

Copernicus

Fitted with a UV/IR cut filter, the Full Spectrum SV305 camera proved to be a first rate imager for the Moon at different scales and with different telescopes.

To obtain the images at larger image scales, a Region Of Interest was used to frame the feature that was to be imaged. Using a ROI allows for faster frame rates, so the SER file can be captured in a shorter period of time. Also, at high focal lengths, any slight tracking issues will lead to significant image drift during the capture period. Therefore, the Region Of Interest Nudge function was used to hold the image and prevent significant image drift.

Capturing 5000 frames allowed for the poorer quality 80% of the frames to be discarded, and the best 20% (1000 frames) to be stacked. The frames that are discarded are in this sense, just as important as the frames that are retained for stacking. Capturing 10000 frames would have been better because then 90% of the frames could be discarded, still leaving 1000 frames to be stacked. A stack of 1000 frames has 31.62 times the signal to noise ratio of a single frame, and this allows the wavelet sliders to be pulled, sharpening the detail, without emphasising the noise in the image.

The Full Spectrum SV305 camera performed well with the addition of a UV/IR cut filter. This is a very good low cost camera that is capable of taking good Lunar images as well as good images of the brighter deep sky objects.

AstroDMx Capture for Windows, macOS or Linux (Including Raspberry Pi) can be downloaded freely here:

Friday, 22 January 2021

Raspberry Pi HQ camera, a work in progress in AstroDMx Capture for the Raspberry Pi, with some astronomical results.

 Nicola has been working with the low level API for the HQ PiCamera.

AstroDMx Capture now has 8-bit support for the HQ camera with exposures of up to 1s. The documentation for the API is surprisingly incomplete, a consequence of which is that implementation takes much longer than for a USB astronomical camera. Such cameras have an SDK with a public interface that allows the camera to be implemented in capture software. Not so with the HQ PiCamera. This is not a USB camera, so the usual techniques won't work. Part of the job of the camera is carried out by the GPU part of the SOC, so the whole process of implementing the camera is different from a USB camera. The camera module constantly streams data to the GPU via a ribbon cable and the task is to capture the buffer and put it into the environment of AstroDMx Capture.

I have reported some bench tests on the camera, but can now report some lunar capture results on the 58% waxing Moon.

The HQ PiCamera was placed at the Cassegrain focus of a Skymax127 Maksutov that was mounted on a Celestron AVx GOTO mount. The HQ PiCamera was attached to a Raspberry Pi 4B with 4GB RAM and data were captured, using AstroDMx Capture, to an SSD that was attached to the Pi by USB3.0.

Click on an image to get a closer view

The equipment setup


Using AstroDMx Capture for the Raspberry Pi, 1000-frame SER files were captured of overlapping regions of the terminator.

Screenshots of AstroDMx Capture for the Raspberry Pi capturing Lunar data with the HQ PiCamera


The best 90% of the frames in the individual SER files were stacked in Autostakkert!, wavelet processed in Registax 6 and post processed in the Gimp 2.10

Individual overlapping panes comprising stacks of 900 frames each


The panes were stitched in Microsoft ICE to make a mosaic of the terminator


It is clear that the HQ PiCamera is a viable Lunar imaging camera with AstroDMx Capture for the Raspberry Pi. The camera is, for the moment, limited to 8-bits with a maximum exposure of 1000 ms. It is likely that Nicola will release this version as a work in progress some time in the near future. Further implementation will not have a high priority as work on this camera is very time-consuming, and other projects require attention.

AstroDMx Capture for Windows, macOS or Linux (Including Raspberry Pi) can be downloaded freely here:

https://www.astrodmx-capture.org.uk

Tuesday, 19 January 2021

Progress in implementing the HQ Raspberry Pi Camera in AstroDMx Capture for the Raspberry Pi

I have previously mentioned that Nicola was researching the possibility of implementing the Raspberry Pi Camera (In this case the HQ PiCamera) in AstroDMx Capure for the Raspberry Pi. In that post I showed that she has had the camera streaming in the software.

Now she has implemented most of the camera controls and AstroDMx Capture for the Raspberry Pi can capture data at some resolutions.

Screenshot showing the camera streaming data from the camera looking at an aquarium


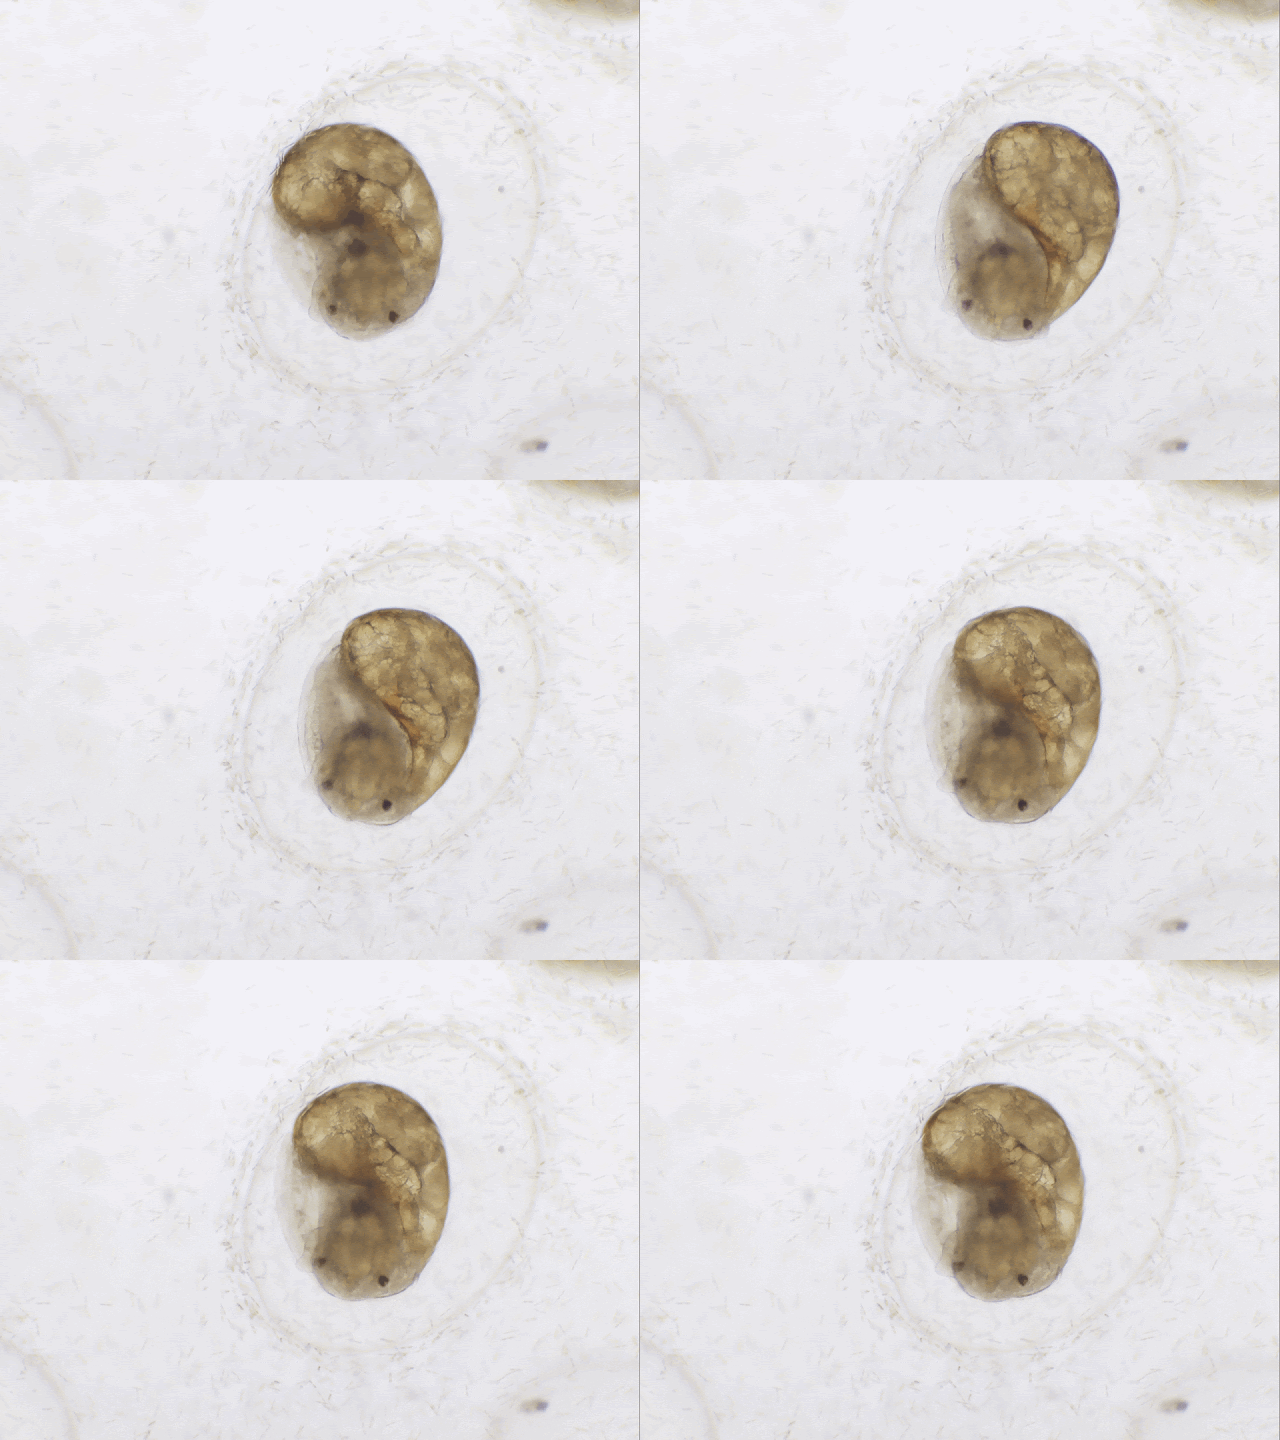
Some aquatic snail eggs were placed on a cavity slide and imaged with the HQ PiCam and AstroDMx Capture. The eggs were then returned to an aquarium in which there are no fish.

The HQ PiCamera mounted on a trinocular research grade microscope


Cropped snapshot of a snail egg captured with AstroDMx Capture


Screenshot showing a SER movie file captured by AstroDMx Capture playing in SER player


Animation of a snail egg captured by AstroDMx Capture as a SER file


We are now waiting for a clear night with the Moon visible, to capture some lunar data.

The implementation is so far a partial implementation. The data captured are 8-bit and the maximum exposure so far is 1 second. It is possible that when one or two small issues are sorted out that this version may be released with the partial camera functionality that it has, but that will not happen until we have done a lot more testing. In the future, Nicola will return to this camera after she has completed some other aspects of her astronomical imaging work.

AstroDMx Capture for Windows, macOS or Linux (Including Raspberry Pi) can be downloaded freely here:

https://www.astrodmx-capture.org.uk

Sunday, 17 January 2021

Testing a rebuilt William Optics ZenithStar 66 SD Apochromatic refractor with AstroDMx Capture for macOS and a ZWO ASI178MC

A William Optics ZenithStar 66 SD Apochromatic refractor was mounted on a Celestron AVXGOTO mount and a ZWO ASI178MC 14-bit camera was placed at the focus.

The refractor was one that I rebuilt after it was left partly disassembled by a late colleague. Having been rebuilt and cleaned, the scope seemed to be good optically. Holes that had been drilled in the tube were covered with black insulating tape and a Red-dot finder was attached using black Surgu.

Rebuilt William Optics ZenithStar 66 SD Apochromatic refractor 


The scope was aimed at the Orion nebula and AstroDMx Capture for macOS was used to capture data from the ZWO ASI178MC.
The imaging setup
An occultation board can be seen on a photographic tripod, shielding the scope from a nearby street light.

Screenshot of AstroDMx Capture for macOS capturing data on the Orion nebula

A total of 150 x 15s exposures were captured with matching dark-frames, and although there were some passing clouds Deep Sky Stacker was used to register and stack the best 135 frames, giving a total exposure time of 33.75 min. More frames would have been captured but thickening clouds prevented further captures.
The final Autosaved 32-bit floating point image was post processed in the Gimp 2.10, Affinity Photo, Topaz sharpen and Neat image..


Final image of M42/M43


Closer view


The scope performed well, giving good colour performance, and AstroDMx Capture for macOS displayed the image nicely using the non-destructive 32-bit visualisation controls.

AstroDMx Capture for Windows, macOS or Linux (Including Raspberry Pi) can be downloaded freely here:


Thursday, 14 January 2021

Bench-testing cameras in AstroDMx Capture; testing new functions in the software; and a sneak preview of current research with the HQ Raspberry Pi Pi-Camera

A cold and starry night is not the time to be testing new functions, new cameras or new SDKs in AstroDMx Capture. The starry night is reserved for doing serious field testing of the software to try to obtain worthwhile astronomical images. Bench-testing is where the first line of testing takes place.

There are two modes in which the capture software needs to be bench-tested on whatever cameras are required, and on all available cameras when major changes to the software have been made. These modes are mainly:

  • 8-bit fast exposures such as would be used for imaging planets, the Moon or the Sun (through suitable solar filters).
  • 16-bit long exposures such as would be used for imaging deep-sky objects.

These tests need to be done at any time of day and have to be realistic.

For 8-bit fast exposures we use a clamp-stand on which are mounted the cameras currently involved in the testing, with lenses mounted on the cameras. (with cameras that cannot take a lens, they are mounted on a small scope and structures across the valley are imaged)

A well-lit aquarium gives a good subject for fast imaging.


For some 8-bit testing the camera is mounted on a trinocular research-grade microscope.


However, if the light source is turned very low and white neutral density filters are placed on the light source, it is possible to set the illumination levels arbitrarily low.


Then, a lights-out canopy completes the darkening procedure


Using this set of equipment it is possible to simulate any imaging situation and to perform meaningful tests of cameras, SDKs and AstroDMx Capture.


A sneak preview of current AstroDMx Capture research with the Raspberry Pi HQ Pi-Camera.

These bench-testing systems are currently being used by Nicola to test the feasibility of controlling the Raspberry Pi High Quality camera and capturing data via AstroDMx Capture for the Raspberry Pi. This post is a preview of some current research.

I did some preliminary tests with python programs to determine whether the Raspberry PI HQ camera might be suitable for astronomical imaging, and these tests can be seen HERE

In general it appeared that acceptable astronomical images could be obtained from the camera, and this made it worthwhile looking further into the possibilities.

Every camera that has been implemented in AstroDMx Capture to date, including DSLRs has been connected to the computer via USB2.0 or USB3.0. 

The Raspberry Pi Pi-Camera is quite different. In a sense, the camera is not an independent device from the computer. The camera module streams data continually to the Raspberry Pi GPU part of the SOC. So, in a sense, we can regard the GPU as performing some of the key functions of the camera. The data have to be sent to the GPU from the camera module, via a special Ribbon cable that connects to a port on the Pi circuit board. These are the things that make the Pi-Camera different from a USB camera.

The first point that was noticed is that the V4L kernel driver for the Pi-Camera is not a fully developed and stable implementation and Nicola rejected it as the first line of approach to controlling the camera.

There are a number of libraries available to control the Raspberry Pi cameras but the documentation is incomplete and the libraries contain very complex routines, few if any are of any relevance to astronomical imaging.

These libraries themselves depend on lower level abstraction layers that form library dependencies for the higher level libraries.

The whole API system is like a Russian doll with lower and lower level APIs that can possibly be used to do the sort of things that an astronomical imaging program needs to do.

Nicola is working with a low level API to try to understand its capabilities and, if possible to use it as an SDK for AstroDMx Capture for the Raspberry Pi.

She first was able to stream video from the HQ PiCamera as this screenshot shows

The reason that the stream is monochrome is simply that for initial tests the Y, luminance component of a YUV stream was used.

The next stage was to incorporate the calls to the API into AstroDMx Capture for the Raspberry Pi, to work with a full colour YUV stream, and to begin the implementation of the camera controls in the AstroDMx Capture GUI.

First in monochrome


Then in colour


Although there is a lot of work to be done on the HQ Pi-Camera part of the AstroDMx Capture project, it looks at this moment in time as though the camera will be controllable by AstroDMx Capture for the Raspberry Pi, and we look forward to testing it on astronomical objects and to discovering the limits of the camera

AstroDMx Capture for Windows, macOS or Linux (Including Raspberry Pi) can be downloaded freely here:

Thursday, 7 January 2021

Maintenance Release of AstroDMx Capture and how to install and run on macOS and Windows

Nicola has released version 0.84.9 as a maintenance release of AstroDMx Capture on Windows, macOS and Linux, including the Raspberry Pi OS.


The latest version of AstroDMx Capture can be downloaded here:

 https://www.astrodmx-capture.org.uk

This release addresses some issues that have come to light since the last release and increases the stability of the system overall.

The AstroDMx Capture project has now grown to 56,670 lines of code plus 9,594 lines of internal documentation that enables the programmer to understand what exactly the code is doing if it is revisited in the future. This is a total of 66,264 lines. This is a minimum because some of the lines of code span several physical lines.

To get a feel for how much this actually is: If a book contained 50 lines per page, then it would require two volumes, each of at least 663 pages to contain the whole of AstroDMx Capture. This is a considerable amount and requires a commensurate effort to maintain and advance the software.

We have noticed that some people are unsure about how to install AstroDMx Capture in macOS or Windows. Both operating system place obstacles in the way of software that has not been downloaded from their respective stores, or has not had expensive and recurrent certification. These obstacles go away when sufficient numbers of downloads of a given piece of software have been made.

In both operating systems it is only necessary to give permission for the software to run. In both operating systems, these obstacles are put there to protect a user from inadvertently running a program that they had downloaded from a source that they don't trust. 

macOS

When the install file has been downloaded to the desktop it should be double clicked and a window will appear the the AstroDMx Capture icon in it. Then a separate window of Finder should be opened and the AstroDMx Capture icon should be dragged over into the Applications folder at the left of Finder.


Then, if you try to run the software this will appear.

Simply open System Preferences


And then select Security and Privacy


Click on Cancel in the small window with the Exclamation mark in a yellow triangle.
Then click on Open Anyway in the Security a Privacy window.


Another small window with a yellow triangle with an exclamation mark will appear.
Click on Open in this window.


You will then be able to run AstroDMx Capture

Windows 10

AstroDMx Capure for Windows is now downloaded as an MSI file, and similar to macOS, Windows places obstacles to make you think about what you are installing and intending to run.

When you double click on the MSI installer file a Window appears.
Just click on More info.


Just Click on Run anyway and your program will install and be able to run.


We hope that you enjoy using AstroDMx Capture on your operating system of choice.


A recent result:

The Flame nebula captured by AstroDMx Capture for macOS
Screenshot

The Flame nebula
Stack of 20 x 30s exposures

The camera used was the full spectrum version of the SVBONY SV305 camera and a Skywatcher Explorer 130 PDS 130mm, f/5 Newtonian mounted on a Celestron AVX mount.