Saturday, 10 October 2020

Testing AstroDMx Capture for Windows with a Canon 4000D DSLR

Testing AstroDMx Capture for Windows using a Canon 4000D DSLR and a Skywatcher Explorer 130 PDS 130mm, f/5 Newtonian.

The implementation of manufacturer-supported DSLRs for tethering is for the capture of images. It allows the DSLR to be connected to the computer via USB and to be controlled by the computer via AstroDMx Capture, in the same way that any astronomical camera would be. All that is required for the Windows version is to change the driver. This is a simple process and the software required to do this will be available for download on the website at the same time that the Windows version is released. If for any reason the original driver is required, it is a simple matter to restore it. Full details will be given at the download site. This process is not needed for the Linux or macOS versions of AstroDMx Capture, as they do not use the driver model that Windows does.

The Skywatcher Explorer 130 PDS 130mm, f/5 Newtonian was mounted on a Celestron AVX mount and the Canon 4000D DSLR was attached via a 2” adapter.

40 x 40s exposures of The Andromeda galaxy were captured at ISO 6400 with matching dark frames using AstroDMx Capture for Windows, which treats the DSLR like any other Astronomy camera, with the camera controls under the control of the software. The Canon 4000D camera has a 14 bit ADC and the captured images were saved as both 16 bit TIFFs and also Camera RAW, which were stored in a folder of their own.

Screenshot of AstroDMx Capture for Windows capturing 16 bit Tiff files of the Andromeda galaxy.


The images were stacked in Deep Sky Stacker and post-processed in the Gimp 2.10, Affinity Photo, Fitswork and FastStone Image viewer.

Final image of M31, the Andromeda galaxy


70 x 30s exposures of M71, the Angelfish globular cluster, with matching dark frames were captured at ISO 6400 using AstroDMx Capture for Windows.

Screenshot of AstroDMx Capture for Windows capturing data on M71 with a Canon 4000D DSLR


The best 90 % of the images were stacked in Deep Sky Stacker and post-processed in the Gimp 2.10 and Affinity Photo.

The Angelfish cluster, M71


The direct implementation of manufacturer-supported Nikon and Canon DSLRs in AstroDMx Capture is an important feature that allows the use of supported cameras by astronomers to capture deep-sky images. These tests are some of the last pre-release tests of AstroDMx Capture for Windows.

AstroDMx Capture for Windows, macOS or Linux (Including Raspberry Pi) can be downloaded freely here:

https://www.astrodmx-capture.org.uk


Wednesday, 7 October 2020

Doubling the precision (or more) of the focusing of an SCT.

 Doubling the precision (or more) of the focusing of an SCT in a non invasive way

Stop Press

Since I made this post, a friend 3D printed a knob to fit on the focusing knob of our Skymax 127 Maksutov. This has increased the precision of the focusing by a factor of 2.63, which will make focusing a lot easier.

3D printed knob for the Skymax 127


Another friend 3D printed a knob adapter for our 8" SCT
This will give the same increase in precision as the one on the Maksutov. Focusing is going to be so much easier from now on.

One of the problems with SCT and Maksutov focusers is that it is so easy to go through focus as you turn the focusing knob at the back of the scope. One solution is to add an external focuser to the visual back. This can be of a rack and pinion type or a Crayford type. The external focuser can be of a motorised type if required. Either way, such focusers can be problematic if you are using a focal reducer/field flattener on the visual back. This is because for optimal performance, the focal reducer should be a constant, optimal distance from the camera. This is not possible with an external focuser.

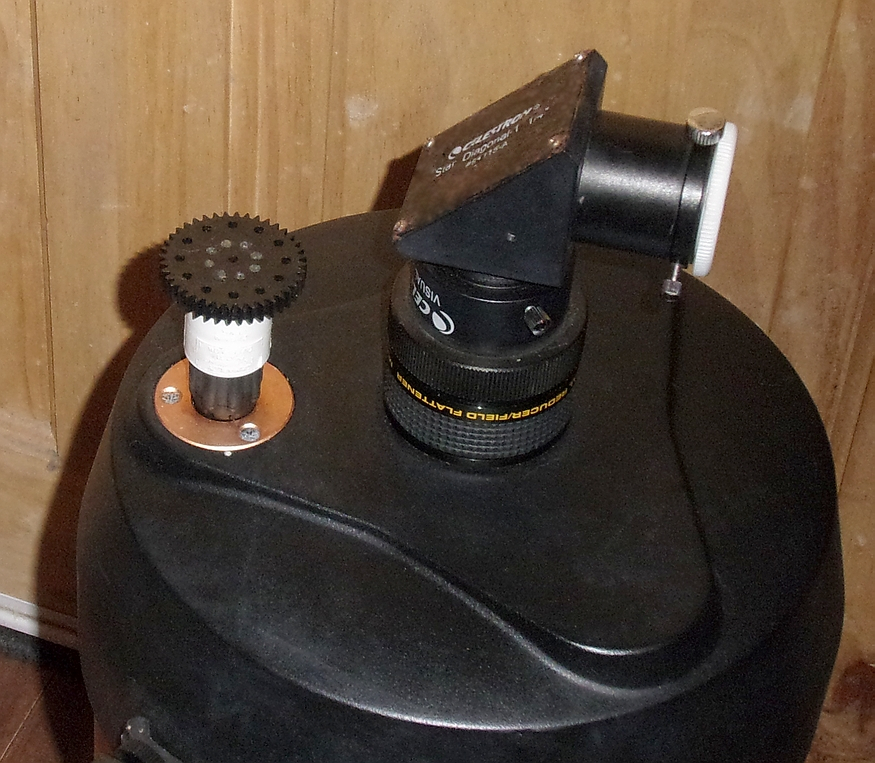
We have found that there is a simple way to double (or slightly more) the precision of the stock, mirror-shift focuser. The focusing knob at the back of an SCT is normally quite narrow. On our 8” Celestron Nextstar SCT it has a diameter of about 21mm giving it a circumference of about 66mm. This means that a point on the focuser knob moves through 6.6cm to make a complete revolution. If the knob had a larger diameter, the point on the knob would have to travel commensurately further to complete a revolution. This means that the greater the diameter of the focus knob, the finer the focusing precision. The circumference is directly proportional to the diameter by the relation:

C = π D

Where C is the circumference and D is the diameter.

We found a piece of PVC tubing that was a snug fit over the focusing knob. The tube was cut to length and a plastic gear wheel of 41mm diameter was attached with araldite to one end of the tube. The tube can be pushed onto the focusing knob and the gear wheel used to turn the focuser.


We find that this increase in the diameter of the focuser knob gives us significantly better control of focusing and makes it less likely to go through focus too quickly.

It can be seen from the images that there is the possibility of using an even greater diameter gear wheel, commensurately increasing focusing precision. Using a gear wheel allows for easily gripping the focuser, and also adds the intriguing possibility of motorising the focuser.

Tuesday, 6 October 2020

Tips for using AstroDMx Capture.

Tips for using AstroDMx Capture.

Downloading

Be sure to read carefully what is written on the download website, otherwise you could end up downloading the incorrect version of AstroDMx Capture. Particular care is needed at the moment because the site is being prepared for other releases.

This is particularly important for Linux downloads as there are versions for CPUs made in 2013 and younger and also for older CPUs. If you download the wrong version, it may crash on startup. The software is not designed to run on CPUs older than 2006. On any older CPU the software will possibly not work.

There are versions of AstroDMx Capture for X86-64 Linux rpm and deb as well as manual installers. As stated above, there are versions for newer and older CPUs. There are versions for the Raspberry Pi ARM 32 and 64bit. There are also versions for macOS (released), Windows (Pending release), and (FreeBSD which is still a work in progress). Take your time to navigate to the appropriate version for you.

Running the software

The first time that AstroDMx Capture runs, it sets up a default location where captured data are stored. This is a folder called AstroDMx_DATA. However in Options there is the possibility to set a different location for captured data to be stored. For example, on one of our computers the Folder AstroDMx_DATA has been created manually in a fast, high capacity SD card that is permanently in the computer for extra storage, and the storage location has been set to this folder.

Connecting a camera

At the top left of the AstroDMx Capture Window is the Capture button. Connect a camera to the appropriate USB port and click on the connect button once. A dialogue will come up that shows all of the detected cameras such as the built in webcam and also your astronomy camera. Select the astronomy camera and after a few seconds it will be connected. Then you have to select the Format.

The camera selection dialogue


Selecting the correct Format

In this example, the camera is the SVBONY SV305 and the three formats offered are RGB24, RAW 8 and RAW 16. When the format is selected, this is the format that the camera will use for the capture of image data. Note that this format can be changed later, but it is best to start with the format required. It is important to understand the differences between these formats and what they should be used for.

RGB24

This is an 8 bit format and should never be used for deep sky imaging. The 24 means 8 bits per colour channel (Red, Green and Blue 3 x 8 = 24). A good reason not to choose this format, even for 8 bit, planetary or lunar imaging, is that the debayering of the colour information is done internally by the camera SDK and we have no idea which debayering algorithm is used. However, if you wish to collect monochrome data from your camera, for example lunar data, you can select RGB24 and then select Greyscale transform. This can allow faster frame rates, but more importantly, the files will only be a third of the size of an RGB file.

AstroDMx Capture is context aware, so the option to transform to greyscale will only appear if RGB24 is selected, and other, irrelevant options will not be shown.

Greyscale transform


RAW 8

This format should never be used for deep sky imaging.

This is an 8 bit format that can either save RAW data, or AstroDMx Capture can debayer the data to RGB using the highest quality debayering algorithms and save RGB data. The default is to save RAW data. If you try to view RAW images they will appear to be monochrome with a pattern all over the image. However, software such as Autostakkert! can debayer the data for you. Consider using this format if you find that it improves your frame rates. 

This is where you can control the saved and displayed formats

Debayer: Full 

This gives a colour display and saves RGB image data.

This is often the debayer mode of choice


Colour Display / Raw Out

This shows a colour preview image but saves RAW image data


Debayer: None

This shows an undebayered image and saves RAW data


RAW 16

This is the format that should always be chosen for deep sky imaging.

It is best to save your deep sky 16 bit data by choosing Debayer: Full. This will give you the greatest choice of software to register and stack your data. Not all stacking software can debayer RAW data.

ADC bit depths

Some cameras such as the SV305, many other astronomy cameras and some DSLRs have 12 bit ADCs (Analogue to digital converters)

Other cameras such as the ZWO ASI178MC have 14 bit ADCs as do some other astronomy cameras and some DSLRs.

Cameras such as the Atik 314L mono have 16 bit ADCs as do a number of other astronomy cameras.

Most cameras with 12 bit or 14 bit ADCs can also save out 8 bit data, which is a rapid process that allows them to have high frame rates when doing solar system imaging.

What do 8 bit, 12 bit, 14 bit and 16 bit mean in terms of cameras and images produced?

8 bit image data contain 28 that is 256 levels of brightness

12 bit image data contain 212 that is 4096 levels of brightness

14 bit image data contain 214 that is 16384 levels of brightness

16 bit image data contain 216 that is 65536 levels of brightness

Astronomical objects have continuous levels of brightness and the larger the number of bits used to capture the data, the more of the intermediate levels of brightness are actually captured and jumps in brightness within images are avoided.

Saving 16 bit image data from 12 bit and 14bit ADC cameras

There are only 8 bit, and 16 bit integer image formats used in astronomy. This means that image data can be saved in 8 bit image containers or in 16 bit image containers (files). Tiff files can be 8 bit or 16 bit. (As an aside, Deep Sky Stacker automatically saves the stacked image in a 32 bit floating point TIFF or FITs file, whatever bit depth and format you chose to save out the stacked image. This is because Deep Sky Stacker, like some other stacking software, sums the registered images into a 32 bit floating point image file). However, the typical images worked on by astronomers are 8 bit or 16 bit integer files.

8 bit data are stored in 8 bit files.

12 bit and 14 bit data are stored and saved in 16 bit files, usually TIFF or FITs files.

All processing is done on the high bit-depth images and only when processing is finished is the bit depth converted to 8 bits and saved, usually as an uncompressed PNG file that can then be used for display and sharing.

The displayed image can be controlled by the Camera’s controls, but also the Software Controls, that in 8 bits can even be applied to the saved data if required.

Software Controls


In general, software controls should only be applied to saved data if the camera itself does not have the required controls.

In 16 bits the display Preview Controls also include various transforms that enable a 16 bit image to be made visible in the display screen.


It will be noticed that in all of the previous images, AstroDMx Capture has inherited the dark theme set in the desktop environment themes. In the image below, where a dark theme isn’t used, AstroDMx Capture does not use a dark theme.

AstroDMx Capture using the Preview controls to render the 16 bit image easily visible


I hope that these tips and information will make it easy and enjoyable to use AstroDMx Capture.

However, no software should be used for the first time when you are seriously trying to capture astronomical images. It is best to practice in daylight on landscape or cityscape objects, so that you can become familiar with the operation of the software.

The information provided here is not exhaustive, but is just intended as an introduction to the intuitive AstroDMx Capture imaging software.

AstroDMx Capture for Windows, macOS or Linux (Including Raspberry Pi) can be downloaded freely here:

https://www.astrodmx-capture.org.uk


Monday, 5 October 2020

Pre-release testing of AstroDMx Capture for Windows

A Celestron 8" SCT was fitted with an f/6.3 focal reducer/field flattener and mounted on a Celestron AVX mount. A ZWO ASI178MC camera was placed at the Cassegrain focus and 1500 frame SER files were captured with AstroDMx Capture for Windows of 6 overlapping panes of the 91.4% waning Moon.

AstroDMx Capture for Windows capturing data on one of the panes.


The best 70% of frames in each SER file i.e. 1050 frames in each SER file, were stacked in Autostakkert! The resulting image for each pane was wavelet processed in Registax 6, and all of the 6 pane images were stitched into a mosaic in Microsoft Image Composite Editor. The final image was post processed in the Gimp 2.10 and Affinity Photo.

A single pane of the final mosaic


Another pane of the final mosaic


Mosaic of the 6 panes


Closer view


The saturation was enhanced to reveal differences in the mineralogy of the lunar surface


Closer view


Animation of the saturated and unsaturated images


Closer view


The Windows version of AstroDMx Capture is close to completion and this is hopefully one of the final tests to be done pre-release.

AstroDMx Capture for Windows, macOS or Linux (Including Raspberry Pi) can be downloaded freely here:

https://www.astrodmx-capture.org.uk

Wednesday, 30 September 2020

Release of version 0.78.5 of AstroDMx Capture for Linux for all Linux platforms

 Nicola has released version 0.78.5 of AstroDMx Capture for Linux for all Linux platforms. 


USB3.0 Lumenera cameras have been implemented but remain untested. USB2.0 Lumenera cameras are however not supported as there is no Lumenera SDK support for USB2.0 cameras under Linux.

There are specific releases of the software for modern and for older CPUs

In addition to some bug fixes, there is improved Region Of Interest nudging to enable the user to track the movements of the object being imaged at high speed if there is some drift.

Nicola is now working on making a release of AstroDMx Capture for Windows


Monday, 28 September 2020

Release of AstroDMx Capture for macOS

 I am pleased to announce that Nicola has today released the macOS version of AstroDMx Capture.


AstroDMx Capture for macOS was used to capture data on the Waxing, 85% gibbous Moon.

An 8” Celestron Nextstar SCT fitted with a 0.63 focal reducer/field flattener, was mounted on a Celestron AVX GOTO mount. A QHY 5L-II-M camera was placed at the Cassegrain focus and AstroDMx Capture for macOS was used to capture 2000 frame SER files of different regions of the Moon.

The best 40% of the frames in the SER files were stacked in Autostakkert! The resulting images were wavelet processed in Registax 6 and post-processed in the Gimp, Affinity Photo and ACDSee.

Click on an image to get a closer view.

Screenshot of AstroDMx Capture for macOS capturing data on the Tycho region of the Moon


The Tycho region


Screenshot of AstroDMx Capture for macOS capturing data on the Mare Serenitatis region of the Moon


The Mare Serenitatis region

Screenshot of AstroDMx Capture for macOS capturing data on the Plato/Sinus Iridum region of the Moon


The Plato/Sinus Iridum region


Sadly this version of AstroDMx Capture for macOS does not have support for the SV305 and SV305Pro cameras as to date, SVBONY have not produced a macOS SDK.

Nicola is now working to finish the Windows version of AstroDMx Capture and has modified the website to make it easier to find and download the correct version of AstroDMx Capture.

AstroDMx Capture can be downloaded from the website https://www.linux-astro-imaging.uk/

Friday, 25 September 2020

Maintenance release of AstroDMx Capture for Linux version 0.78.3.2

Nicola has made a maintenance release of AstroDMx Capture for x86-64 Linux.


Some users were experiencing a problem of the software crashing on startup. This was traced back to a problem not in the software, but in the CPU instruction set of some older x86-64 CPUs. This has been rectified in the maintenance release.

If users of version 0.78.3 have experienced no problem at startup then they should do nothing and just use the software as usual. Only if they experienced the startup crash should they install the maintenance release 0.78.3.2. There is absolutely no functionality difference between the version 0.78.3 and the maintenance release 0.78.3.2. The maintenance release just fixes the startup problem for older CPUs.

Meanwhile work continues on the macOS and Windows versions of AstroDMx Capture.

Monday, 21 September 2020

M27 with AstroDMx Capture for the Raspberry Pi, 64 bit Ubuntu MATE Pi OS, and an SVBONY SV305 camera.

A Skywatcher Explorer 130 PDS 130mm, f/5 Newtonian was mounted on a Celestron AVX GOTO mount. An SVBONY SV305 camera was placed at the Newtonian focus. 

A Raspberry Pi 4B was running  64 bit Ubuntu MATE for the Pi. AstroDMx Capture for the Raspberry Pi was used to capture 30 x 60s exposures of M27, the Dumbbell nebula with matching dark-frames

The best 26 exposures were aligned and stacked with Deep Sky Stacker. The final image was post-processed in the Gimp 2.10, Affinity Photo, Neat Image and ACDSee.

Screenshot of AstroDMx Capture for the Raspberry Pi capturing data on M27


The final image of M27


Once again, the SV305 worked nicely with the Raspberry Pi running a 64 bit operating system.

Even after a release of the software, the testing continues; looking for anomalies and possible bugs. The combination of the SV305 and AstroDMx Capture for the Raspberry Pi, is proving to be a very useful, low cost imaging platform.

Meanwhile Nicola continues to work on macOS and Windows versions of AstroDMx Capture.

AstroDMx Capture for Windows, macOS or Linux (Including Raspberry Pi) can be downloaded freely here:

https://www.astrodmx-capture.org.uk
Saturday, 19 September 2020

The SVBONY SV305 and the Raspberry Pi working well together.

A Skywatcher Explorer 130 PDS 130mm, f/5 Newtonian was mounted on a Celestron AVX GOTO mount.

An SVBONY SV305 production camera was placed at the Newtonian focus.

AstroDMx Capture for the Raspberry Pi was run on a Raspberry Pi 4B with the 32 bit Raspberry Pi OS. This system was used to capture 40 x 30s exposures of the globular cluster M15 as 16 bit Tiff files with matching dark-frames.

The best 36 frames were aligned and stacked in Deep Sky Stacker. The resulting image was post processed in the Gimp 2.10, Affinity photo, and Neat image.

Click on an image to get a closer view.

Screenshot of AstroDMx Capture for the Raspberry Pi capturing data on M15


The display transforms and the non-destructive display controls allow the 16 bit image preview to be nicely visualised.

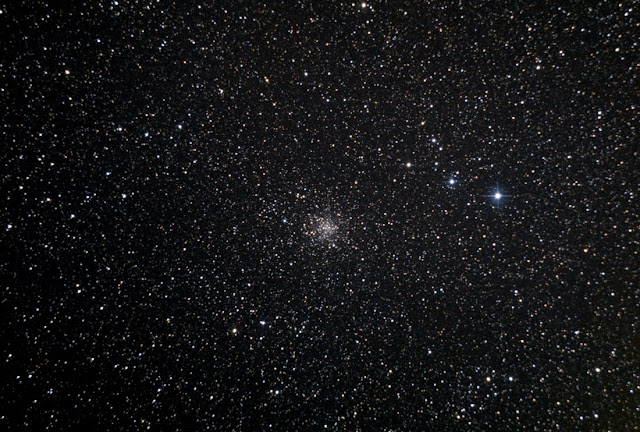
Final image of M15


The system worked very well with the 32 bit version of Raspberry Pi OS (previously called Rasbian). Previous problems were due to us using a pre-production prototype that had different firmware. The camera always worked with te 32 bit and 64 bit versions of Ubuntu MATE for the Pi.

The Raspberry Pi 4B (also the 3B) in combination with the SVBONY SV305 camera makes a good imaging platform for long or short exposures. The SV305 is a very good, low cost astronomical imaging camera that now has its range extended across Windows, Linux and Linux for the Raspberry Pi ARM architecture. The same is true of the SV305 Pro.

AstroDMx Capture for Windows, macOS or Linux (Including Raspberry Pi) can be downloaded freely here:

Wednesday, 16 September 2020

Mars with AstroDMx Capture for Windows, an 8” SCT with a 2x Barlow and an SVBONY production SV305 camera.


Until now we have been working with a pre-production prototype of the SVBONY SV305. Nicola has implemented this camera in AstroDMx Capture in Linux X64 and Linux for the Raspberry Pi (32 bit and 64 bit), and Windows. The tests reported here are with the production model of the SV305, which has newer firmware and works with the SDK for the platforms mentioned above.

A Celestron 8” SCT was mounted on an AVX GOTO mount. The scope was fitted with a 2x Barlow and an SVBONY SV305 camera was attached.

Mars was imaged using AstroDMx Capture for Windows using a region of interest of 800 x 600. A frame-rate of just under 100fps was used to capture a 5min Time-Limited SER file of 27,000 frames.

SER Player was used to process the file for gamma and gain, and re-save as a SER file. The processed and the unprocessed SER files were stacked in Autostakkert! 3. The best 15% of the frames in the processed SER file were stacked and the best 20% of the frames in the unprocessed SER file were also stacked. The resulting images were wavelet processed in Registax 6, post-processed and combined in the Gimp 2.10.

Screenshot of AstroDMx Capture for Windows capturing a SER file of Mars

Note the edge reticle with a centre indicator defines the limits of the region of interest.

The final image of Mars

Again, these results show that the SVBONY SV305 camera is a very capable device at a very reasonable price and that it has been implemented very well in AstroDMx Capture.

AstroDMx Capture for Windows, macOS or Linux (Including Raspberry Pi) can be downloaded freely here:

https://www.astrodmx-capture.org.uk

Monday, 14 September 2020

AstroDmx Capture for macOS and AstroDMx Capture for Windows.

As mentioned in the previous post; Nicola has been working on the implementation of our 12 bit Lumenera Infinity 2-2C microscope camera in AstroDMx Capture for Windows. There is currently no support for Linux and no SDK for macOS for this particular camera. The implementation is almost complete and I have done a little testing with some microscope slides.

AstroDMx Capture for Windows streaming data on a TS Jasmine leaf


High quality Tiff snapshot of the leaf TS


Screenshot of AstroDMx Capture for Windows streaming data on a root cap


I also tested AstroDMx Capture for Windows with an 8” Celestron SCT fitted with a 6.3 focal reducer, field flattener. A ZWO ASI178MC, 14 bit CMOS camera was placed at the focus of the SCT.

60 x 15s exposures of the globular cluster M2 were captured with matching dark-frames

AstroDMx Capture for Windows capturing 16 bit Tiff files of M2


The images were dark-frame corrected and Stacked in Autostakkert! 2 and the resulting image was post processed in Affinity Photo, the Gimp 2.10 and Neat image.

The final cropped image of M2


AstroDMx Capture for macOS was tested with an Atik 314L mono CCD camera on the Celestron 8” SCT with the 6.3 focal reducer.

30s Tiff images with matching dark-frames were captured of the globular cluster M15 and 35 images of M2. The data were dark-frame corrected and stacked in Deep Sky Stacker. The final images were post processed in Affinity Photo and the Gimp.

AstroDMx Capture for macOS capturing data on M15


The final cropped image of M15


Screenshot of AstroDMx Capture for macOS capturing data on M2


Final cropped image of M2


These tests show that progress is being made towards the release of macOS and Windows versions of AstroDMx Capture in addition to the implementation of another camera in the Windows version, the Lumenera Infinity 2-2C.

AstroDMx Capture for Windows, macOS or Linux (Including Raspberry Pi) can be downloaded freely here:

https://www.astrodmx-capture.org.uk


Thursday, 10 September 2020

AstroDMx Capture for macOS, a Bresser Messier-AR-102-xs f/4.5 ED refractor, an Atik 314L mono CCD camera with a H-alpha narrowband filter.

Nicola has been working on implementing the Atik 314L and other Atik cameras in AstroDMx Capture for macOS and we have been testing the implementation.

The scope/camera combination were mounted on a Celestron AVX mount.

AstroDMx Capture for macOS was running on a MacBook Air computer.

40 x 60s exposures were captured of M16 as 16 bit Tiffs with matching dark-frames.

The images were stacked and dark-frame corrected in Deep Sky Stacker and post processed in the Gimp 2.10 and Affinity Photo.

Click on an image to get a closer view

Screenshot of AstroDMx Capture of AstroDMx Capture gathering data on M16, the Eagle nebula.

The non-destructive software controls in addition to the image transform rendered the Eagle nebula easily visible in the preview.

M16 final image showing the ‘Pillars of Creation’.


Nicola is spending a little time implementing our Lumenera Infinity 2-2 CCD microscopy camera in AstroDMx Capture for Windows, which is causing a slight delay in finishing the macOS version. However, this is timely because we are waiting to see if SVBONY will produce a macOS SDK for the SV305/Pro. We will not wait long before release, but it has given a little time to work on our own camera for our microscopy. I shall publish results here when the Lumenera implementation is finished.

AstroDMx Capture for Windows, macOS or Linux (Including Raspberry Pi) can be downloaded freely here: