Sunday, 30 April 2023

AstroDMx Capture has passed the milestone of 100 KLOCs

Nicola has been working very hard to build advanced functionality into AstroDMx Capture for Linux, Windows macOS, ChromeOS and ARM Linux platforms.

AstroDMx Capture codebase has now passed the milestone of 100 KLOCs (thousands of lines of code). In addition there are 21 K lines of internal documentation, bringing the number to 121 KLOCs in total.


What does the total of 121,000 lines of code plus documentation actually mean? It is important to realise that a line of code frequently occupies more than a single physical line. To put this in an understandable and realistic perspective I will use a method that I have used before: 

The book 'iWoz', the autobiography of Steve Wozniak, co-founder of Apple Computer, is a fairly typical book in terms of size. It has 30 lines of text per page and 342 pages.

Therefore, if the whole of AstroDMx Capture was to be printed book fashion; to hold all of the lines of source code and internal documentation, it would require about 12 printed volumes, each the size of 'iWoz' to contain everything; 10 volumes for the codebase and 2 volumes for the internal documentation (comments) that are an essential part of any large program to help with the future understanding of the code for maintenance and update. Of course, the codebase is still growing as more functionality is added.

AstroDMx Capture for all platforms can be downloaded HERE


Tuesday, 25 April 2023

More imaging with a Skymax 127, an SVBONY SV605CC OSC cooled CMOS camera and AstroDMx Capture.


The SV605CC was fitted with a 1.25” nose-piece and an SVBONY UV/IR cut filter. The camera was fitted directly into the visual back without the use of a diagonal. The Skymax 127 Maksutov was motor focus modified to give very fine control over focusing.

Auto-guiding was done by PHD2 running on a separate computer using an SVBONY SV165 guide-scope fitted with a QHY-5II-M guide camera.

As usual, the Celestron AVX GOTO mount was placed on marks on the concrete base which give a fairly good polar alignment. AstroDMx Capture passed the time, altitude and location coordinates to the hand controller via the INDI server. The hand controller which now contained all of the correct information was set to its previous alignment and was unparked by AstroDMx Capture.

PHD2 auto-guiding


With such a long focal length telescope as the Skymax 127 it helps to be autoguiding when an attempt is made to plate-solve prior to centering the object of interest. This is to make sure that we have round stars rather than elongated stars in the image to be plate-solved. Of course, guiding must be switched off before the scope/mount is moved onto the object of interest. Guiding must be switched back on as soon as the mount has stopped slewing.

The equipment used


Using the procedures outlined in the previous article, AstroDMx Capture was used and the mount/scope was sent to Regulus, plate solved, and focus checked with a Bahtinov mask. It should be noted that quite long exposures should be used for plate solving to be sure to have enough stars in the field of view.


AstroDMx Capture then sent the scope/mount in turn to the Hamburger galaxy, NGC 3628 and then to M51.

AstroDMx Capture captured 2 hours worth of 5 minute exposures of the Hamburger galaxy.


The images were stacked in Siril and post-processed in GraXpert, Neat Image and the Gimp 2.10 with Starnet++.

Star removal techniques involving Starnet++ as a Gimp plugin were used so that the galaxy could be processed independently of the stars and then the stars added back.


These techniques were also used for the other two objects (M51 and M104) imaged for this article.

The Hamburger galaxy NGC 3628.


The mount/scope was then sent by AstroDMx Capture to M51, plate solved and M51 centred. 

AstroDMx Capture captured 63 minutes worth of 3 minute exposures of M51

The images were stacked in Siril and post-processed in GraXpert, Neat Image and the Gimp 2.10 with Starnet++.

Starless M51 image being de-noised in Neat Image


M51 the Whirlpool galaxy


On a separate night the Maksutov was fitted with a larger, 50mm, F=190mm guidescope with a Touptek guide camera. This should help with guiding such a long focal length scope as the Skymax 127.

The focus was checked on both scopes using Bahtinov masks


A small Bahtinov mask was used to focus the guide scope on a bright star so that the focus of the stars is optimised for auto-guiding.

AstroDMx Capture was used to send the scope/mount to M104 the Sombrero galaxy, plate solve and centre the galaxy in the field of view.

AstroDMx Capture capturing just 8 x 3 minute exposures of M104 before the clouds came in.


The images were stacked in Siril and post-processed in GraXpert, Neat Image and the Gimp 2.10 with Starnet++.

M104 the Sombrero galaxy


More work will be done using a different guide camera with the 50mm F=190mm guide scope.

It is not the conventional wisdom that scopes such as the Skymax 127, with long focal lengths and limited aperture, are suitable for deep sky imaging. We have demonstrated that lack of aperture can be compensated by longer exposures. However, auto-guiding has to be good for this to work satisfactorily. Moreover, motor focusing in conjunction with Bahtinov mask focusing can yield satisfactory stars.

The SV605CC has proved to be a suitable camera to use with such a telescope. 


Tuesday, 18 April 2023

Imaging M3 with a Skymax 127, an SVBONY SV605CC OSC cooled CMOS camera and AstroDMx Capture.

The SV605CC was fitted with a 1.25” nosepiece and an SVBONY UV/IR cut filter. The camera was fitted directly into the visual back without the use of a diagonal. This gave a very firm grip on the camera which was held firmly in place by the two substantial thumb screws. The Skymax 127 Maksutov was motor focus modified to give very fine control over focusing.

Auto-guiding was done by PHD2 running on a separate computer using an SVBONY SV165 guide-scope fitted with a QHY-5II-M guide camera.


As usual, the mount was placed on marks on the concrete base which give a fairly good polar alignment. AstroDMx Capture passed the time, altitude and location coordinates to the hand controller via the INDI server. The hand controller which now contained all of the correct information was set to its previous alignment and was unparked by AstroDMx Capture.


The equipment


AstroDMx Capture was used to send the scope/mount to Arcturus to check focus with a Bahtinov mask.


At this stage it was necessary to start auto-guiding even though the scope just missed Arcturus as expected. The reason is that it is necessary to plate-solve in order to centre Arcturus. Due to the long focal length of the scope, plate-solving is commensurately more difficult as at least 30 stars, some as low as mag 16, are required by ASTAP to be in the limited field of view in order to plate-solve; preferably more. A two minute exposure was used in order to capture sufficient stars. This is why autoguiding is required at this stage as even slightly trailed stars will not enable successful plate-solving. After a successful plate-solve, Arcturus was placed near the centre of the field of view and focus could be checked by using a Bahtinov mask.


A Bahtinov mask on the front of the Maksutov


The mount/scope was then sent to M3 by AstroDMx Capture, plate-solved and M3 was centred in the field of view.


AstroDMx Capture was used to capture 30 x 2 minute FITS exposures of M3


Dark frames and Flat fields were also captured


A variable light illuminated tracing box was used along with a white plasticard filter to capture flat fields.


AstroDMx Capture capturing Flat fields


Stacked median flat field


This image shows the importance of capturing flats.


The FITS images of M3 were calibrated, registered and stacked in Siril. Although it is possible to do processing and background extraction in Siril, it was decided to use GraXpert to stretch and background extract the stacked M3 image in one operation.


GraXpert sampling the background


GraXpert showing the original stretched image with a gradient due to a nearby street light.


GraXpert showing the extracted background


GraXpert showing the background corrected, stretched image


The background corrected, stretched image was then post processed in the Gimp and Neat Image.


M3


When using a Maksutov Cassegrain or a Schmidt Cassegrain telescope the exact focal length of the scope can vary depending on how far the mirror has to be moved to achieve focus. With the small fields of view involved here, this can impact the actual field of view, and therefore the probability of a successful plate-solve. We determined the field of view and therefore the focal length of the scope in our configuration by doing a blind plate-solve on a captured image using Astrometry.net. We were then able to enter the correct focal length into AstroDMx Capture’s ASTAP plate solver and achieve reliable plate solving.


Nicola intends to implement a mode in AstroDMx Capture that will take longer to solve, but which will be able to tolerate small inaccuracies in the focal length and field of view.


Markarian’s Chain with AstroDMx Capture and some interesting tools.

It has often been said that if you have a Windows computer that is at, or coming to the end of its supported life; don’t discard it, install a Linux operating system and you will have a computer that is more secure and still very familiar to use.


For this session we used a Lenovo X270 Thinkpad with 8GB of RAM, a 6th generation i5 processor and a 256GB SSD drive. The computer was obtained via Amazon UK as a refurbished machine at a total cost of less than £150.


We installed Linux Mint; Wine that would enable us to run some Windows software; other software such as the Gimp 2.10 and AstroDMx Capture for Linux.


The telescope used was a William Optics Super Zenithstar 81mm ED Doublet APO refractor at f/5.5 with x 0.8 reducer/flattener, using an SVBONY SV605CC 14 bit, cooled, OSC CMOS camera and a Pegasus IR/UV cut filter. The scope was mounted on a Celestron AVX GOTO auto-guiding was done by PHD2 running on a separate computer using an SVBONY SV165 guide-scope fitted with a QHY-5II-M guide camera.


The equipment capturing flat fields


AstroDMx Capture capturing 30 x FITS flatfields


Stacked median flat field captured by this setup.


This image shows why it is important to capture flat fields.


As usual, the mount was placed on marks on the concrete base which give a fairly good polar alignment. AstroDMx Capture passed the time, altitude and location coordinates to the hand controller via the INDI server. The hand controller which now contained all of the correct information was set to its previous alignment and was unparked by AstroDMx Capture.


AstroDMx Capture was used to send the scope/mount to a bright star to check focus with a Bahtinov mask. 


Focusing on Regulus


AstroDMx Capture, via the INDI server, sent the scope/mount to the main Copeland’s eyes galaxy NGC4438. AstroDMx Capture plate-solved the field of view and centred the object in the field of view.This galaxy is central to Markarian’s Chain of galaxies. This allowed a good framing of the chain.


AstroDMx Capture capturing 45 x 2 minute FITS exposures of Markarian’s Chain


Copeland’s Eyes can be seen in the centre of the image.


The data were calibrated and stacked in Siril and the stacked image was stretched and the background extracted to remove the gradient using GraXpert.


GraXpert showing stretched image with the gradient.


GraXpert showing the extracted background


GraXpert showing the gradient removed by background extraction


The Stretched, background extracted image was then denoised in Neat Image and post processed in Fitswork and the Gimp 2.10.


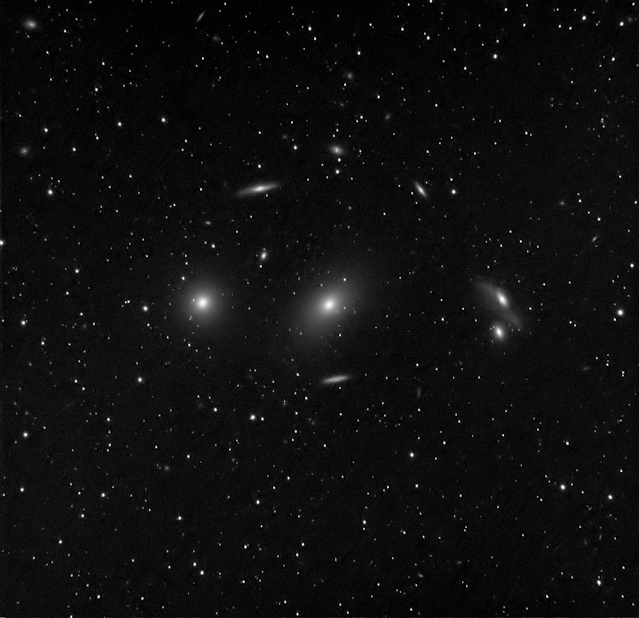
Markarian’s Chain


The image was submitted to Astrometry.net to identify a plethora of galaxies within the image.


The background extraction could have been done in Siril, but GraXpert was chosen to stretch the image and background correct all at once.


Monday, 17 April 2023

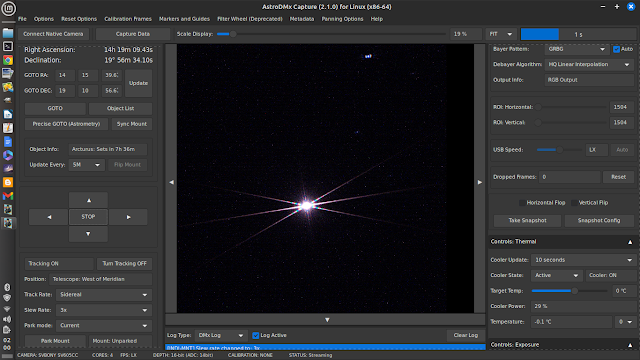
Feature release of Version: 2.1.0 of AstroDMx Capture

We are pleased to announce that Nicola has released Version 2.1.0 of AstroDMx Capture.


Mutatis mutandis

Version: 2.1.0

Added: Negative preview screen transform.

Added: New exposure controls for capturing flat fields. The exposure values in the flat field UI are now entered using a text based notation in a similar way that exposures are entered in the main exposure control area. For example, typing 30ms sets a 30 millisecond exposure, typing 40s sets a 40 second exposure and typing 1m30s sets an exposure of 1 minute and 30 seconds. This allows arbitrary exposure lengths to be set whereas previously, the maximum exposure was 1 second.

Improved: The time-lapse mode has been significantly improved. Previously, the time-lapse mode allowed one exposure to be saved during a given time interval. The new functionality allows for an arbitrary number of frames to be saved during a given time interval. The timer can be either stopped or left running while data are being saved. Leaving the timer running means that data can be aligned to precise time points. The software calculates the estimated amount of time required to save the data and if that time is greater than the interval timer, then a warning is given to the user.

Improved: Significant improvements have been made to how AstroDMx handles time zones and daylight saving. Time zones and daylight saving are now calculated automatically. This new functionality applies to setting the time on mount hand controllers and for the object database, for example, rise, set and transit times specific to a given geographical location.

Improved: The geographical location UI now has North, South, East and West parameters. This frees the user from having to enter negative latitude (for south of the equator) or negative longitude values (for west of the prime meridian).

The Raspberry Pi builds of AstroDMx Capture have been re-branded to ARM to reflect the fact that a significant number of users are now using generic ARM SBCs. ARM32 is used for armhf 32 bit builds and AMR64 is used for aarch64 builds.

Fixed: Significant bugs associated with time zones other than UTC and other daylight saving bugs (see the fourth point above).

Fixed: Ubuntu 22.x libstdc++ bugs for AMR64 builds of AstroDMx Capture.

Updated: ‘fxload’ for QHY cameras on Linux x86-64 and ARM

Updated: QHY SDK on all platforms other than macOS. For macOS please see known issues.

Updated: PlayerOne SDK on all platforms.

Updated: Atik SDK on all platforms.

Other bug fixes and improvements

AstroDMx Capture for all platforms can be downloaded HERE

Wednesday, 5 April 2023

The Moon with new tools


A Player One Mars-C II OSC CMOS camera was attached to a William Optics 81mm APO refractor with 0.8 reducer/flattener and an IR/UV cut filter. The scope was mounted on a Celestron AVX mount that was controlled by AstroDMx Capture via an INDI server.

AstroDMx Capture  was used to capture two 1500-frame SER files that overlapped to cover the whole 95% lunar disk.


Autostakkert! Was used to stack the best 80% of frames from each SER file. The resulting images were wavelet sharpened in the new, cross-platform wavelet processor waveSharp by Cor Berrevoets the author of Registax in close collaboration with Grant Blair; Michael Owen; Filip Szczerek; Cheng-Yang Tan and Don Capone.


waveSharp wavelet sharpening a stacked lunar image


The two wavelet sharpened images were combined into a single image, rotated and cropped using PhotoPad Image Editor. There is a free version by NCH Software.


Combining the two images into a panorama mosaic in PhotoPad Image Editor


Panorama (mosaic) produced by PhotoPad Image Editor.


Image rotated in PhotoPad Image Editor


The image was then cropped and post processed in PhotoPad Image Editor.


Final image of the 95% waxing Moon


PhotoPad Image Editor is not a new program but it is not one that one naturally associates with Astronomical image processing. It is a Windows program by NCH Software and mostly works in Wine. The free version does everything that was done here and the license is low cost.


On the other hand, waveSharp is new software that extends the Registax wavelet processor into a new form and very importantly, as cross platform software that has versions for Windows, Linux and macOS.


waveSharp and AstroDMx Capture are just two examples of software for Astronomical imaging being made natively available for platforms such as Linux and macOS without having to use Wine.


Sunday, 2 April 2023

Stacking over a meridian flip under bright moonlight


AstroDMx Capture was used to capture FITS images before and after a meridian flip in bright moonlight. This article describes the problems and the workflow for this imaging session.


Equipment used


A William Optics 81mm Apochromatic ED doublet refractor with an 0.8 reducer/flattener was fitted with an Altair Quadband filter and an SVBONY SV605MC monochromatic cooled CMOS camera.

The Quadband filter was used as a contrast-enhancing, light-pollution filter, we could have used no filter or a UV/IR cut filter.


The same equipment capturing flats, using a variable brightness illuminated tracing panel, after the imaging session was completed.


Stretched, stacked flats showing the regions of varying brightness


Image with no flatfield calibration.

This shows that flatfield calibration is absolutely essential


Click on an image to get a closer view


AstroDMx Capture capturing 3 minute FITS images of M86 and surrounding galaxies


AstroDMx Capture capturing 3 minute FITS files following a meridian flip


Having captured images on the east side of the meridian, AstroDMx Capture flipped the mount and re-centred M86. Then images on the west side of the meridian were captured.


Three stacking programs; Affinity Photo, Siril and Deep Sky Stacker were used to calibrate, register the images from each side of the meridian in a single batch. They all performed as expected and rotated the images where required to match the reference frame decided by the program.


There was an 82% waxing Moon nearby and a marked gradient was produced across the image. Fitswork 4 was used to flatten the background and remove the gradient.


Fitswork 4 removing the gradient across the image


Animation showing the image before and after the gradient was removed


The flattened image was post processed in the Gimp 2.10 and Neat image


Final image of M86 and surrounding galaxies


This session tested the SV605MC camera which worked well. It demonstrated that flat fields were essential for the calibration of light frames to remove areas of reduced illumination probably caused by contamination of the sensor surface or the surface of the optical window in the camera.

It also showed that when a gradient is introduced into the image, probably in this case by a nearby bright Moon, the gradient can be removed by flattening the background in Fitswork 4. The resulting image reveals many galaxies in addition to the main 9 galaxies towards the centre of the image, centred on M86.


Result from Astrometry.net showing the numerous galaxies captured in this image