The Optolong LeNhance filter is a duo-band narrowband filter with two bandpass regions; one that passes H-alpha light in the red and the other that passes both OIII and H-beta light in the blue-green.
Transmission curve of the LeNhance filter
The rest of the spectrum is effectively blocked which eliminates most light pollution and increases the contrast of the images.
Removing stars
Probably the most effective way to process astronomical images is to use star removal techniques, process the nebulosity and then add back the stars to the image. The advantage of this is that during the processing, the stars are not processed and possibly become bloated. Also, any false colours that may have been introduced into the stars by the filter can be reduced by reducing their saturation or otherwise correcting their colours.
The Gimp 2.10 is a cross platform image processor of the same calibre as Photoshop and the star removal tool Starnet++ version 2 is available from GitHub as a plugin for the Gimp 2.10 in Linux or Windows. (It probably works in macOS as well). This means that virtually all of the processing of LeNhance filtered images can be done in the Gimp (Gnu Image Manipulation Program). The Gimp does have noise reduction functions but at the moment they are not quite as powerful as for example, Neat Image. However, the Gimp’s noise reduction could still be used to good effect if no other is available.
The example used here is from data captured of NGC 7000 The North America Nebula, captured through an Altair Starwave 60ED doublet refractor using AstroDMx Capture and an SVBONY SV605CC OSC 14 bit CMOS camera with an Optolong LeNhance duo-band narrowband filter. The image is a stack of 22 x 3min FITS exposures. These data were captured when we were still working out the spacing for the field-flattener/reducer so the field was not yet flat.
Click on any image to get a closer view
The basic image of NGC 7000
The Processing workflow
ALWAYS duplicate an image and work on the duplicate. In this way any changes you make will not affect the original image and mistakes can be easily rectified.
Star removal
The image must be a 16 bit TIFF, Linear light.
Select Starnet++
Starnet++ v2 working on star removal will take a few minutes depending on the computer.
Stars are removed
Flatten and save the image
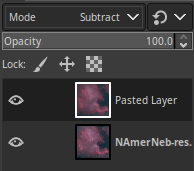
Copy the visible and paste it over the original image (with the stars) as a new layer and select Subtract as the mode (method of blending). This will give an image of the stars.
Flatten the image, reduce the saturation a little and apply the Gimp noise reduction. This will have the effect of reducing the noise and reducing the stars a little. Export the image of the stars that will be added back later.
Stars
Working on the starless image.
Export the starless image and denoise it with Neat image or other application, or the Gimp’s own noise reduction function. The denoised image will be worked on from now on.
Using Colours, Components and Decompose.
The three monochrome images can be seen above, the arrows have been added to show which channel is which.
We are going to construct a bicolour image using the red channel (H-alpha) and the sum of the green and blue channels (OIII and H-beta).
Copy the visible of the green-channel image and paste it as a new layer onto the blue-channel image, using Addition as the blending mode.
Flatten the image and then apply Colours and Curves to stretch the image
You may have to come back to this stage (to stretch more or less) depending on the result you obtain in the following steps.
At this stage you can remove the green channel image to avoid possible confusion.
So we now have a red channel and a blue channel (actually the sum of the original green and blue channels).
Composing a bi-colour image
Using Colours, Components and Compose, we have to specify what will go into each of the 3 colour channels of the RGB bi-colour image we are about to construct.
Put red in the red channel, blue in the green channel and blue in the blue channel and the bi-colour image will be composed.
At this stage you will have to decide, based on the result obtained, whether you are satisfied with the stretching of the green+blue image in the previous stage, or whether that stage needs to be re-visited.
In Colours and Hue-Saturation, you can selectively adjust the saturation of the separate colours (in this case red and cyan) if required.
Starless bi-colour image
At this stage it is possible to use Colours and Hue-Saturation to selectively change the hue of one of the colours. In this example, the red has been changed to a golden hue often seen in bi-colour images.
Hue-changed bi-colour starless image
This is a matter of personal preference.
Adding stars back into the images
Remember that the stars now have less false colour and are slightly less prominent than in the original image.
Copy the visible of the stars image and paste it as a new layer onto the starless image selecting Addition as the blending mode. Then flatten the image.
Bi-colour image with stars back
Hue adjusted bi-colour image with stars back
RGB image with stars back
The images in which the stars have been put back have a more pleasing star field with less false star colour and with the stars being less dominant in the image in which the nebulosity can be more readily appreciated.
Bi-colour images can give more insight into the qualitative composition of nebulae than can be deduced from the original RGB image captured through a duo-band narrowband filter such as the LeNhance filter.


