Tuesday, 7 January 2025

Distributed telescope control via Ethernet over mains with a headless Linux computer attached to the telescope, controlled remotely by AstroDMx Capture.

While Nicola is refactoring the AstroDMx Capture code, we have been testing  a system for remote control of an imaging system via a distributed system using Ethernet over mains

List of equipment

  • Celestron AVX mount
  • Stella Mira 66 ED APO refractor
  • ZWO Electronic Focuser
  • ZWO Electronic Filter wheel
  • SVBONY SV 605MC 14 bit Cooled CMOS camera
  • SVBONY SV165 Guide scope
  • QHY-5II-M guide camera
  • MeLE Quieter 2D fanless mini PC running Fedora Linux
  • TP-Link LS108G 8 Port Gigabit Network Switch
  • Tenda P200 x 2 Powerline Ethernet adapters
  • JJC DHS-1 USB Lens Heater Strip x 3 (For imaging scope, guide scope and ZWO electronic focuser)
  • Multi USB 4 Port Plug Adaptor
  • 5A 12V Power adapters x 3 (For mount, Cooled CMOS camera and Lens Heater Strips)
  • Mains extension lead

The equipment in use


A distributed system is a network of independent computers that work together. These systems share resources, data, and tasks across multiple machines.

The schematic diagram bellow shows the connectivity between all devices involved in our setup. At the telescope, there is a small headless computer (In our case a MeLE Quieter 2D fanless mini PC) running Fedora Linux. This computer runs an INDI (Instrument Neutral Distributed Interface) server which is responsible for managing the states of all of the connected astronomical devices. There is no client software running on this system and hence the telescope computer is not accessed via VNC or RDP. Using desktop sharing protocols over slow networks often introduces UI lag which can be awkward to use. 

The small headless computer is connected via Ethernet to a powerline adapter which is paired with a matching powerline adapter indoors. This link forms a reliable and encrypted Ethernet connection between the powerline adapters and thus allows the small form factor computer to be accessed by its IP address from any computer on the local network. 

AstroDMx Capture is run on the capture computer connected to the local network and can access all of the devices in a similar fashion to how they would be if they were connected directly via USB. PHD2 auto-guiding software is run on the guide computer. This essentially creates a distributed system.

Schematics of the system used

The imaging computer and the guide computer are both located indoors along with the ethernet switch and one Ethernet power adapter which is plugged into the mains. We use two separate computers for convenience of divided activities between two people, but just the imaging computer could have been used alone, doing the tasks of both computers. The imaging computer runs AstroDMx Capture and the Guide computer runs PHD2 guiding software. We work this way because we are always testing the current development of AstroDMx Capture, and we prefer to monitor the session at all times.

The rest of the equipment is located outdoors at the observing site at the front of the house or in the observatory area at the top of the rear garden. All that connects them is a mains extension lead.

Screenshot of AstroDMx Capture capturing monochrome luminance data on M33 The Triangulum galaxy


30 minutes worth of 5 minute exposures was captured through each of: Red, Green, Blue, UV/IR cut and H-alpha filters.

The data were stacked and co-registered in Deep Sky Stacker. Further processing was done with Siril, PixInsight, Gimp 2.10,  Starnet, ACDSee and the Seti Astro Cosmic Clarity suite combining all of the data into the final image.

Final image of M33


The advantage of this system is that the imaging and guide computers access the relevant equipment via the headless computer exactly as though they are directly connected by USB and no desktop sharing software is used. Currently we use an INDI server, but in the future, INDIGO and ASCOM Alpaca will be available. Of course, all of this takes time but will be greatly facilitated by Nicola's current refactoring work.

Friday, 27 December 2024

The Sadr Butterfly nebula IC1318

23 x 5 minute exposures of the Sadr Butterfly nebula captured with AstroDMx Capture through a William Optics 81 mm ED APO refractor with an Altair Hypercam 533C 14 bit OSC CMOS camera with an Altair quadband filter. Stretched with unlinked channels.

The data were debayered, calibrated, stacked and SpectroPhotometric Color Corrected and stars removed in PixInsight; post processed in the Gimp 2.10, Background extraction, initial denoising and stretching in GraXpert and SetiAstro's Cosmic Clarity for sharpening and final denoising.

Click on an image to get a closer view

RGB Channels linked 


RGB channels unlinked


Blend


Saturday, 21 December 2024

The Forsaken nebula IC5068 in Cygnus

45 minutes worth of 5 minute exposures of the Forsaken nebula were captured with AstroDMx Capture through a William Optics 81 mm ED APO refractor with an Altair Hypercam 533C 14 bit OSC CMOS camera with an Altair quadband filter.

The data were debayered, calibrated, stacked and SpectroPhotometric Color Corrected and stars removed in PixInsight; post processed in the Gimp 2.10, Background extraction and stretched with linked an unlinked channels and initial denoising in GraXpert and SetiAstro's Cosmic Clarity for  sharpening and final denoising.

RGB images

Stretched with channels linked


Stretched with channels unlinked


Blend of linked an unlinked


Thursday, 5 December 2024

Enhancing details in Deep sky images using GREYC's Magic for Image Computing G'MIC

There are a number of programs that can be used to enhance the details in deep sky images such as Seti Astro's Cosmic Clarity.

However GREYC's Magic for Image Computing from the GREYC research laboratory, a joint research unit of CNRS, ENSICAEN, and the University of Caen, France can be used to good effect. It has 625 filters and we are going to look a four of them here in the context of details enhancement.

Click on an image to get a closer view

The image we will use is a starless image of the Andromeda Galaxy

Starless Andromeda Galaxy


The four filters we shall use are found in the filter section Details. The names of the filters are:

  • Freaky Details
  • Local Contrast Enhancement
  • Magic Details
  • Mighty Details

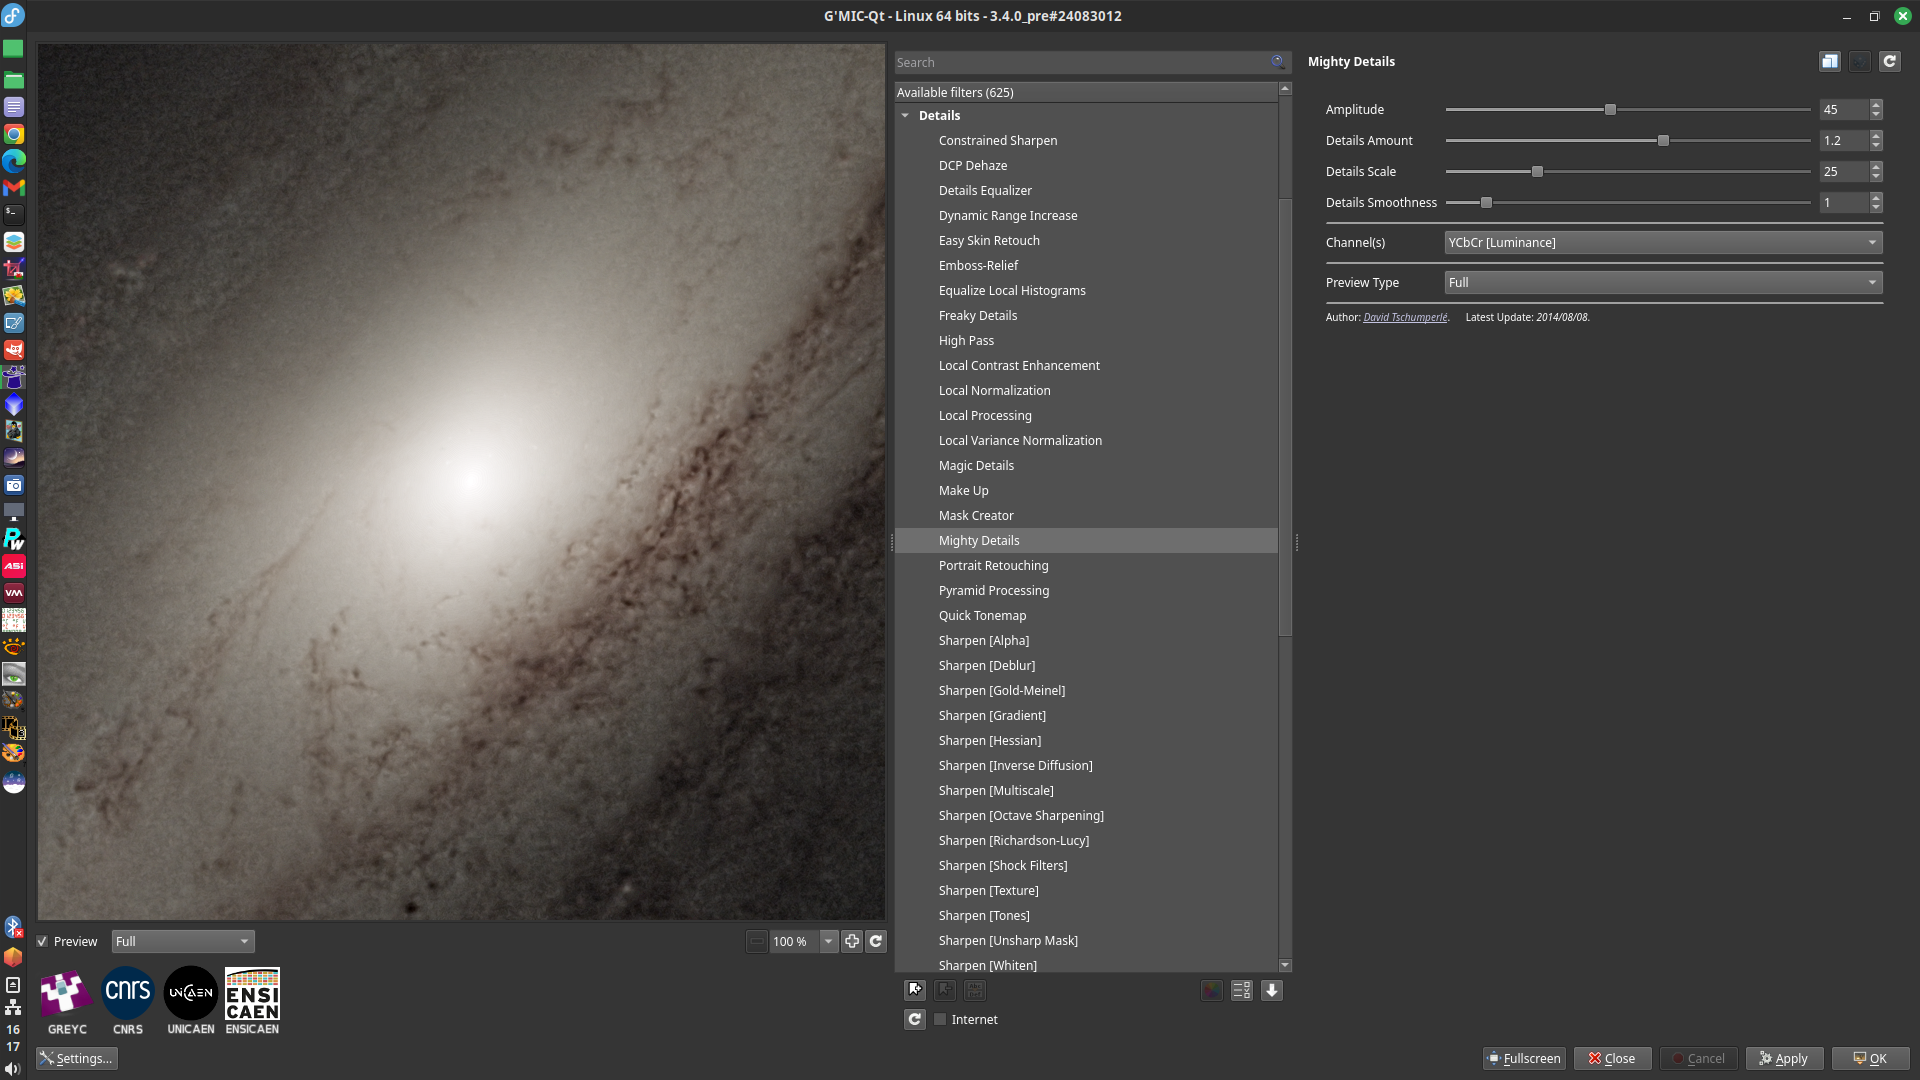
We shall show screenshots of G'MIC with each filter and the preview turned on and off (to see the effect) and then the starless image processed with that filter.

The parameter settings that have been used can be seen in the screenshots, but it is important to experiment with the settings as the values used may not be optimal.

Freaky Details

Preview off


Preview on

Image processed with Freaky Details


Local Contrast Enhancement

Preview off


Preview on

Image processed with Local Contrast Enhancement


Magic Details

Preview off


Preview on

Image processed with Magic Details


Mighty Details

Preview off


Preview on

Image processed with Mighty Details


The 4 processed images were then blended 25% each in the Gimp to produce a details enhanced image with an equal contribution from each filter.

Blended image


Original image for comparison


Animation showing the results of the various G'MIC filters of the details

Animation showing the original image and the image produced by the blended G'MIC filters

In future articles we shall look at other filters in GREYC's Magic for Image Computing G'MIC for deep sky image processing.

Tuesday, 3 December 2024

Removal of Hot Pixels from Deep Sky images

Hot pixels in images from a colour astronomical camera appear as bright, fixed spots of red, green, or blue in deep sky astronomical images. These spots are caused by individual pixels on the camera's sensor that retain a higher-than-average charge, even in the absence of light. This excess charge manifests as a bright spot in the image.

Causes of Hot Pixels:

Sensor Defects: Hot pixels are inherent defects in the camera sensor. They are more noticeable in long-exposure astrophotography because the sensor is exposed to light for extended periods.

Cosmic rays: When a cosmic ray strikes a pixel on the sensor, it can ionize atoms within the silicon, creating electron-hole pairs. These excess charge carriers can become trapped in the pixel's structure, causing it to retain a higher-than-normal charge even in the absence of light. This trapped charge manifests as a persistent bright spot, or a permanent hot pixel.

Age: As the camera sensor ages, the number of hot pixels can increase.

Dark frame calibration should remove most or all of the hot pixels but this may not occur satisfactorily.

For one reason or another an imager might end up with hot pixels in her/his deep sky image

In the current case, the powerful open source software G’MIC Qt will be used to remove the hot pixels from the image.

G'MIC (GREYC's Magic for Image Computing) is a comprehensive open-source framework for image processing. It offers a variety of tools and interfaces for manipulating and processing images. G'MIC provides a number of user interfaces, including a command-line tool, a GIMP plug-in, a web service, and a Qt-based interface. G'MIC-Qt is compatible with several image editing programs, including GIMP, Krita, Photoshop, Affinity Photo, PaintShop Pro, and Paint.NET. It can also be used as a standalone application. G'MIC is developed in Caen, France, by the IMAGE team at the GREYC research laboratory, which is a joint research unit of CNRS, ENSICAEN, and the University of Caen. Since its inception in 2008, the development of G'MIC has resulted in numerous academic research articles focused on the design of new image processing algorithms.

Here the stand alone version is used in a Linux environment, but looks and behaves just like the Gimp plugin.

100% zoomed of part of a deep sky image showing bright red, green and blue hot pixels


Click on an image to see a closer view with more details

To remove hot pixels the Repair group of filters in G’MIC is selected and from within that group, Remove Hot Pixels is selected.


Remove Hot Pixels parameters set to mask size 5 and Threshold 4


The hot pixels have been removed.

Of course, it is advisable to experiment with the values of the filters’ parameters used to evaluate the results in each case.

A second filter called Recursive Median is capable of removing hot pixels and is selected from within the Repair group of filters.


Parameters set to Median Radius 3 and Repeats 7


The hot pixels have been removed.

Although either of these methods would suffice, doing them both and 50% blending the results in the Gimp may be preferable.

Blended of images with hot pixels removed by both filters


Animation showing the hot pixel removal by G'MIC


G'MIC Online web service interface 

GREYC's Magic for Image Computing is extremely powerful and in a separate article I shall discuss other aspects of deep sky image enhancement using this software.

Saturday, 2 November 2024

Starfixer: an online tool for star reduction, the correction of elongated stars and noise reduction.

From time to time I like to try out software that I come across that makes use of AI and has the potential for inclusion in my astronomical image processing workflow. StarFixer is a Deep Artificial Neural Network, trained to detect and fix elongated stars in astronomical images, it also reduces the sizes of stars. Starfixer can produce a processed image up to 4000x4000 pixels whilst preserving its aspect ratio. Within the past few days, a denoising funtionality has been added to Starfixer.

The Starfixer project dates back to 2020 and has steadily progressed to the present day.

The developer, Filippo, a 39 years old Italian (at the time of writing), is a computer engineer with a passion for artificial intelligence and astrophotography. He began studying AI when it was (in his own words) still considered futuristic and primarily for nerds.

Starfixer is quite responsive with a simple to use web interface. An image (in png (8 or 16 bit) or jpg format) is uploaded to the system. A link to the results page is provided. The speed of the process depends on the dimensions of the image. The results page has to be refreshed manually and when the processing is complete, the results from three models V1, V2 and V3 are provided to be seen in separate tabs as well as denoising results that are discussed below. You can examine and download any or all of the the three results as a png file. At the moment, whether the input image is 8 bit or 16 bit, the output image is 8 bit. Filippo tells me that he is working on full 16 bit compatibility.

Starfixer is freeware/donationware which is a form that I prefer. Donating the price of a cup of coffee now and again is a good way of supporting the project as well as keeping Filippo awake during the long coding nights.

A series of animations of before and after Starfixing images.

The propeller nebula with elongated stars. 
The elongated stars are also reduced

The Soap Bubble nebula showing star reduction
Reducing the stars gives more emphasis to the Soap bubble nebula.

The cloud Sculpting Cluster NGC 6823 and the nebula NGC 6820
A very busy, star-rich field where the stars obscure the nebulosity to an extent. Reduction of the stars reveals more of the structure of the nebulosity.

Testing the denoising functionality of Starfixer 

The test image is a SeestaS50 image comprising a 2 minute stack of 10s exposures. The stars are clear but the image is noisy.

When an image is uploaded to Starfixer at the moment; when processing is completed, the results page contains these options for viewing the results:

Animation of the original image, The original image denoised and the AI version 3 and denoised image


FULL SIZE ANIMATION

This image did not require star reduction therefore it is important that a denoised original image is provided as well.

A 17 minutes worth of 10s exposure image of M33 captured with a Seestar S50, stacked, debayered, SPCC and ADBE processed in PixInsight, stretched in GraXpert and Gimp, was submitted to Starfixer to examine its image denoising.

Animation of the original image of M33 and the Original denoised in Starfixer

FULL SIZE

Starfixer is a welcome addition to my suite of image processing tools. The enthusiasm of the Developer, Filippo will ensure that the software continues to improve over time and will be well worth trying as another option for any astroimager.

Starfixer can be accessed at starfixer dot org

Saturday, 10 August 2024

CaK solar experiment with a Seestar S50

The equipment used

Baader solar filter OD 3.8 was placed at the end of a dewshield for the Seestar S50 and held in place with glue and plastic adhesive tape.

A filter holder for the Seestar S50 with a 2” to 1.25” filter adapter.

The solar filter assembly and the adapter fitted with a Baader Ca K-line double stacked filter 394 nm peak transmission with an 8nm bandpass.


The whole assembly viewed from the bottom.

The Ca K-line filter can be seen in place.


The whole assembly seen from the top.


The Seestar S50 with the Double filter assembly in place


There were initially two unknowns in this experiment:

1) Whether a 1.25” filter would cause vignetting

2) Whether the built-in UV/IR cut filter would be so aggressive that it would prevent the Ca K-line light from being detected by the sensor.

Optical density 3.8 Baader photographic grade solar filter was used because it transmits 16 times the amount of light that is transmitted by an OD 5.0 visual/photographic solar filter. This will give the best chance for the sensor to detect the CaK light if the UV/IR filter will allow it to pass.

As seen below, in a short opportunity between the clouds, the system worked well and revealed more detail of the photosphere than normal white light filtering. There was no noticeable vignetting. 

As this system works, it should also work with the Altair 2nm G-band Solar Contrast Filter 430.3 nm peak transmission.

Ca K-line image as seen on the Seestar S50 preview screeen


More work needs to be done to determine the best exposure setting when imaging with this setup. Because of clouds, very little time was available to optimise this. However, automatic exposure and gain seems to give a reasonable result.

The RAW AVI data were debayered and stacked in Autostakkert! with 1.5 drizzle (as the Seestar S50 is slightly under-sampled). The stacked image was wavelet processed in waveSharp, and post processed mainly in the Gimp 2.10.

Seestar S50 Ca K-line solar image August 9


The same situation occurred the next day on August 10 but with 252 debayered and stacked RAW AVI frames and post processing, another acceptable Ca K-line image was obtained 

Seestar S50 Ca K-line solar image August 10


The results of this experiment are very encouraging. Whilst the assembly holding the OD 3.8 Baader solar filter and the double stacked Ca K-line filter worked fine, it may be possible to build a more compact assembly.

It is not known if this system would work with Ca K-line filters such as the Antlia 3nm CaK filter or whether it would yield even better results. It remains for others with different bandpass Cak filters to try.

Once again, the Seestar S50 is shown to be a serious and capable 'smart' telescope.