Thursday, 1 December 2022

Workflow paradigm shift with AstroDMx Capture.

Nebula imaging while testing advanced functionality in AstroDMx Capture.

Although it is, of course, possible to use a finder scope and an illuminated reticle eyepiece to do a scope/mount alignment, it is not required if the mount can be placed in the same position each time so that the previous alignment can be used. In our case, marks on the concrete slab on which the mount is placed are sufficient for us to be able to place the mount in essentially the same position for each imaging session.


The imaging scope, an Altair Starwave ASCENT 60ED doublet refractor with flattener, was mounted on a Celestron AVX GOTO mount. An SVBONY SV165 guide-scope fitted with a QHY-5II-M guide camera was mounted on the imaging scope. A Raspberry Pi computer running an INDI server was connected to the hand controller and communicated with the indoor computer running AstroDMx Capture via WiFi. The guide camera was connected by USB to the indoors computer running PHD2 auto-guiding software. An Altair 2” magnetic filter holder version 2 containing an LeNhance narrowband filter was placed in the optical train.

Nicola has implemented an INDI Configurator in AstroDMx Capture which is capable of configuring up an INDI server on another computer running the Linux operating system, in this case, a Raspberry Pi running Raspberry Pi OS. It can configure the INDI server for whatever tasks it is to perform. This can be done even if AstroDMx Capture is running on a Windows computer or a macOS computer.


The AVX mount was placed on the alignment marks on the concrete base. The mount was powered on and AstroDMx Capture passed the time, altitude and location coordinates to the hand controller via the INDI server. The hand controller which now contained all of the correct information was set to its previous alignment and was unparked by AstroDMx Capture.

AstroDMx Capture connected the SV605CC OSC camera natively by USB, set the camera temperature to -10 degrees C and sent the scope/mount to Aldebaran. AstroDMX Capture plate solved the field and centred Aldebaran in the field of view. A Bahtinov mask was placed on the imaging scope and Aldebaran was brought to sharp focus.

AstroDMx Capture was then used to send the scope/mount by means of the INDI server to the California nebula, plate solve and centre the nebula in the field of view. The mount nudge function was then used to compose the image as required.

AstroDMx Capture captured 20 x 3 min FITS exposures of the California nebula
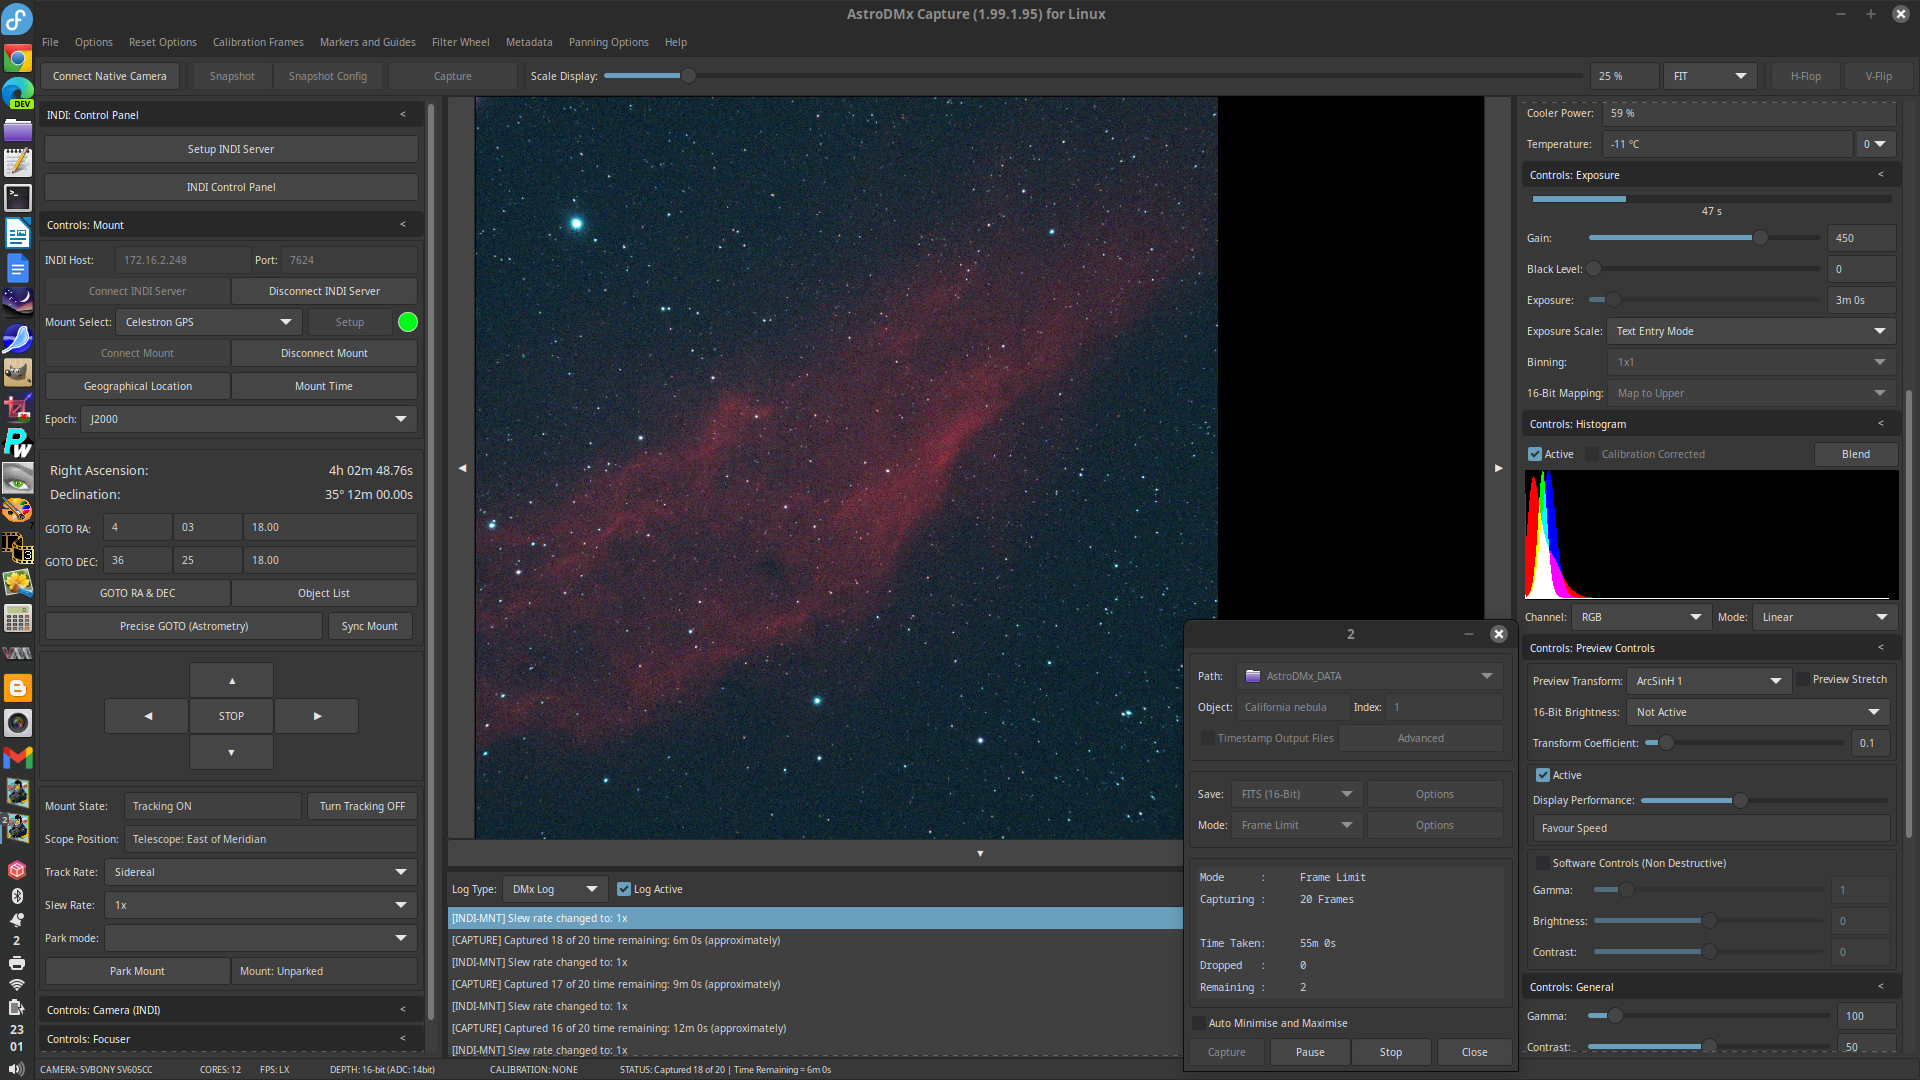

The images were stacked and partly processed in Deep Sky Stacker and post processed in The Gimp 2.10 and Neat Image

The California nebula


AstroDMx Capture was then used to send the scope/mount to the star Alnitak in Orion’s belt, plate solve and centre in the field of view. Then AstroDMx Capture’s mount nudge function was used to compose the image so that the Horsehead nebula and the Flame nebula were optimally positioned in the field of view.

Twelve 5 min FITS exposures were captured of the Horsehead and Flame nebulae region.

The imaging computer indoors


Screenshot of AstroDMx Capture saving 5 min FITS exposures of the Horsehead/Flame nebula region


The hour’s worth of data were stacked and partly processed in Deep Sky Stacker and post-processed in the Gimp 2.10 and Neat Image.

The Horsehead and Flame Nebulae


The scope/mount was then sent by AstroDMx Capture to the Monkeyhead nebula, plate solve and centre the nebula in the field of view.

AstroDMx Capture was used to capture 12 x 5 min FITS exposures of the nebula


The data were stacked and partly processed in Deep Sky Stacker and post processed in the Gimp 2.10 and Neat Image.

The Monkeyhead nebula


Finally, AstroDMx Capture was used to send the scope/mount to the Jellyfish nebula, plate solve and centre the nebula in the field of view.

Only 5 x 5 min FITS exposures were captured before clouds moved in and stopped imaging. In fact the last two images were captured through very thin clouds.


All five images were stacked, partly processed in Deep Sky Stacker and post processed in the Gimp 2.10 and Neat Image.

The Jellyfish nebula


No dark frames were captured for any of these images. The SV605CC OSC camera produces no significant amp glow and the images produced were satisfactory. In a poor and changeable weather system such as we frequently have in the UK, such an amp-glow free camera allows for more time to be spent on image capture. Of course, dark frame calibration is desirable, but with this camera it is not essential.

The paradigm shift mentioned here is that with a mount that is not permanently installed and which requires placing on the ground for each separate imaging session, it is possible to acquire the desired objects and to image them without first having to align the mount. In fact, the mount only needs to be aligned once and at least for several sessions can be set to previous alignment before proceeding, as long as it is placed carefully on marks on the concrete upon which the tripod rests.

Nicola’s newly implemented INDI Configurator in AstroDMx Capture allows the configuring of an INDI server on any Linux computer, such as the Raspberry Pi that we use. It allows for the INDI server to be configured for any of the tasks for which it may be required without having to manually login to the remote computer via SSH (Secure Shell).

Again, these features bring AstroDMx Capture that much closer to a major incremental release. We shall report here when that happens.


Tuesday, 22 November 2022

Further tests with AstroDMx Capture with an SV605CC and an Altair Starwave 60ED doublet refractor

AstroDMx Capture with an SV605CC and an Altair Starwave 60ED doublet refractor with field-flattener and dew heater strip.


The equipment was mounted on a Celestron AVX GOTO mount. An SVBONY SV165 guide-scope fitted with a QHY-5II-M guide camera was mounted on the imaging scope. A Raspberry Pi computer running an INDI server was connected to the hand controller and communicated with the indoor computer running AstroDMx Capture via WiFi. The guide camera was connected by USB to the indoors computer running PHD2 auto-guiding software. An Altair 2” magnetic filter holder version 2 containing an LeNhance narrowband filter was placed in the optical train.

The AVX mount was placed on the usual marks on the concrete base. The mount was turned on and AstroDMx Capture passed the time, location and altitude coordinates to the hand controller via the INDI server. The hand controller which now contained all of the correct information was set to its previous alignment and was unparked by AstroDMx Capture.

AstroDMx Capture connected the SV605CC OSC camera, set the camera temperature to -10 degrees C and sent the scope/mount to Deneb. AstroDMX Capture plate solved the field and centred Deneb in the field of view. A Bahtinov mask was placed on the imaging scope and Deneb was brought to focus.

The Bahtinov mask was removed and AstroDMx Capture sent the scope/mount to the Pelican nebula, plate solved and centred the Pelican Nebula.

PHD2 was used for autoguiding.

AstroDMx Capture was used to capture 20 x 3 min FITS exposures of the Pelican nebula.


The imaging computer indoors


The sub frames were stacked and part processed in Deep Sky Stacker and post processed in the Gimp 2.10 and Neat Image.

The Pelican nebula


The image of the Pelican nebula was combined with the image of the North America nebula from the previous imaging session using Microsoft ICE


AstroDMx Capture was then used to send the scope/mount to the open cluster M29 in Cygnus, plate solve the field and centre M29

AstroDMx Capture was used to capture just 3 x 5 min FITS exposures of M29 and surrounding nebulosity before the imaging session was terminated by clouds.

The sub-frames were stacked and part processed in Deep sky stacker and post processed in the Gimp2.10 and Neat image.

M29 and surrounding nebulosity


AstroDMx Capture performed flawlessly in this experiment that involved no star alignments or eyepiece work. The whole imaging session was conducted from indoors. 

This session again brings closer a release of AstroDMx Capture with advanced functionality. 


Sunday, 20 November 2022

AstroDMx Capture with an SV605CC and an Altair Starwave ASCENT 60ED doublet refractor with field-flattener.

AstroDMx Capture with an SV605CC and an Altair Starwave ASCENT 60ED doublet refractor with field-flattener.


The equipment was mounted on a Celestron AVX GOTO mount. An SVBONY SV165 guide-scope fitted with a QHY-5II-M guide camera was mounted on the imaging scope. A Raspberry Pi computer running an INDI server was connected to the hand controller and communicated with the indoor computer running AstroDMx Capture via WiFi. The guide camera was connected by USB to the indoors computer running PHD2 autoguiding software. An Altair 2” magnetic filter holder version 2 was placed in the optical train so that filters could be rapidly changed.

The AVX mount was placed on marks on the concrete base where it is always placed for each imaging session. The mount was not given a star alignment. It was turned on and AstroDMx Capture passed the time, location and altitude coordinates to the hand controller via the INDI server.

The hand controller which now contained all of the correct information was set to its Previous alignment and was unparked by AstroDMx Capture.An Optolong L-eNhance narrowband filter was placed in the filter holder.

AstroDMx Capture connected the SV605CC OSC camera, set the camera temperature to -10 degrees C and sent the scope/mount to Deneb.

AstroDMX Capture plate solved the field and centred Deneb in the field of view. A Bahtinov mask was placed on the imaging scope and Deneb was brought to sharp focus.

The Bahtinov mask was removed and AstroDMx Capture sent the scope/mount to NGC7000. Plate solved and centred the North America Nebula.

PHD2 was used for autoguiding.

AstroDMx Capture was used to capture 22 x 3 min FITS exposures of NGC7000 with matching dark-frames.


The sub-frames were stacked and part processed in Deep Sky Stacker and post processed in the Gimp 2.10 and Neat Image.

The North America Nebula


The L-eNhance filter was replaced by an IR/UV cut filter and AstroDMx Capture sent the scope/mount to Rigel, plate solved the field and centred the star in the field of view. The Bahtinov mask was used to bring Rigel to an exact focus. The Bahtinov mask was removed and AstroDMx Capture was used to sent the scope/mount to M42 the Orion nebula, plate solve the field of view and centre the object. Then AstroDMx Capture was used to nudge the nebula to the required position for composing the image of M42/43 and the Running Man nebula.

AstroDMx Capture was used to capture 50 x 10s exposures, 50 x 20s exposures and 20 x 70s FITS exposures of the Orion nebulae.


The sub-frames were stacked and part processed in Deep Sky Stacker,  and post processed in the Gimp2.10 and Neat image.

The Orion nebula and the Running Man nebula


Then the LeNhance narrowband filter was placed in the optical train and AstroDMx Capture was used to send the scope/mount to Sirius, plate solve and centre the star. The Bahtinov mask was used and the small adjustment needed to bring Sirius into focus was made.

The Bahtinov mask was removed and AstroDMx Capture was used to send the scope/mount to NGC2244, the Satellite open cluster at the centre of the Rosette nebula, plate solve and centre the cluster in the field of view.

AstroDMx Capture was used to capture 10 x 5min FITS exposures of the Rosette nebula.


The sub-frames were stacked and part processed in Deep Sky Stacker and post-processed in the Gimp and Neat Image.

The Rosette nebula and the Satellite cluster


The SV605CC paired nicely with the 60mm Altair Starwave ED refractor. It will be noted that dark-frames were captured for the image of NGC700 but not for the other two objects. This is because the SV605CC uses the Sony IMX533 which exhibits zero amp glow. There was no evidence of any problems caused by the lack of dark-frame calibration. AstroDMx Capture performed flawlessly in this experiment that involved no star alignments or eyepiece work. The whole imaging session was conducted from indoors with only a safety check during a meridian flip to make certain that there was no cable snagging.

This session brings closer a release of AstroDMx Capture with advanced functionality.

Friday, 4 November 2022

The Orion nebulae and the Rosette nebula with AstroDMx Capture and an SV605CC camera

These images were obtained whilst testing the mount-control features of AstroDMx Capture and at the same time testing the newly implemented SVBONY SV605CC

A (slightly out of collimation) Skywatcher Esprit ED 80 APO refractor was mounted on a Celestron AVX GOTO mount. A Field flattener was placed in the optical train. An SVBONY SV605CC OSC camera was directly connected to the optical train, so there was no flexure. To image the Orion nebulae, no filter was used and to image the Rosette nebula a 2" L-eNhance filter was used. An Altair magnetic 2" filter holder was included in the optical train.

The mount was given a 1 star alignment on Aldebaran and the scope was focused using a Bahtinov mask. The focusing was repeated when the filter was inserted.


AstroDMx Capture was used to send the mount to M42, plate solve and centre the object in the field of view.


AstroDMx Capture was used to capture 50 x 20s FITS exposures with matching dark-frames. The images were calibrated, registered, stacked and partly processed in Siril. The final image was post-processed in the Gimp and Neat Image.

The Orion nebulae, M42/34 and the Running man nebula


The L-eNhance narrowband filter was then introduced into the optical train and the scope was refocused using a Bahtinov mask, having been sent to a bright star.

AstroDMx Capture then sent the scope to the Rosette nebula, plate solved and centred the object. The nudge function in AstroDMx Capture was used to further compose the image to get more of the nebulosity in the field of view.


AstroDMx Capture was used to capture 35 x 60s FITS exposures with matching dark-frames. The images were calibrated, registered, stacked and partly processed in Siril. The final image was post-processed in the Gimp and Neat Image.

The Red Channel as seen in Siril

The Rosette nebula


The SV605CC camera has a Sony IMX533 CMOS square colour sensor and a 14 bit ADC. The sensor is essentially free of amp-glow which helps with imaging and also with EAA and outreach.

Sunday, 30 October 2022

Maintenance release of AstroDMx Capture

 Nicola has made a maintenance release of AstroDMx Capture for all platforms

Mutatis mutandis

  • The SVBONY SDK has been upgraded to the latest version.
  • A problem with some installations of Windows 10 with a missing dll runtime library, possibly caused by a Windows update has been corrected.

The major release that will incorporate INDI mount and camera control as well as plate solving is significantly closer. As I have mentioned previously, additional advanced features will be added incrementally when the UI modifications and testing are complete. Significant periods of bad weather have prevented some of the field testing, but hopefully this will soon improve.

Monday, 24 October 2022

The Helix nebula with a Player One Mars-C II camera and AstroDMx Capture.

A Player One Mars-C II OSC camera fitted with an Optalong L-eNhance filter was placed at the focus of an f/5.5 80mm ED refractor fitted with a Pegasus FocusCube v2 motor focuser, an SVBONY SV165 guide-scope fitted with a QHY-5II-M camera and a Raspberry Pi computer running an INDI server along with its rechargeable power supply. The Raspberry Pi was connected to the AVX mount's hand-controller and to the FocusCube. AstroDMx Capture communicated with the Raspberry Pi and INDI server over WiFi. 

Click on an image to get a closer view

The equipment used


The mount/scope was given a two star alignment and focused on the star Vega using a Bahtinov mask. Using AstroDMx Capture, with a previously saved preset for this camera/scope combination, the star came to a perfect focus as judged by the Bahtinov diffraction spikes.

Bahtinov Mask which was placed at the front of the scope


The grid produces characteristic diffraction spikes with bright stars

In focus star


When the star is perfectly in focus, the central diffraction spike is positioned half way between the outer two spikes.

AstroDMx was used to send the mount/scope to the Helix nebula, plate solve and centre the Helix nebula.


PHD2 multi-star pulse-autoguiding was used, using a separate computer to control the auto-guiding. However, this could just as easily have been done all on one computer using separate desktops.

AstroDMx Capture was set to capture 2 min 30s FITS exposures. Some clouds spoiled some of the captured images, but 20 usable images were captured, which amounted to 50 minutes of exposure time. Although the camera produces zero amp glow, matching dark frames were also captured.

The FITS files were calibrated, stacked and partly processed independently in Deep Sky Stacker and Siril, the results eventually being combined. The stacked images were post processed in the Gimp 2.10 and Neat image.

Final image of The Helix nebula


Again, the Player One Mars-C II OSC camera proved to be a very capable deep sky imager in combination with AstroDMx Capture.


Tuesday, 11 October 2022

The SV705C, AstroDMx Capture and the 98.7% waning Moon

These data were obtained during a session testing an experimental advanced feature of solar system object location in AstroDMx Capture.

An 80mm Ekinox f/5.5, ED refractor was mounted on a Celestron AVX mount. A Raspberry Pi computer was attached to the scope along with its rechargeable Goodmans power supply. The Raspberry Pi was running an INDI server. The mount and the Pegasus FocusCube v2 were coupled to the Raspberry Pi and AstroDMx Capture was able to control the mount and the focuser via WiFi and the INDI server. The SV705C was fitted with a UV/IR cut filter and placed at the focus of the scope.

A star alignment was not used and the mount was simply set to previous alignment. This was good enough for the mount (which is not permanently placed) to be sent to a star, plate solve and then centre the star.


Using AstroDMx Capture the mount/scope was sent to Deneb. A Bahtinov mask was attached to the scope and the scale of the preview of Deneb was optimised for examining the Bahtinov diffraction spikes. The Pegasus FocusCube v2 was controlled by AstroDMx Capture and had already been brought to a preset approximate focus for the UV/IR filter/ camera combination. 

Using the Bahtinov diffraction spikes, Deneb was brought to optimal focus.


The mount/scope was sent to the Moon. AstroDMx Capture was used to image the 98.7% waning Moon using an arbitrary ROI.

Screenshot showing the preview of the Moon as a 2000-frame SER file was being captured. In this case, the INDI controls at the left hand side and the log view at the bottom were both visible.


The AstroDMx Capture GUI is set up so that any section can be minimised, to make more room for the preview screen. In the screenshot below, the left hand and bottom areas had been minimised.


The best 75% of the frames in the SER file were stacked in Autostakkert!, wavelet processed in Registax 5.1 and post-processed in the Gimp 2.1.

98.7% waning Moon


This again demonstrates that in combination with the correct scope, the SV705C can provide whole disk images of the Moon.

AstroDMx Capture is still in the development of advanced features. It will soon be released with some of these features available. As previously stated, the release of the advanced features will be incremental and will happen only when our testing is complete and Nicola is satisfied with the stability of the features.

Monday, 10 October 2022

The SV705C as a solar imaging camera

An 80mm F=440mm, ED refractor was fitted with a Thousand Oaks Type 2+ glass solar filter and mounted on a Celestron AVX mount. 

A Raspberry Pi computer was attached to the scope along with its power supply. The Raspberry Pi was running an INDI server. The mount and the Pegasus FocusCube v2 focuser were coupled to the Raspberry Pi and AstroDMx Capture was able to control the mount and the focuser via WiFi and the INDI server.


An SVBONY SV705C OSC camera was fitted with a Baader green continuum filter and placed at the focus of the refractor. AstroDMx Capture was used to nudge the solar image into the desired position on the preview screen and brought the image to focus using the Pegasus FocusCube v2.

AstroDMx Capture was used to capture a 2000-frame SER file in Mono 8 mode in an arbitrary ROI.


An advantage of the SV705C in this configuration is that the large sensor is able to capture the whole solar disk, liberating the user from having to make a mosaic. Even with a longer focal length scope, fewer panes would be needed to image the whole disk.

The double stacked Baader green continuum filter is particularly effective with refractors. The red and blue ends of the spectrum are completely excluded. The central wavelength of the filter’s 10nm band-pass is 540nm where the telescope optics are sharpest and free from chromatic aberrations.

The best 75% of the frames of the SER file were stacked in Autostakkert!, wavelet processed in Registax 5.1 and post-processed in the Gimp 2.10.

The Sun in green continuum light 

The SV705C performed well as a 'white light' solar imager even when imaging through a 10nm band-pass narrowband green continuum filter, which selects a region in the middle of the visible spectrum.


Sunday, 9 October 2022

Testing the SVBONY SV705C OSC as a Lunar and planetary camera.

This article covers the use of the SV705C with two telescopes to investigate its performance as a Lunar imager and also a planetary imager using AstroDMx Capture.

Using a Skymax 127 Maksutov

The first test used a motor-focus modified Skymax 127 Maksutov mounted on a Celestron AVX mount. The seeing was poor due to the jet stream and also the Moon was rather low in the sky at this latitude in the UK.

It is notoriously difficult to judge focus when the seeing is bad. It is best not to rely on judgement but rather to focus on a bright star using a Bahtinov Mask. As the Moon, the planets and the stars are all at optical infinity, this provides an objective way of achieving the best focus.

Seeing limited the magnification that could be used for imaging the planet Jupiter, so the SV705C, fitted with a UV/IR cut filter was placed at the focus of the scope and two SER files were captured, one with a wide field, to capture the planet and the four Galilean moons.

Screenshot of AstroDMx Capture capturing a SER file exposed for the Galilean moons.


Screenshot of AstroDMx Capture with an arbitrary ROI capturing a SER file of Jupiter and exposed for the planet.


NB The images in the screenshots are actually at exactly the same scale. The first screenshot has the preview window at 36% full size, whereas the second screenshot has the preview at 100% because it is a relatively small ROI.

The two images were combined to produce an image of Jupiter and the four Galilean moons.

Left to right Callisto, Io, Jupiter, Europa and Ganemede

Imaging the Moon

Six overlapping panes of the 80.5% waxing Moon were imaged as 1500 frame SER files.

Some examples are given below.

AstroDMx Capture saving a SER file of the Mare Tranquilitatis, Serenitatis and Palus Somni region of the Moon


AstroDMx Capture saving a SER file of the Tycho, Clavius region of the Moon.


Final image of the Copernicus region


Final image of the Plato, Sinus Iridum region


The 6 final images were stitched together into a 6 pane mosaic of the Moon

6 Pane Mosaic of the Moon

Using a Refractor

Another test of the SV705C OSC camera as a planetary imager was done using an F=440mm, 80mm ED refractor mounted on a Celestron AVX mount. The camera was placed at the focus of the refractor. The mount was connected to a Raspberry Pi computer running an INDI server. The Pegasus FocusCube V2 motor focuser was also connected to the Raspberry Pi. AstroDMx Capture communicated with the INDI server via WiFi.

AstroDMx Capture was used to unpark the mount and to send the mount/scope to Deneb without prior alignment. The focuser was controlled by AstroDMx Capture and the stars were brought into focus. Then AstroDMx Capture captured an image and plate-solved and centred Deneb in the field of view. Then a Bahtinov mask was used and AstroDMx Capture brought the star into perfect focus.


The Mount/scope was then sent to the Moon and the nudge functions in AstroDMx Capture were used to centre the Moon in the field of view.

AstroDMx Capture was used to draw an arbitrary ROI around the Moon, which fitted nicely into the field of view.

AstroDMx Capture was used to capture a 2000 frame SER file of the optimally focused 95.1% waxing Moon


The best 75% of frames were stacked in Autostakkert! and the resulting image post-processed in the Gimp 2.10

95.1% waxing Moon


95.1% waxing Moon slightly chroma enhanced to accentuate mineralogical differences on the lunar surface


The SVBONY SV705C OSC camera performed well as a lunar imager whether at high resolution using a long focal length Maksutov or captured as a single disk using a short focal length ED refractor.

The use of a Bahtinov mask on a bright star to achieve optimal focus even during conditions of poor seeing proved this to be a reliable method of focusing on the Moon (and also a planet) without having to use judgement to decide whether optimal focus had been achieved. This is probably the best way to achieve optimal focus, whatever the seeing conditions.

Saturday, 1 October 2022

AstroDMx Capture and a ZWO ASI178MC as an INDI camera.

Fortitudo in diversitate et stabilitate

A ZWO ASI178MC camera with a 2" adapter was placed at the Newtonian focus of a 130mm, F=650 mm Newtonian telescope fitted with a coma corrector. The scope was mounted on a Celestron AVX GOTO mount. 

The hand controller was connected to a Raspberry Pi computer running an INDI server for controlling the mount. The camera was also connected to the Raspberry Pi for INDI camera control.

The raspberry Pi was connected by a CAT 6 Ethernet cable to the network.

The mount was given a 2 star alignment and AstroDMx Capture with added control features was connected via Ethernet to the Raspberry Pi.

A Bahtinov mask was used to finely focus the scope on the last alignment star, using AstroDMx Capture to view the Bahtinov diffraction spikes.

The mount was controlled via AstroDMx Capture and PHD2 for auto-guiding via Ethernet. The Guide-scope was an SVBONY SV165 fitted with a QHY-5II-M camera. The guide computer was also connected to the Raspberry Pi computer via Ethernet.

AstroDMx Capture was then used to send the mount to M27, the Dumbbell nebula, plate solve and then centre M27 in the field of view. To test the nudge controls, the object was moved a very small amount from the centre and it was not re-centred for imaging.

AstroDMx Capture was then used to capture 13 x 2 min FITS exposures of M27 with matching dark-frames.

Screenshot of AstroDMx Capture saving FITS files of M27


The FITS images were registered and stacked in Deep Sky Stacker and post-processed in the Gimp 2.10.

M27 the Dumbbell nebula with a A ZWO ASI178MC as an INDI camera


This experiment, along with an earlier one reported HERE with a Player One camera and HERE with an Atik camera, are indicators that Nicola’s implementation of INDI cameras in AstroDMx Capture is coming along well.

However, when AstroDMx Capture is released with enhanced capabilities, INDI camera support will not be included. The reason for this is so that delays in release will not happen while INDI camera support is being finalised. The release with enhanced capability support will feature INDI mount control, plate-solving, motor-focusers and filter wheels.

There will be an interim maintenance release finalising support for the SVBONY SV705C camera.