Tuesday, 23 May 2023

The SVBONY prototype SV305C OSC CMOS camera with AstroDMx Capture.

The SV305C is a replacement for the SV305.They are both uncooled  USB 2.0 cameras.


The SV305 has a Sony IMX290 CMOS colour sensor whereas the SV305C has an IMX662 CMOS colour sensor. Both sensors are the same dimensions and both have 2.9µm x 2.9µm pixels. The big improvement in the IMX662 sensor is that it is a zero amp glow sensor, which makes the SV305C more suitable for EAA and deep-sky imaging than its predecessor.

So far we have tested the implementation of the SV305C with the prototype Windows SDK using AstroDMx Capture for Windows although we now have SDKs for other platforms and will test with them in due course.

As always, the testing of a newly implemented camera is combined with the general testing of the developing AstroDMx Capture software. This set of tests involved two different telescopes and two filters.

Lunar imaging

The SV305C, fitted with a 1.25” adapter and a UV/IR cut filter was placed at the focus of a William Optics Zenithstar SD doublet 66mm APO refractor. The scope was also fitted with a Pegasus FocusCube 2 motorised focuser.  The scope was mounted on a Celestron AVX mount and the mount was connected to an INDI server running on a Raspberry Pi computer which was located along with its power supply on the top of the telescope. In all cases the SV305C was connected natively to the imaging computer.


The equipment used


As usual, the Celestron AVX GOTO mount was placed on marks on the concrete base which give a fairly good polar alignment. AstroDMx Capture passed the time, altitude and location coordinates to the hand controller via the INDI server. The hand controller which now contained all of the correct information was set to its previous alignment and was unparked by AstroDMx Capture.

AstroDMx Capture then sent the mount/scope to the Moon and focused the scope via the INDI server.

AstroDMx Capture for Windows was used to capture two overlapping 1000-frame SER files of the Moon to cover the whole of the visible disk. 


The best 90% of the frames in each SER file were stacked in Autostakkert.

The two resulting stacked lunar images


The two images were stitched in Microsoft ICE, wavelet processed in Registax 5.1 and post-processed in the Gimp 2.10.

The 91.5% waxing Moon


Deep Sky imaging

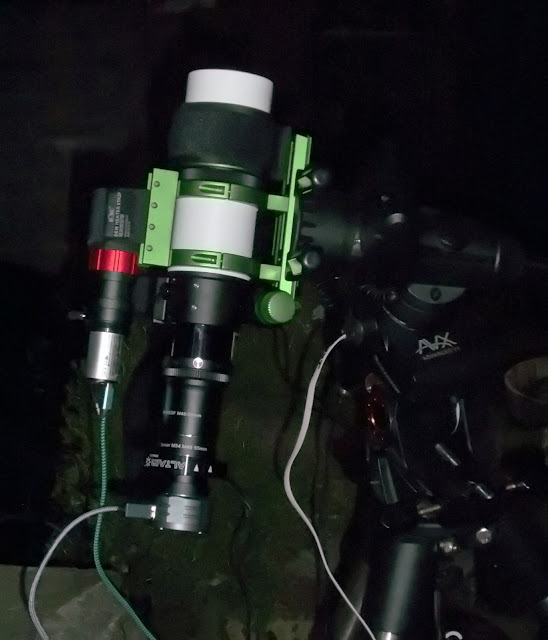
The SV305C comes with a 1.25” C adapter so a C to T2 adapter was used to connect the camera to the optical train of an Altair Starwave 60 ED Imaging refractor fitted with a 0.8 flattener reducer and an Altair magnetic filter holder.

Auto-guiding was done by PHD2 running on a separate Linux Computer using an SV165 guide-scope fitted with a QHY-5II-M guide camera.

The INDI server was running in an Oracle VirtualBox Linux virtual machine running in the imaging Windows computer as described in a previous article.

SV305C with a C to T2 adapter


The SV305C camera mounted at the focus of the Altair Starwave 60 ED scope


A UV/IR cut filter was placed in the magnetic filter holder.

The SV305C capturing Flats using an LED diffuser variable brightness tracing panel


It is important to capture flat fields so that variations in sensitivity of the sensor usually caused by dust particles can be corrected for.

Stacked flat fields


AstroDMx Capture for Windows was used to send the mount/scope to Arcturus, plate solve, centre the star and fine focus using a Bahtinov mask. The scope was then sent to M3, plate solved and the object was centred in the field of view.

AstroDMx Capture was then used to capture 115 x 10s FITS exposures of M3 with matching dark frames.


The data were calibrated, registered, stacked and partly processed in Siril. The resulting image was post processed in the Gimp 2.10 and Neat image.

M3


AstroDMx Capture was then used to send the mount/scope to M13, plate solve and centre the object in the field of view.

AstroDMx Capture was then used to capture 200 x 10s FITS exposures of M13 with matching dark frames.


The preview set to 100% to see the globular cluster more clearly


Negative preview


The data were calibrated, registered, stacked and partly processed in Siril. The resulting image was post processed in the Gimp 2.10 and Neat image.

M13


AstroDMx Capture was used to send the mount/scope to the globular cluster M10, plate solve and centre the object in the field of view.

AstroDMx Capture was then used to capture 30 x 60s FITS exposures of M10 with matching dark frames.


The preview set to 100% to see the globular cluster more clearly


Negative preview


The data were calibrated, registered, stacked and partly processed in Siril. The resulting image was post processed in the Gimp 2.10 and Neat image.

M10


We have some local problems of light trespass even though the Skies are Bortle 4. 

The problem of a very close street light is solved using an occultation board with a lights out canopy skirt preventing light coming in under the board.


Showing the light from which the imaging is protected


We use a very successful Altair 2” magnetic filter holder however, if bright light shines on the filter holder, there is some light leakage which could be serious. The occultation board and skirt protect the filter holder from light ingress but in addition, wrapping black Velcro around the outside of the holder gives even more protection.


The imaging computer was changed for a Fedora Linux machine and the INDI server was running on a Raspberry Pi computer.

Just before the clouds came in the scope/mount was sent to the Whale NGC4631 and Hokeystick NGC4656 galaxies and the field of view was nudged to give a pleasing composition.

A 2 minute exposure was captured before the clouds came in. This would be used as a reference image of the field of view for future use.

The single reference image of the Whale and Hokeystick galaxies.


The following night AstroDMx Capture plate solved the reference image using the Online Astrometry.net plate solver and AstroDMx Capture then sent the scope/mount to the coordinates of the reference image.

AstroDMx Capture capturing FITS images of the Whale and Hokeystick galaxies


With a negative preview


AstroDMx Capture captured 45 x 2 minute FITS exposures which were calibrated, registered, stacked and partly processed in Siril. The resulting image was post processed in the Gimp 2.10 and Neat image. Star removal and replacement techniques were used with the Starnet++ plugin for the Gimp so that the galaxies and background could be processed separately from the stars.

The Whale and Hokeystick galaxies


The UV/IR cut filter was removed from the Altair magnetic filter holder and was replaced by an Altair Quadband OSC narrowband filter.

AstroDMx Capture sent the scope/mount to the star HD168137, which is close to the ‘Pillars of Creation’ in the Eagle nebula, plate solve and centre the star.

AstroDMx Capture capturing FITS data of the Eagle nebula


With a negative preview


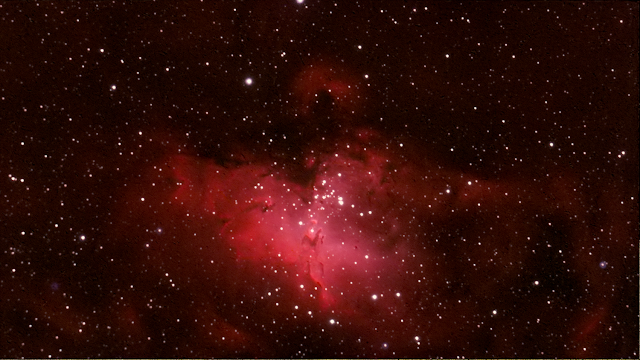
AstroDMx Capture captured 22 x 2 minute FITS exposures which were calibrated, registered, stacked and partly processed in Siril. The resulting image was post processed in the Gimp 2.10 and Neat image. Star removal and replacement techniques were used with the Starnet++ plugin for the Gimp so that the nebula and background could be processed separately from the stars.

The Eagle nebula and star cluster


Lunar imaging with the Altair Starwave 60 ED Imaging refractor fitted with a 0.8 flattener reducer and an Altair magnetic filter holder.

AstroDMx Capture was used to capture a 3000-frame SER file of the 17.2% waxing crescent Moon using a region of interest (ROI) .


The best 50% of the frames were stacked in Autostakkert! , wavelet processed in waveSharp and post processed in the Gimp 2.10

17.2% waxing, crescent Moon


The SV305C acquitted itself well in these tests as a lunar imager and a deep sky imager, having imaged the Moon, globular clusters, galaxies and a nebula.

The online plate solver worked well in AstroDMx Capture as did the use of a reference image to solve and return to the same place to resume imaging.


Wednesday, 17 May 2023

Deep Sky with the SVBONY SV705C

Deep Sky with the SVBONY SV705C uncooled, 12 bit CMOS camera and AstroDMx Capture for Windows.

The SV705C is marketed as a Planetary camera suitable for EAA (Electronically Assisted Astronomy)

It has the SONY IMX585 zero amp glow sensor with 3856 x 2180 maximum resolution.

The sensor is 11.2mm x 6.3mm with 2.9µm x 2.9µm  pixels.

The SV705C was placed at the focus of an Altair Starwave 60 ED Imaging refractor fitted with a 0.8 flattener reducer and an Altair magnetic filter holder.

The scope was mounted on a Celestron AVX mount and the mount was connected to an INDI server.

Auto-guiding was done by PHD2 running on a separate computer using an SVBONY SV165 guide-scope fitted with a QHY-5II-M guide camera.

The INDI server was running in an Oracle VirtualBox Linux virtual machine as described in a previous article.

The equipment used


Capturing Flats


The stacked flats image shows the necessity of capturing flat fields.


As usual, the Celestron AVX GOTO mount was placed on marks on the concrete base which give a fairly good polar alignment. AstroDMx Capture passed the time, altitude and location coordinates to the hand controller via the INDI server. The hand controller which now contained all of the correct information was set to its previous alignment and was unparked by AstroDMx Capture.

A UV/IR cut filter was placed in the filter holder for the first imaging session.

AstroDMx Capture sent the mount/scope to the bright star Rigel, plate solved using the offline ASTAP solver and centred the star for focusing with a Bahtinov mask.

AstroDMx Capture for Windows then sent the mount/scope to the Hokeystick galaxy NGC4656. Once plate solved and centred, the Whale galaxy NGS4631 was in the same field of view.

AstroDMx Capture was used to capture 1h 16m worth of 2 minute exposures and matching dark frames.


A negative preview can be used if required to assist in the viewing of the objects.


The data were stacked and partly processed in Siril and post-processed in the Gimp 2.10, Fitswork 4 and Neat Image.

The Whale and Hokeystick galaxies


The filter was then changed to an Altair Quadband filter that passes the light from H-beta, OIII, H-alpha and SII. AstroDMx Capture was used to send the mount/scope to M16, the open cluster and the Eagle Nebula.

AstroDMx Capture was used to capture 1h 12m worth of 3 minute exposures and matching dark frames.


Negative preview of the Eagle nebula


The data were stacked and partly processed in Siril and post-processed in the Gimp 2.10, Fitswork 4 and Neat Image.

The Eagle nebula


The SV705C proved to be a capable deep sky imager and the zero amp glow facilitated a pleasant imaging experience.

It is important to realise that although the sensor produces zero amp glow it is important to capture dark frames because hot pixels and fixed thermal noise would spoil the final image if they were not removed.


Sunday, 7 May 2023

Further test of Deep sky imaging with a Skymax 127

In this session all of the plate solving was done by AstroDMx Capture in the cloud using the Astrometry.net method that Nicola has implemented.

An SV605CC 14 bit CMOS camera was placed at the focus of a Skymax 127 Maksutov telescope and an SV305 CMOS camera was placed at the focus of an F=190mm, 50mm guidescope for guiding with PHD2.

The equipment used

The imaging was done on a Windows 11 computer which was running an INDI server in a Linux VirtualBox virtual machine on a different virtual desktop. The INDI server was used by AstroDMx Capture for Windows to control the AVX GOTO mount. 

AstroDMx Capture unparked the mount and sent it to Regulus. The field of view was solved by AstroDMx Capture using the cloud plate solver, Astrometry.net. Focus was checked on the Skymax 127 imaging scope and the guide scope using Bahtinov masks.

PHD2 auto-guiding was done during plate solving and turned off only for slewing. The mount/scope was then sent by AstroDMx Capture to the globular cluster M53, plate solving and centring of the object.

Screenshot of the PHD2 auto-guiding. M53 is visible in the centre of the guidescope field of view.


AstroDMx Capture was used to capture a total of 1 hour 26 minutes worth of 2 minute FITS exposures of M53 and matching dark-frames


Demonstration of the negative preview option in AstroDMx Capture

The data were dark and flat frame calibrated, stacked and partially processed in Siril

A slight gradient due to the rising Moon was removed by background extraction in GraExpert

The resulting image was post processed in the Gimp 2.10 and Neat Image.

M53 globular cluster

This session was a further demonstration that with good auto-guiding it is possible to use a Skymax 127 to image small deep sky objects in conjunction with a suitable camera such as the SV605CC OSC cooled CMOS camera used successfully here.


Saturday, 6 May 2023

AstroDMx Capture with local plate solving and plate solving in the Cloud; and a procedural shift in the way that objects might be acquired and centred in the field of view.


Plate solving or Astrometric calibration of an image was done before modern times by the careful measurement of photograph glass plates of star-fields; now, of course it is done by computer software. Nicola has implemented in AstroDMx Capture, two methods of plate solving the field of view in order to determine how to automatically move the mount so that the required object is placed in the centre of the field of view.

The first method is a local plate solving solution using ASTAP and the second method, which requires an internet connection, does the plate solving in the cloud using Astrometry.net.

Sometimes, particularly if the field of view is quite small, a local plate solver can struggle to find a solution, although this can often be resolved by increasing the exposure. If the local plate solver fails to find a solution and the user has an internet connection, the plate solving can be done in the cloud by Astrometry.net, which is more likely to be successful. AstroDMx Capture makes the plate solving transparent to the user who only has to select the method to be used. In the experiments done here with a Skymax 127 Maksutov, a local plate solver may struggle due to the accuracy of the field of view and focal length, which varies with a Maksutov in which focusing is achieved by moving the primary mirror. This is no problem for Astrometry.net plate solving in the cloud.

We did experiments including a slightly different approach that facilitates working with lunar and planetary imaging in addition to deep sky imaging.

An SV605CC 14 bit CMOS camera was mounted at the focus of the Skymax 127 Maksutov telescope and an SV305 CMOS camera was mounted at the focus of an F=190mm, 50mm guidescope. Two instances of AstroDMx Capture were run on separate virtual desktops of a Fedora Linux computer. One instance streamed data from the Skymax 127 and the other streamed data from the guidescope. AstroDMx Capture was used to send the mount/scopes to the Moon.

The imaging scope and the guidescope were co-aligned so that the moon appeared in approximately the same place in the field of view of each scope.

Screenshot showing the imaging scope data stream at the top left and the guide-scope data stream at the top right.


Whilst on the Moon, AstroDMx Capture was used to capture three overlapping fields of view to cover the whole of the visible Moon. 1000-frame SER files were captured.


The best 95% of the frames in each SER file were stacked in Autostakkert running in Wine and the resulting images were combined into a single image using Photopad running in Wine.

Photopad is a useful alternative to Hugin or Microsoft ICE and works with relatively small amounts of vertical displacement and if the images are arranged correctly horizontally.

Mosaic Lunar image in Photopad

The mosaic image was wavelet processed by Registax 5.1 running in Wine and post-processed in the Gimp 2.10. Alternative wavelet processors such as waveSharp or IRIS could have been used.

85% waxing, gibbous Moon


Having imaged the Moon, attention then changed to deep sky imaging despite the bright moonlight.

AstroDMx Capture sent the mount/scopes to Regulus and Regulus was nudged to the centre of the field of view of the Maksutov imaging scope.


Regulus was focused in the guide-scope using a Bahtinov mask.

Well focused stars would produce optimal stars for PHD2 auto-guiding.

Using the guide-scope adjustment rings, Regulus was brought to the centre of the field of view of the guide-scope

Contrary to usual practice, Plate solving was done on the guide scope image using Cloud plate solving to refine the position of Regulus.

This just showed that it could be done if there were too few stars in the Imaging scope field of view.

From here on, in this session, all plate solving was done in the cloud on the imaging scope field of view.

When using a scope with such a long focal length and small field of view, it is best to start autoguiding for plate solving and only turn guiding off briefly during slewing. Nicola plans to implement PHD2 control within AstroDMx Capture to automate stopping and starting of the guiding routines when slewing is required.

Screenshot of PHD2 auto-guiding during this session.

AstroDMx Capture sent the scope/mount to M13, plate solved in the cloud and centred M13 in the field of view. (M13 can also be seen in the centre of the field of view of the guide scope in the above image). 

Screenshot of AstroDMx Capture capturing 32 x 2 minute FITS images of M13

Matching dark frames were also captured.

The best 50 minutes worth of data were calibrated with dark frames and flat fields and partly processed in Siril and post-processed in the Gimp 2.10, Fitswork and Neat Image.

M13


AstroDMx Capture was used to send the Scope/mount to M63 the Sunflower galaxy, plate solve in the cloud and centre the object in the field of view.

AstroDMx Capture capturing 3 minute FITS exposures of the Sunflower galaxy

Only 15 minutes worth of exposures were captured before clouds prevented further imaging.

Matching dark frames were also captured. The data were calibrated and stacked and partly processed in Siril and post processed in the Gimp 2.10, Fitswork and Neat Image.

The Sunflower galaxy M63

It is regrettable that more data could not be collected on this object at the time; but this image serves the purpose of demonstrating the imaging capabilities of the Skymax 127 in conjunction with an SV605CC camera.

This session succeeded in all of its aims:

  • To co-align accurately the Skymax 127 and the guide scope.
  • To position the Moon in the imaging scope with the aid of a second instance of AstroDMx Capture running on a different virtual desktop.
  • To capture lunar SER files and to process them in various software into a single mosaic image, and point out alternative software that could be used.
  • To demonstrate AstroDMx Capture plate solving in the cloud with Astrometry.net in a new GUI that is identical for the local ASTAP plate solver.
  • To plate solve in the cloud using the guide scope image stream as well as plate solving in the cloud with the imaging scope and camera.
  • To auto-guide the Skymax 127 using PHD2 and to capture image data on two deep sky objects.

The control of PHD2 by AstroDMx Capture for the purpose of automatically turning off guiding during slewing and turning it back on after slewing completes was recognised as a requirement for implementation, and Nicola will be implementing it for a future release of AstroDMx Capture.

The cloud plate solving will be present in the next release of AstroDMx Capture which Nicola will make soon, and instructions on how to set it up will be provided.

AstroDMx Capture for all operating systems can be downloaded HERE.